Use Template Studio
Use Template Studio to create and manage templates.
Open Template Studio
-
Click the logo at the top-left corner and select Template Studio.
Tip: You can open multiple Template Studio tabs to work on multiple templates at the same time. In design mode, this facilitates copying and pasting formatting.
Open Template Studio through a file
- In Document Explorer, select the template file.
- Select Actions and the Template Studio mode that you want to use.
Work with templates
Open a template
Select File > Open.
Start a new template
Select File > New.
Save your work at any time
Select File > Save or Save as.
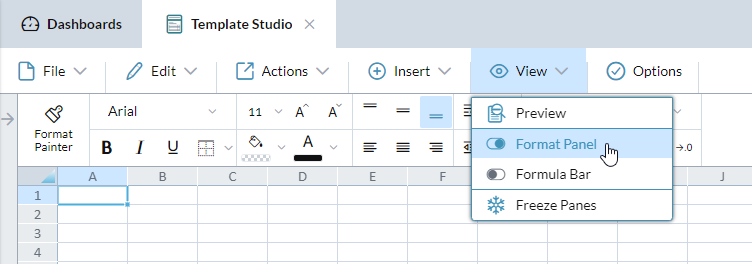
Preview a template
Select View > Preview.
Undo or redo an action
Select Edit > Undo or Redo.
Cut, copy, and paste
When you cut or copy cells (under the Edit menu) all possible cell content is included: values, formatting, and formulas.
When pasting:
- If you select Paste, all the content is copied to the target cells.
- If you select Paste and open the drop-down, you can choose to paste a single content type alone: Values, Formatting, or Formula.
Note: You can paste external content from the system clipboard as well. You can't cut objects (for example, Auto Text or data view components).
Fill cells
- Select the cell(s).
- Select Edit > Fill Down/Right/Up/Left.
Fill cells quicker
- Select the cell(s) and hover over the bottom-right corner of the range until the pointer changes to a + handle.
- Drag the handle in any direction to select the target range.
- To paste the content and formatting, release the handle.
Clear cells
- Select a cell(s).
- Select Actions and Clear Formatting or Clear Contents.
Add information about the template
Whether a template is for data entry or reporting, you can enhance it by adding Auto Text to the grid. (You can also add Auto Text to the headers and footers of the print version of the template.)
Data views
Create a data view
- Select Insert > New.
- If you have more than one model, select the model that the data view derives from and click OK.
-
In Edit Layout, define the data view, and clickOK.
An outline appears in the grid showing the proposed location of the data view.
- To change the outline, click a cell in the grid.
- To insert the data view, click OK.
Add an existing data view
- Click the cell where you want to put the top-left cell of the data view.
- Select Insert > Open.
-
Select a data view.
An outline appears in the grid showing the proposed location of the data view.
- To change the outline, click a cell in the grid.
- To insert the data view, click OK.
Open a data view drawer
In the left-side panel, each data view has its own drawer.
- To open a drawer, click .
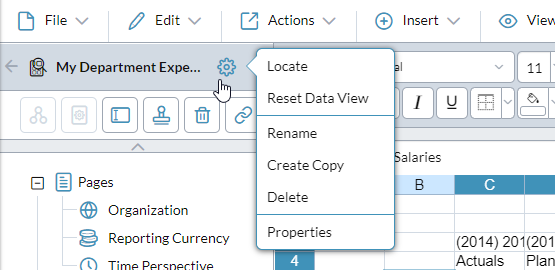
Reveal the data view menu
-
Select the data view's drawer and click :
Set the properties for a data view
-
Select the data view's drawer and click > Properties.
The Data View Properties dialog opens.
Set the properties for a page dimension
- In the data view's drawer, select the page dimension.
-
In the lip click .
The Page Dimension Properties dialog opens.
You can specify the display properties for the members , as well as the default Display mode (List or Hierarchy), whether the dimension is visible when the template runs, and specify a custom name for the dimension.
Copy a data view
In the data view's drawer, click > Create Copy, select the target location, and click OK.
Note: The copy is an exact clone, right down to the cell formatting, cell formulas, Row Notes, and Comments (mapping has no effect, whether it is On or Off).
Modify the structure of a data view
-
Select > Reset Data View.
Edit Layout opens and you can change the data view.
Note: Most settings, such as data view properties, formatting, Row Notes, Blanks, and linked templates, are retained. Row Notes and Blanks are only affected if you make structural changes that remove a dimension, row, or column that they depend on.
Format Cells
Apply formatting
Common spreadsheet-style formatting options are available two ways: in the formatting panel and in the Format Cells dialog.
- Select a cell or range of cells.
- To access formatting options do one of the following:
- To open the Format Cells dialog, select Actions > Format Cells.
To open the Format Panel, select View > Format Panel.
- Select the options to apply.
Example: To merge cells, select the range of cells that you want to merge, and in the formatting panel click . To unmerge, select the merged cell and click .
Apply custom numeric formats
- Select Actions > Format Cells.
-
In the Numeric Format tab, from Category, select Custom.
The custom properties are shown, including the following:
- Red if negative – Negative values appear in red.
- Numeric scaling – Scale for thousands or millions (see the example below).
- Currency Symbol – Select existing options or select Custom to define your own symbol as well as its placement.
- Hide Symbol – Turn on to hide the currency symbol.
Set the default font for the entire template
- Select Options.
- Set the font and size.
Quickly copy-and-paste formatting
- To copy, select the formatted cell(s) and click Format Painter.
- To paste, click the target cell(s), a column or row header, or the sheet selector in the top-left corner of the grid.
Paste formatting multiple times
To repeatedly paste the same formatting:
- Double-click Format Painter (locking it).
- Paste to the targets.
To unlock Format Painter:
- Click Format Painter or press Esc.
Paste formatting to other templates
You can use Format Painter between Template Studio tabs in the same browser session.
How does the Numeric Formatting drop-down work?
- This drop-down always shows the format that is applied to the currently selected cell.
- You can apply a format to a cell(s) and then customize the format by using other options such as Currency, Comma Style, and Increase/Decrease Decimals.
What is the Account Dimension numeric format?
This format is only available for cells in data views and is taken from the member definitions in the Account dimension that the data view uses.
Remove only formatting or only content
- Select the cell or cells (they need not be contiguous).
- Select Actions > Clear Formatting or Clear Contents.
Hide the currency symbol
- Select the cell(s).
- From select Hide Symbol.
Add rules to control cell formatting
-
Select Edit > Conditional Formatting.
The Conditional Formatting dialog opens.
Tip: You can also add automatic data cell formatting for data-entry mode.
Lock a cell to prevent changes when in data-entry mode
- Select the cells.
- Open the Format Cells dialog.
- In the Protection tab select Locked.
Apply a numeric scaling format
- Select the cells.
- Open the Format Cells dialog.
- From Category select Number.
- From Numeric scaling, select an option.

Custom colors
Add custom colors to a template
- In Format Painter, open Fill Color or Font Color and click .
-
Select or specify a color and click to add it to the Custom list.
Note: Fill Color and Font Color share the same Custom palette of up to six colors.
Custom colors can't be removed
You can't delete custom colors. However, when the list is full and you add a seventh color, the one at the far right is dropped.
Re-use your custom colors
- To avoid having to specify your custom colors each time you create a template, save them in a blank template.
- When you want to create a new template, open that file and immediately do a Save as.
Rows and columns
Hide rows or columns in the grid
- Select a row or column header.
-
Select Actions > Hide.
Tip: To hide multiple rows or columns, hold down Ctrl and make your selection, which can also be non-contiguous.
Reveal a hidden row or column
- Select the adjacent rows or columns.
- Select Actions > Unhide.
Reveal all hidden rows and columns
- Select Actions > Unhide All.
Resize row height or column width manually
- Select one or more row or column headers.
- Drag a border line.
Resize row height or column width logically
- Select the row or column header(s).
- Select Edit > Resize Rows or Resize Columns.
- Type the new size (in pixels) and click OK.
Resize row height or column width to fit the content
- Select the row or column header(s).
-
Select Edit > Autofit Rows or Autofit Columns.
Tip: You can do the same thing by hovering the pointer over the row header's bottom line or column header's right line and double-clicking.
Add locked rows and columns
- Click the cell that you want to be the top-left cell of the non-locked area of the grid
-
Select View > Freeze Panes.
The rows above this cell and the columns to the left of it no longer scroll.
- To unlock them, select View > Unfreeze Panes.
Insert rows or columns
- Select a range or non-contiguous row or column headers.
-
Select Actions > Insert Row(s) or Insert Column(s).
New rows are inserted above the selected, new columns to the left.
Note: If your selection intersects a data view, the row(s) or column(s) is also inserted to the data view as a Blank.
Delete rows or columns
- Select a range or non-contiguous row or column headers.
-
Select Actions > Delete Row(s) or Delete Column(s).
Note: If your selection intersects a data view, these menu options are only available if the selected data view row(s) or column(s) are blank.
Add special columns or rows to the data view only
- Blanks and Row Notes are available to users during data-entry.
Add row filters
You can add row filters to a template that allow its users to select the leaf members that they want to work with. This means that a single version of the template can meet the needs of all users and groups, instead of having to spin off custom versions.
Note: When the user runs the template the only members available for selection are those that the user has at least Read access for.
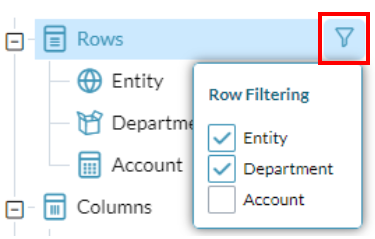
-
Open the data view's drawer and beside Rows click :

- From the Row Filtering menu, select the dimensions that you want to enable row filters for.
- For each dimension that you selected:
- Under Rows right-click the dimension and select Choose Members
In Member Selector, choose the members that you want the template's users to be able to select from when they open the template.
Note: If you select a non-leaf member but none of its leaf descendants, when users open the template, that member will be excluded from the Row Filtering dialog and users will be unable to select its leaf descendants.
Best Practice: To give users maximum flexibility, use the dimension's All.plusdescendants option.
- Save the template.
Remove row filters
- Open the data view's drawer and beside Rows click .
- In the Row Filtering menu, clear all the check boxes.
Row filters FAQ
What conditions disable row filters?
- Row filtering is disabled if either of the following occurs:
- The template contains more than one data view.
- The template contains a data view with unique combinations enabled in the Rows section.
- To re-enable row filtering, remove the disabling condition.
Where are row filter definitions applicable?
- Template users get a Row Filters dialog after opening a template from the following:
- Document Explorer
- Task Assistant
- A template link
- A Dashboard chart
- Detailed Planning schedule reviewing templates
- The Workflow tasks Data Entry and Approval Only
Where are row filter definitions NOT applicable?
- Template users don't get a Row Filters dialog in the following:
- Report Binder
- The Offline Process
- Contributor Workflow tasks
What else is affected by row filters?
When you use either of the following Template Studio options, the current row filters and member selection are respected:
- Actions > Analyze
- File > Download Excel or PDF
Why did my row filters disappear?
If you did not remove the row filters, then what probably happened is that in the data view's drawer, you selected > Reset Data View, and then in Edit Layout you removed a row-filter-enabled dimension from Rows. This action removes the row filter definition from the data view.
Formulas
Show/hide the formula bar
- Select View > Formula Bar.
Create a formula in a cell
- Click the cell.
- Type =.
- To see the available functions, start typing the function name.
- Build the formula as you would in Excel or other spreadsheet applications.
Show the formula for a cell
- Double-click the cell.
- The formula is revealed inside the cell and referenced cells are highlighted.
Images
You can add graphics or pictures
- You can add up to four images to a template.
- The maximum file size is 500 KB.
- You can use GIF, JPG, JPEG, and PNG files.
Add a graphic or picture
- Select a cell in the template grid.
- Select Insert > Image.
Tweak an image
- To move an image, drag it.
- To re-size an image, drag one of its edges or corners.
Manage images
- When a template contains an image, the Image drawer appears on the left, listing all the images.
- You can use the drawer to rename, copy, delete, or add a link to an image so that when an end user clicks it, a linked template opens.
Clone an image
- Select the image in its drawer.
-
In the lip click .
The copy appears on top of the original.
- Drag the copy to another place in the grid.
Other features
Add a template link
You can link two templates so that the end user can open the second template to see supporting details.
Set the print options
-
Select File > Page Setup.
The Page Setup dialog opens.
Convert a Template Studio Classic file to a Template Studio file
- In Template Studio, open the TSC file.
-
Save.
The file is saved as a TS file (the original TSC file is unaffected).
Create line item detail reports
These are reports for the line items in a template.