Use templates
Templates play a central role in taking FP&A Plus beyond the Finance Department into the entire organization.
Open a template
When you open a template you have the choice of reporting mode or data-entry mode.
- In Document Explorer, highlight a template file
-
Select Run > Report Mode or Data Entry Mode.
Note: The Row Filtering dialog may open. To learn about it, see the next section.
Tip: You can open the same template multiple times; each time you open the template file, a new tab opens for that instance.
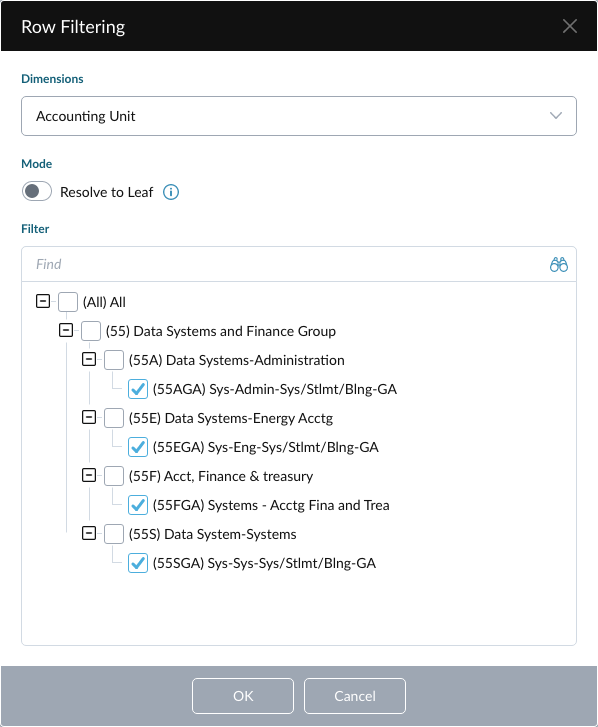
Filter row members
If the template designer has added row filters to a template, the template opens to the Row Filtering dialog, allowing you to select the leaf members that you want to see and/or input data to:
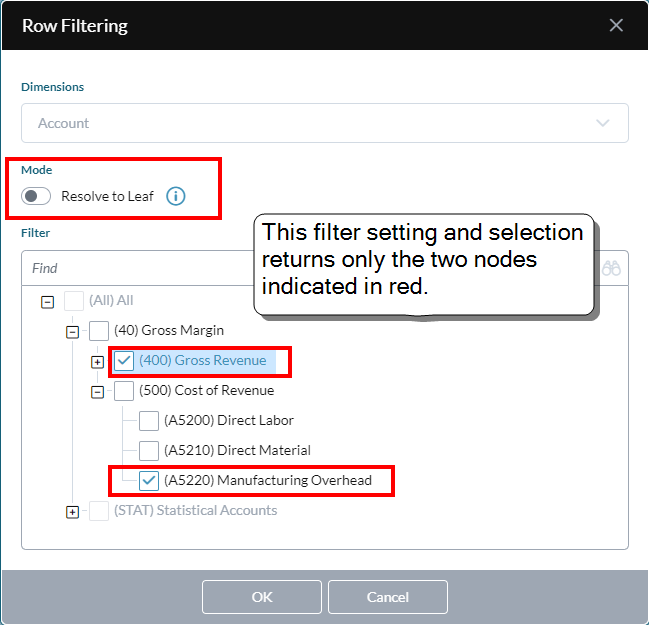
About row filter modes
Row filtering has two modes controlled by the Resolve to Leaf setting:
- Resolve to Leaf Off (default): The filter returns only the members (both non-leaf and leaf) that you select in the tree.
Example: The row filter below returns the members 400 and A5220:

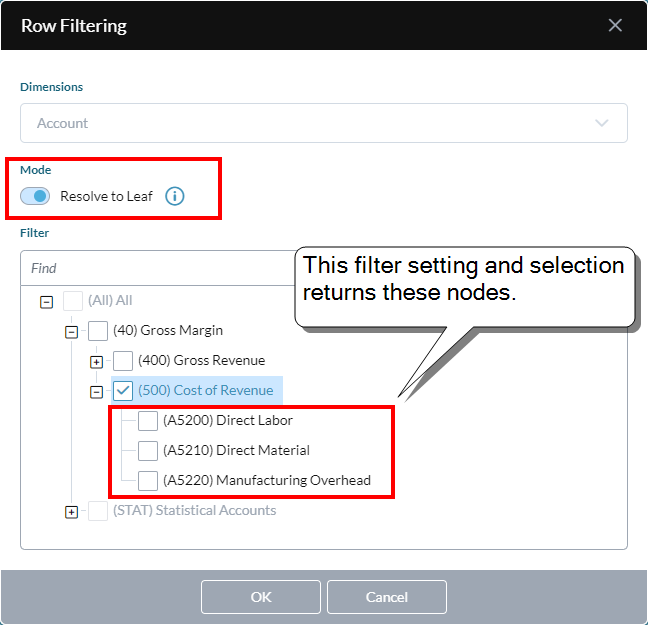
- Resolve to Leaf On: The filter returns all the leaf members belonging to the non-leaf members that you select in the tree.
Example: The row filter below returns leaf members A5200, A5210, and A5220:

Filter the row members in the template
- In the Row Filtering dialog, select from Dimensions.
- Choose the row filtering behavior you want to use:
- To have returned only the members (both non-leaf and leaf) that you select, accept the default setting for Resolve to Leaf (that is, turned off).
To have returned all the leaf members belonging to the non-leaf members that you select, turn on Resolve to Leaf.
Tip: With Resolve to Leaf turned on, you don't need to select at leaf level; selecting a member causes all its leaf members that appear in the hierarchy to be included in the filter when the template is rendered.
Caution: The Mode applies to the entire row filter rather than individual dimensions; if you make selections and then change the setting for Resolve to Leaf, you selections are lost.
-
In Filter, browse and/or search and select (in accord with the row filtering behavior you chose in the preceding step) the members that you want to see in the template.
- Repeat the previous step as needed for each dimension included under Dimensions.
- Click OK.
Change the row filter
- Select Edit > Row Filtering.
- Repeat the steps from the previous procedure.
View/select pages
You can view and select page dimensions.
In the left panel click Pages.
-
Open one or more pages and select a member in each.
Tip: If Delay page change is turned on, to see the data click .
View as list or hierarchy
You can view a page dimension's structure as either a list or a hierarchy.
View member definitions
You can view the definition of any member.
- To open the Member Definition dialog do one of the following:
- In the left panel click Pages, select the page member, and click > Member Definition.
- In the template, select member cell in the row header and select View > Member Definition.
Tip: In the Member Definition dialog you can select from the options in the drop-down to see the various types of information available, including the resulting members and children.
Get combination details
You can view detailed information on a member combination
- Select View > Cell Properties.
Copy data
Copy data to the clipboard
- Select a range of cells,
- Select Edit > Copy.
- Paste the data into any application that supports the system clipboard.
Note: The contents of rows or columns that you hid manually will also be copied. For cells that contain a formula, only the cell value is copied.
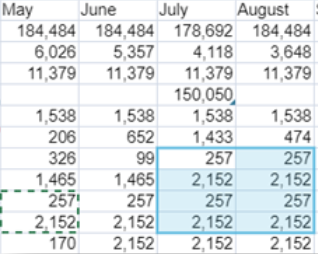
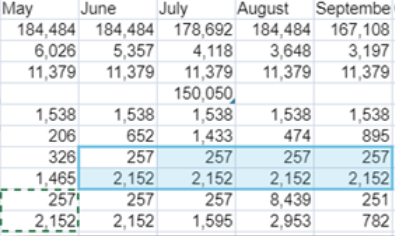
Copy and paste multiple cells
You can copy multiple cells and paste them to a range of the same multiple.
-
In the examples below, the same two-row/one-column selection is pasted to a multiple of four; in the first example, four rows by two columns, and in the second, two rows by four columns:
Get dynamic calculations
-
Select a range of numeric cells in one or more columns.
The status bar shows the average, count, and sum for the selection.
Adjust numeric data
- In the data view grid, select one or more base leaf member cells.
-
Select Actions > Adjust Data.
The Adjust Data dialog opens.
Note: The Adjust Data option is only available when the current selection contains at least one editable cell.
To be editable, the cell meet the following criteria:
- The cell must belong to a selection that:
- consists of contiguous cells, whether in a single or multiple data views
- contains no cell that requires Line Item Schedules for data entry
- The cell itself must:
- be writable
- contain a leaf member
- not contain a formula
- not contain text
- not be a template 'blank' cell
- not be locked
- The cell must belong to a selection that:
Update the model using formulas
When template data view cells contain formulas, the values in those cells are written to the model when you click (Refresh). Note that the formula cells must be writable.
Tip: You can automate this action by creating a Template Calculation process in Process Manager.
Supporting details
Show supporting details
You can show or hide the indicators for supporting details.
- In the View Indicators drawer, click any of the following:
- for comments
- for line item schedules
- for linked templates
- Click .
The indicators appear in the grid cells and are as follows:
- A comment - a red triangle at the top-right corner
- A line item schedule - a blue triangle at the bottom-right corner
- A linked template – a green triangle at the top-left corner
Note: Currently the linked template indicator only appears for data view components and Auto Text; a linked image does not show the indicator.
See most recent comment
If a cell has comments attached, you can see the most recent one quickly.
-
Hover over the cell.
Note: If the cell has an attached document, this is not indicated.
Add/edit supporting details
To add or edit comments or line item schedules:
- Select a cell.
- Select Supporting Details.
- Choose the appropriate menu option.
Open a Row Note
- Select the cell.
-
Select View > Cell Properties.
You can read the note, see who added it, and see linked members.
See combination change history
You can see the history of manual changes made to a member combination.
-
Right-click the cell and select Data History.
The Data History dialog opens.
Open in Ad Hoc Analysis
You can select a data view in the current template and have it open in Ad Hoc Analysis.
- Click anywhere in the data view or a connected chart.
- Select Actions > Analyze.
Drill across to a data source
Note that this option requires that the template has a drill across definition attached or is linked to a detailed planning model.
- To drill across from the selected cell to a relational table, select Actions > Drill Across.
- To drill across from the selected cell to its supporting detailed planning data, select Actions > Drill to Detailed Planning.
Open a linked template
- Select the cell that contains the link.
- Select Actions > Linked Template. If the link is contained in an image, double-click the image.
Download templates
Create an Excel or a PDF file from a template
You can save the data in a template to an Excel or a PDF file. (A saved template can be up to 250 page combinations.)
- Select File > Download Excel or PDF.
- Optionally, you can customize the report by sorting and/or filtering the columns. (See the next procedure.)
- Select or clear the check box for each page combination that you want to include in the file.
-
If Remove pages with no data is turned on, pages that have no data will not be generated (but the page still counts toward the 250-page limit).
Note: If you turn on this option, for each data view in the template you must turn on its Exclude missing rows and Exclude missing columns options. These options are described in Data View properties. (When creating a new data view you can also apply these "exclude" settings in the Edit Layout dialog's Choose Layout tab.)
Tip: The phrase "no data" means pages that have no rows or columns; "no data" does not refer to rows or columns that contain empty cells. In other words, a blank or data value still counts as data, just as zero still counts as a numeric value.
- Click OK. When file generation is complete, your browser notifies you.
Customize an Excel or PDF file by sorting and/or filtering it
You can sort and filter on one or more columns.
- In the Download dialog, in the column header click .
- To sort the report on the column, click Sort > Ascending or Descending.
- To filter the report on values in the column, click Filter and click one option:
- Text Filter: Type the filter text that you want to use. (Partial searches are allowed; wildcards are not.)
- Unique Column Filter: The list shows up to 75 unique items; click each item you want to add to the filter. To select/deselect all items, click or .
-
Click Apply.
The icon in the column header now indicates the combination of sort/filter choices that you made.
Downloads FAQ
Does an Excel file created from a template inherit the characteristics of the template?
Yes. The Excel file takes the following attributes of the template:
- Cell formatting, including Conditional Formatting, if present
- Cell protection
- Cell formulas
- Worksheet protection
- Worksheet naming and table of contents
- Page layouts, margins, and headers
Does a PDF file created from a template inherit the characteristics of the template?
Yes. The PDF file uses the same cell formatting, including Conditional Formatting, if present, as well as page layout, margins, headers, and so on.
Templates FAQ
Does the mode affect a template's functionality?
Aside from entering and editing data, the two modes share all functions.
What does Delay page change do?
The Delay page change option is only available in reporting mode.
- If Delay page change is turned on, it stops the page from refreshing its data until after you make your page member selections and click (located at top right).
- If Delay page change is turned off, the data refreshes automatically.
Note: The template designer sets the initial state for Delay page change.
Best Practice: It is recommended that Delay page change be turned on whenever possible.
How does Auto Refresh work?
The Auto Refresh option is only available in data-entry mode.
- If turned on, the data is refreshed from the model when a spread is performed or a line item schedule is exited.
- If turned off, data is only refreshed when you click .
How does Autosave work?
In data-entry mode, the changes you make to cell data are automatically saved when one of the following occurs:
- you close the template: both cell values and formulas in the grid are saved
-
you switch to a different tab: the cell values are saved (but not their formulas)
Caution: If you close or refresh your web browser, your unsaved changes are lost.
Why can't I add/edit a comment or a line item schedule?
If you can't add or edit, it may be for one or more of the following reasons:
- The data view (but not the template) is read-only
- The template is in report mode
- The cell is protected
- You only have read permission for the selected member combination