Contributor
Note: This is an Opt-In feature.
Contributor is an add-in for Microsoft Excel that allows you to participate in the budgeting process as follows:
- Open and complete your Workflow Tasks in Excel
- Open workflow templates in Excel
- Save an Excel workbook to work on offline
- Integrate workflow templates into your existing Excel workbooks
- View, edit, and save Row Notes
For more background, see Contributor FAQ, below.
Requirements
Contributor supports Microsoft 365 using Monthly Enterprise Channels.
Note: Microsoft Office 2019 and Office 2016 perpetual licensed editions are not supported.
Contributor does not support the following:
- Microsoft 365 Excel Online
- Microsoft Office Insider/Pre-Production Semi Annual (Targeted) Channel
- Office for Mac
Deploy Contributor
To deploy Contributor
- Contact Prophix Support to obtain ProphixContributor.xml (manifest file).
- In an editor open ProphixContributor.xml.
-
Replace each CLOUD-INSTANCE-URL placeholder with the fully-qualified domain name of your instance of FP&A Plus.
Caution: Your cloud instance always uses SSL with an HTTPS endpoint.
-
If your FP&A Plus sign-in process requires using external URLs (for example, to access an identity provider for SSO or for multi-factor authentication through a service such as DUO) you need to add these domains to Excel.xml to whitelist them. You do this in two parts:
- Get the URLs for the whitelist:
- In a web browser, in Incognito or private browsing mode, open your FP&A Plus instance.
- During the sign-in process, record all the URLs that you access that are different than your FP&A Plus instance URL.
- In Excel.xml, for each URL, do the following:
- Go to the <AppDomains> section.
Within the section add the following line:
<AppDomain>https://<ExternalURL></AppDomain>Where <ExternalURL> is a URL for the whitelist. (You only need to insert the domain name.)
- Get the URLs for the whitelist:
- Save the XML file.
- To deploy Contributor, choose one method:
- Microsoft 365 Centralized Deployment (recommended)
- Set up a Network Share
Microsoft 365 Centralized Deployment
Centralized deployment requires users have Exchange Online and active Exchange Online mailboxes. Specifically, to use the Centralized Deployment feature the following requirements are necessary:
- Your directory must be federated to Azure Active Directory
- Your users must sign in to Microsoft 365 using their Organizational ID
- Your user's Exchange mailbox must be OAuth enabled
To perform a Microsoft 365 centralized deployment:
- Sign in to Microsoft 365 as an administrator.
- At the upper-left from the app launcher icon select Admin.
- In the navigation menu, select Settings > Services & add-ins.
-
Select Upload Add-in at the top of the page.
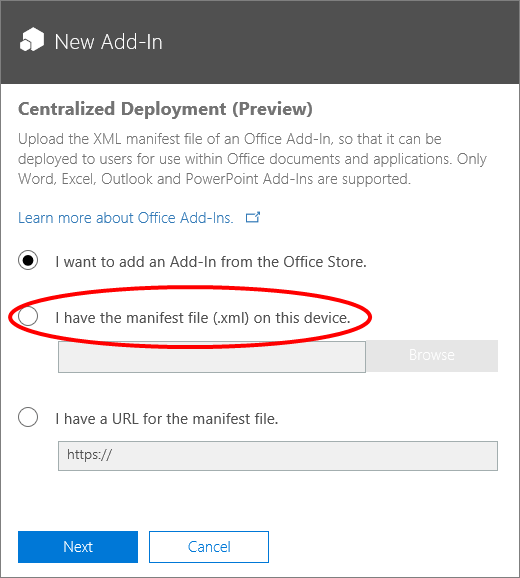
- On the Centralized Deployment page, select I have the manifest file (ProphixContributor.xml) on this device.
- Upload the manifest file.
-
Click Next.
On the Centralized Deployment page, the add-in's Status shows as On.
- Click Next.
- In the Who has access? section, click Edit.
- On the Edit who has access page, select either Everyone or Specific Users/Groups, as appropriate.
- Click Save.
Set up a network share for Contributor
Note: Use this method of deployment if you do not have Microsoft 365 or are not able to use Centralized Deployment.
The following steps should be completed by someone with the appropriate permissions to create shares:
- On a file server where you store your network shared files, create a directory.
- Copy ProphixContributor.xml to the new directory.
- Open the directory's Properties dialog and select the Sharing tab.
- Click Share and add yourself and any users or groups who you want to have access to the add-in.
-
Click Share:
-
Note or copy the network file path.
The following steps must be completed on each user’s installed version of Excel
- Open Excel and select a new document.
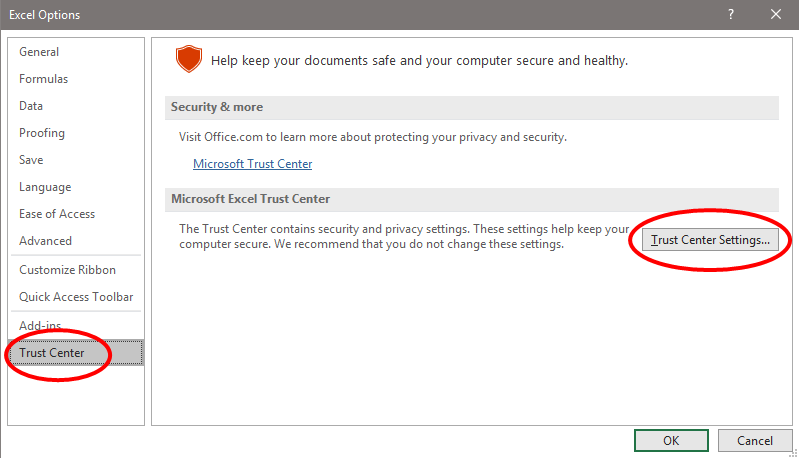
- Select the File tab and select Options.
-
Select Trust Center and click Trust Center Settings:
- Select Trusted Add-in Catalogs.
-
In Catalog URL, type or paste the previously copied UNC path (that is: \\<servername>\<path>\):

- Click Add Catalog.
- Select Show in menu, and click OK.
- Restart the Microsoft 365 application.
Install Contributor
Prerequisite
Before you can install Contributor, your FP&A Plus admin needs to deploy Contributor to your organization (described above).
After the deployment is complete, the administrator should announce that you can install it from inside your desktop Excel.
Install Contributor
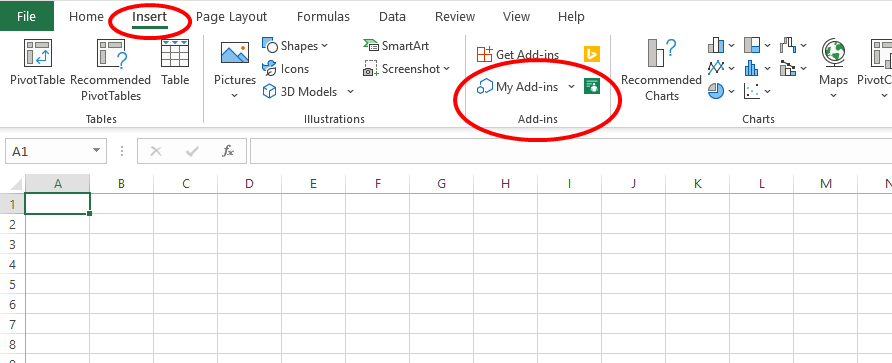
- Open Excel.
-
Go to Insert > My Add-ins.
The Office Add-ins window opens:
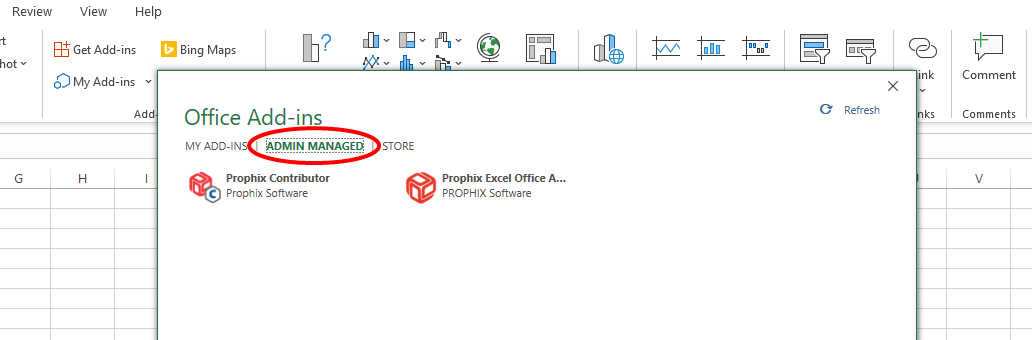
- Depending on how your administrator chose to install the add-in, do one of the following:
- Click ADMIN MANAGED, and select Contributor.
- Click Shared Folder, and select Contributor.
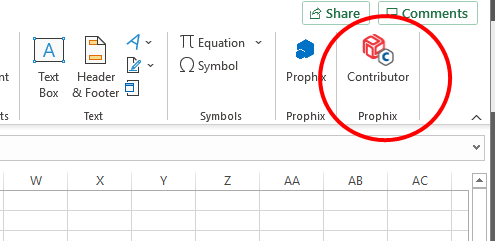
-
Click Add.
A Prophix panel is added to the Ribbon :
Open a workbook
-
After you receive a workflow notification email that your task is available, click the link in the email.
Note: A workflow link expires after 30 days.
- In the download site, click Download.
- Open the downloaded workbook in Excel.
-
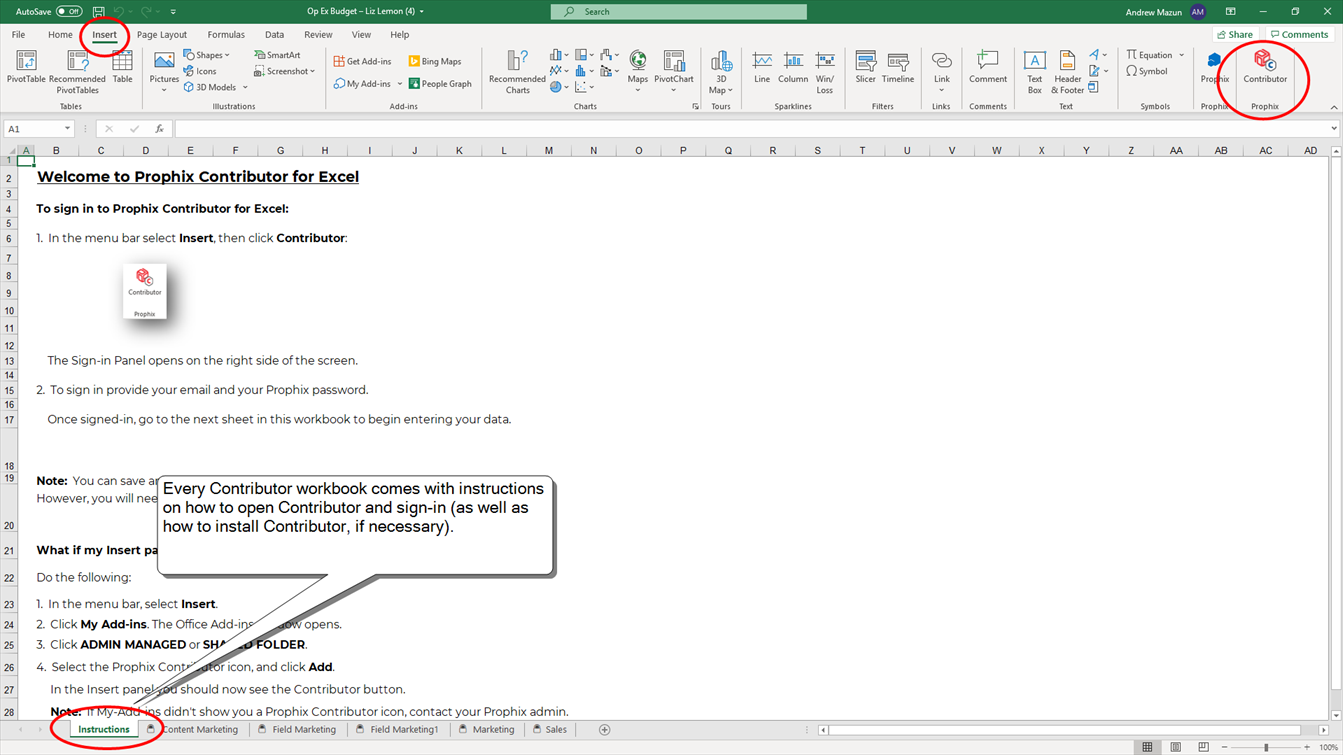
Go to Insert > Prophix > Contributor.
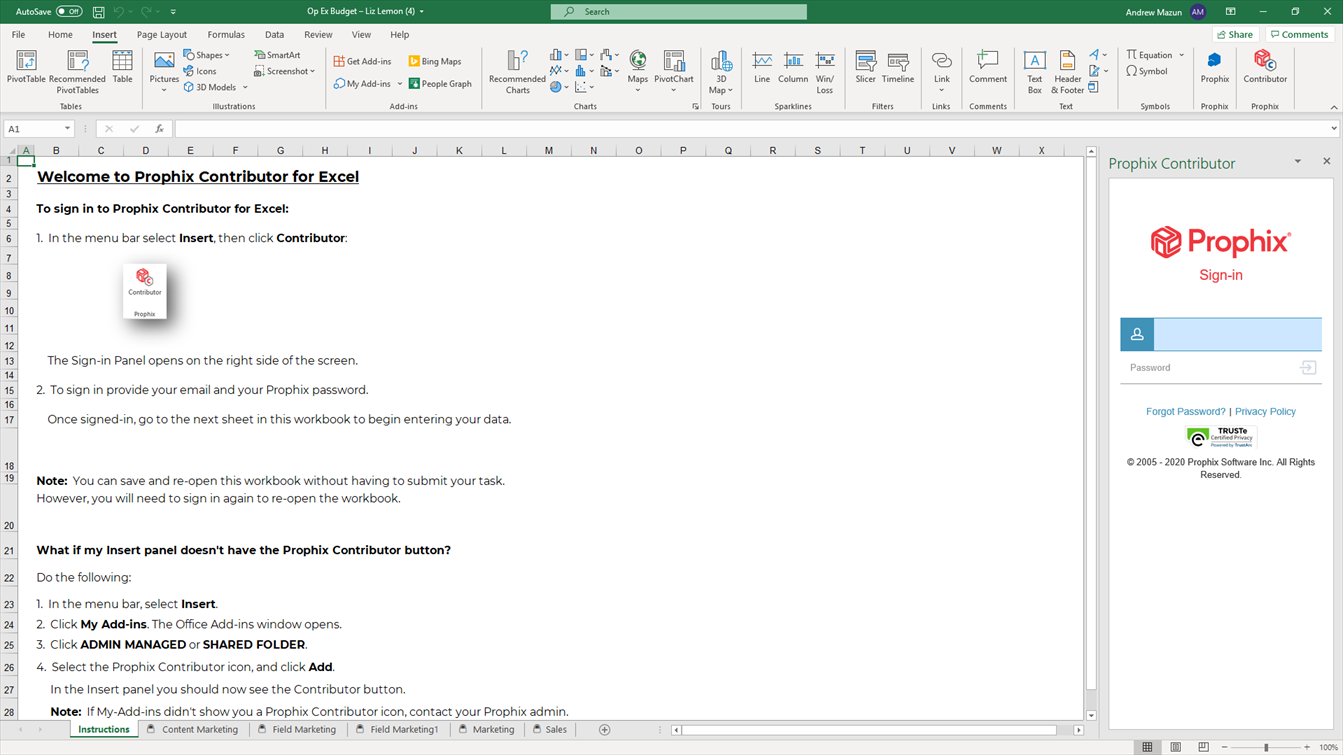
The Contributor panel opens:
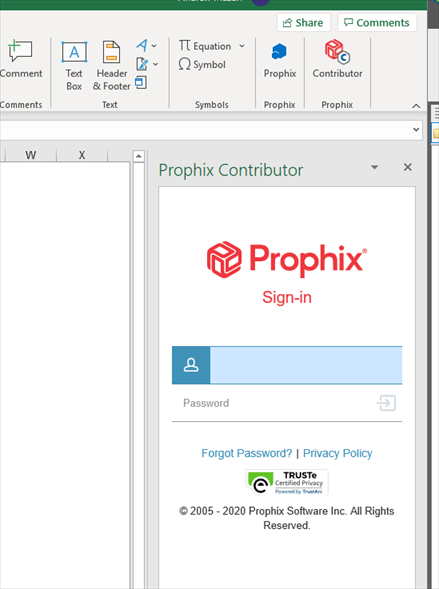
- Sign in to FP&A Plus.
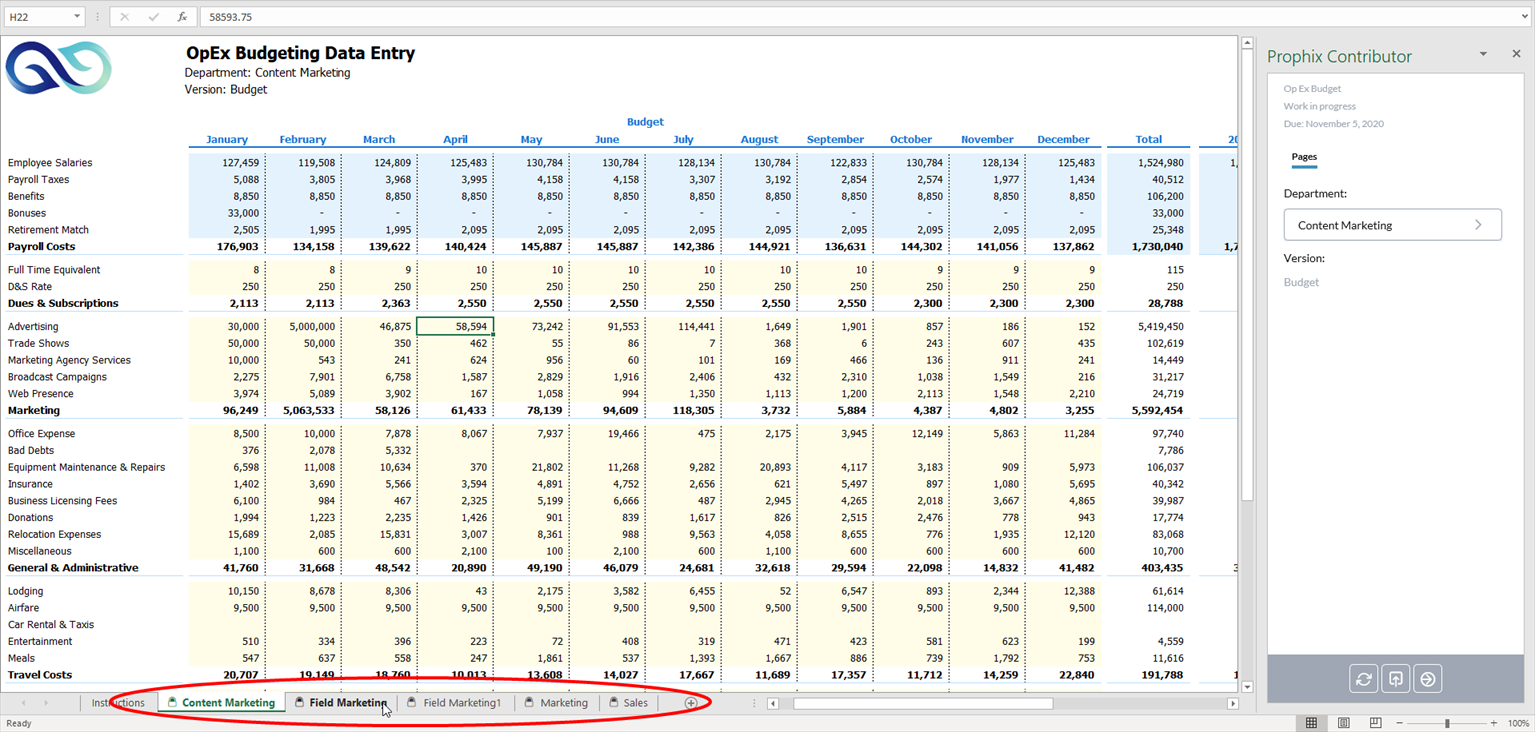
-
Click any FP&A Plus-enabled sheet to open its template:

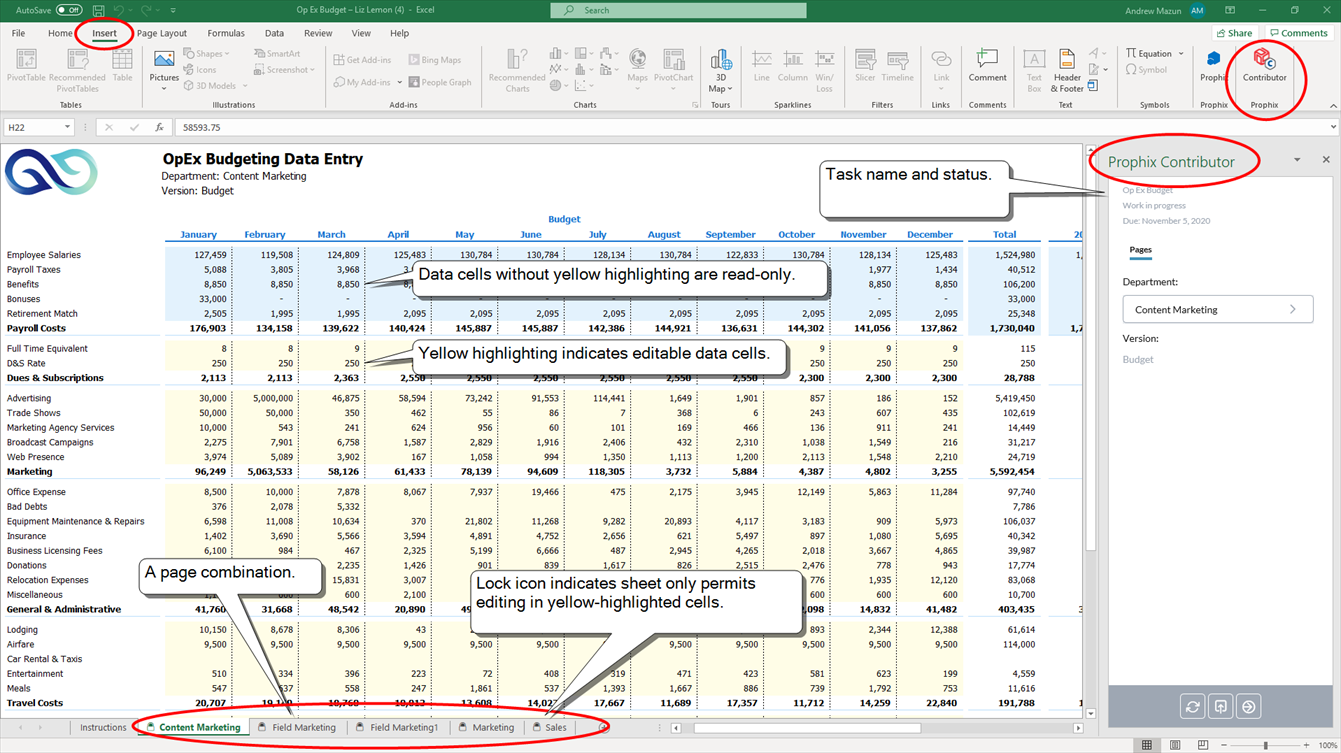
Work on a task
- In a Data Entry task, enter values as you would in Excel. (Note that, based on security permissions, some cells may be protected.)
- To refresh the sheet with data and calculations from the model, click .
- To save your data to the model, click (saving also refreshes the data and calculations).
- (Optional) At any time you can save the workbook in Excel, as described below.
- (Optional) If the workflow template contains multiple page dimensions, you can switch between, as described below.
- To complete a task:
- Data Entry task: input your data; to submit the task, click .
- Approval Only task: review the data; to approve, click ; to reject, click .
- (Optional) For either task type you can enter Comments (up to 2,000 characters).
Note: All changes made in Contributor and saved are logged in FP&A Plus Data History.
Save the workbook
Just like any Excel workbook, you can save your work as an Excel file so that you can continue working on it at a later time.
Note: This procedure won't save your changes to FP&A Plus—that only happens when you click (Save) or click (Submit).
- Save the workbook as you normally would in Excel.
- Next time, open the workbook in Excel.
- Open Contributor.
-
In the Contributor panel, click Connect; sign-in to FP&A Plus.
All the sheets from your previous session are present and show the latest data from the model.
Navigate the workbook
As stated above, you can switch pages just as you would in any workbook by clicking sheets. But if a workbook contains many page combinations you may find it more convenient to use one of the alternate navigation methods available in Contributor.
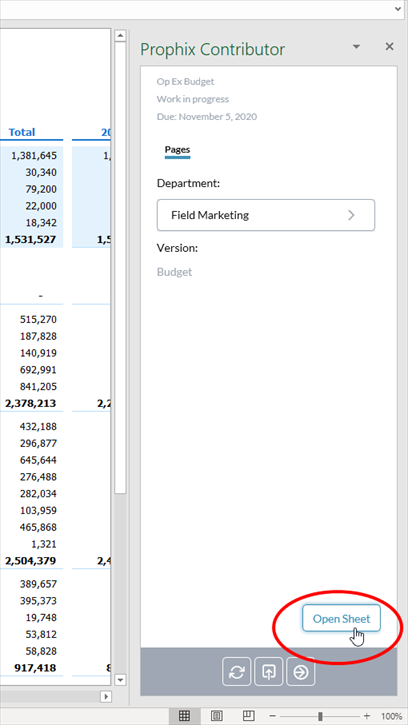
The Contributor panel lists the page combinations in drop-downs that you can use to move among the sheets.
-
Select a page:

-
Click Open Sheet:
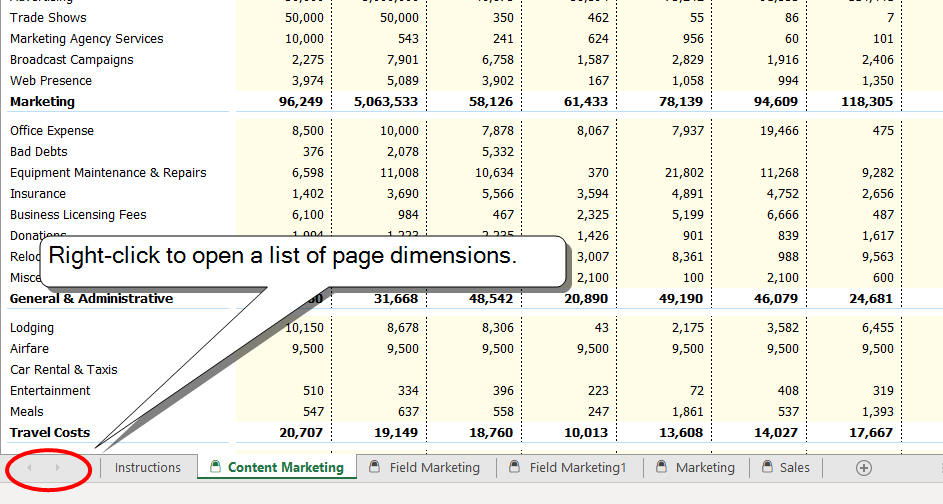
The Excel feature "Activate sheet" is also available:
-
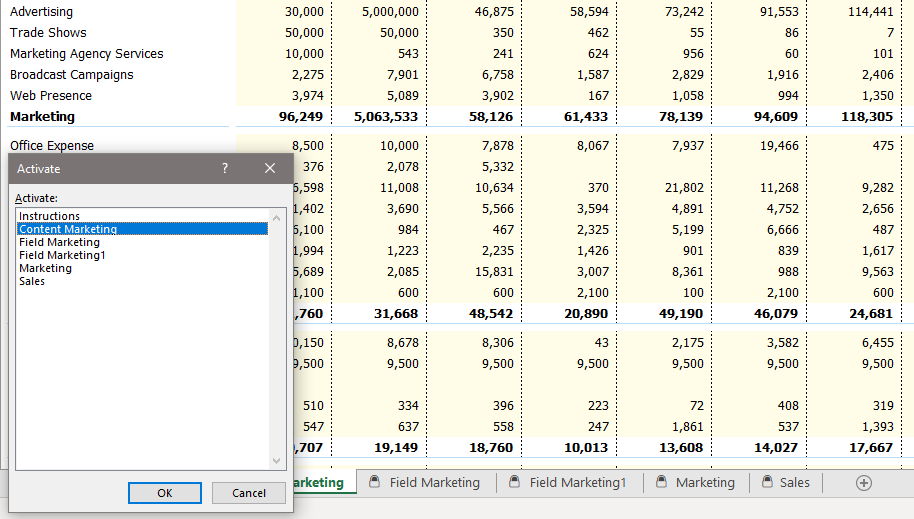
At the bottom-left corner of the Excel window, right-click in the arrows area:

-
To open a page, select it and click OK:

Integrate workflow templates to your Excel models
Contributor allows you to link your existing workbooks with Contributor workbooks using Excel cross workbook cell-reference formulas.
- In a data cell, start a formula.
- Reference the cells in another workbook.
-
Save the data to FP&A Plus (click ).
The resulting value is saved back to FP&A Plus while the formula remains in the workbook.
User FAQ
How do I know if I am a good fit for Contributor?
Contributor is likely for you if you:
- Love using Excel
- Have loads of lovingly crafted workbooks
- Have minimal FP&A Plus knowledge
I love the FP&A Plus Offline Workbook feature; is Contributor better?
Yes! Contributor essentially allows you to do the same things, but more directly. The biggest advantage of Contributor is that you can save your data to the model, then use the refresh option to immediately see the results of model calculations (both account calculations and parent-child consolidations). Also, when you save and submit, your data is automatically consolidated.
What are the prerequisites to use Contributor?
The administrator must register you as a FP&A Plus user, assign Contributor functional access, and the Contributor add-in must be installed to your Microsoft 365 Excel.
Why did I get an email from FP&A Plus that contains a link to FP&A Plus and a link to an Excel workbook?
Your admin has set you up with one or more permissions for regular FP&A Plus workflow and permission for Contributor:
In this case, you can use either option to complete your workflow task.
What types of workflow tasks are available in Contributor?
You can receive Data Entry or Approval Only tasks, and can submit/approve/reject tasks the same as in FP&A Plus.
What page combinations are included in the workbook?
Every page combination that you have data permissions for, each one rendered as a separate sheet. However, a workbook is limited to 50 sheets.
Can I download the same workbook more than once?
You can download a workbook as many times as you need.
Can I save workbooks?
Yes.
Why are all the sheets locked?
All the sheets in a Contributor workbook show the lock icon to show that you can't make structural changes such as adding or deleting rows or columns (such changes would make it impossible to save your data back to FP&A Plus). If your template author is following recommended practice, the editable data cells in your sheets are highlighted in yellow.
Does Contributor have any functional limitations?
At this time there are a few FP&A Plus features (spreading, line item schedules, and Comments) that Excel doesn't support.
If the template author changes the template, or its data structure changes, will clicking update my workbook with those changes?
The refresh option only updates data points, and only those that are already in the sheet. Refresh ignores design changes to the template, and changes owing to dynamic members; to see these types of changes, you must download the workbook again.
Why is there no way for me to approve/reject an Approval Only task?
It may be that you were assigned the observer role for the task. If that is the case, you will not see the and options.
I approved an Approval Only task but the status is still Waiting; how come?
Some approval tasks are set up with multiple approvers; when that is the case, the status does not change until all the approvals have been made.
Admin FAQ
Questions that admins, advanced users, and template authors ask.
How much implementation effort is required by administrators?
Contributor requires no additional user training; no migration effort is involved because Contributor uses the FP&A Plus functionality existing in the Web Client: the same workflow tasks, template files, template formatting, and data permissions.
What are the prerequisites to use Contributor?
You must register the user as a FP&A Plus user, assign Contributor functional access, and the Contributor add-in must be installed in Microsoft 365 Excel.
How do I get the workbook to my Contributor user?
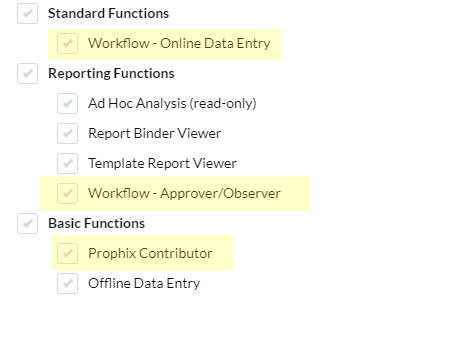
Once the user has been assigned Contributor functional access, Workflow automatically adds the download link for the workbook to the user's task notification email. (In Security Manager, the necessary permission is found at Functions > Basic > Contributor.)
How can I specify the name for the sheets?
To specify a custom name, in Template Studio, in Template options apply the Customize worksheet naming option to the template.
If you don't provide a name for the sheets, when rendering the workbook FP&A Plus uses the first 26 characters of the workflow Task Name, and adds a number. For example, budget_data_entry1, budget_data_entry2, etc. (If Task Name contains any of the following characters FP&A Plus ignores them: . \ / * ? : ] [.)
How do data permissions work in Contributor?
FP&A Plus data security applies in Contributor. In a data-entry task, data permissions are based on those of the owner of the task; in an approval-only task, permissions are based on those of the approver. This means the user can see and edit exactly the same cells as in FP&A Plus.
How many page combinations can a workbook contain?
Up to 50. Each appears in its own sheet.
A page combination my Contributor user expected in the workbook is missing.
If the data view only returns Empty data cells and the Exclude missing columns or Exclude missing rows option has been turned on in the data view, FP&A Plus doesn't render a sheet for that page.
My Contributor user downloaded a blank workbook. What gives?
The workflow template did not contain a data view.
Contributor Best Practices
These best practices are for template designers and workflow admins.
Show the user what cells are editable
Contributor sheets are locked and only the relevant data cells can be edited. To distinguish editable from read-only data cells, in Template Studio apply the auto format option to the template.
Tip: Using the auto format option is also considered a best practice in FP&A Plus.
Auto Text
Instead of using the Auto Text elements for date and time, template designers should use the equivalent Excel functions.
The Total Pages Auto Text element does not work in Contributor.
Be careful about changing roles
If the user has already downloaded a workbook, and the workflow admin changes the user's task role, the workbook will be unusable and the user will need to re-download it.
If the template has more than one data view
Caution: If a template has multiple data views, in order to avoid duplication of data cells you must link all page dimensions using page hierarchy groups.
Example: A template contains two data views, A and B. The Contributor user is looking at a sheet for the Marketing Department, specifically in data view A, but then switches the page to show the R&D Department. If the pages are not linked, data view B will still show the data for Marketing. Also, the sheet that was originally generated for the R&D Department will still show its data, which means that some data points now appear twice in the workbook.
Furthermore, whenever the user saves the workbook back to FP&A Plus, all the sheets are saved. If there are duplicate sets of data, both will be saved, which means that edited values could be overwritten by the older duplicates.