Use Model Manager
Use Model Manager to maintain all the elements that make up a model.
To use Model Manager, you must have Model Administration permission for at least one model.
Open Model Manager
- Click the logo at the top-left corner and select Administration > Model Manager.
Models
View your model types
You can see a summary of your current models and their distribution among model types, as well as the consumption of model types versus the entitlement provisioned.
-
To see your model type counts, in the menubar, click Model Types.
The Model Types dialog appears:
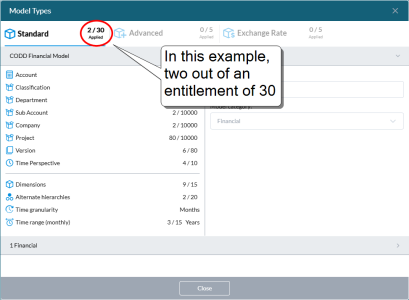
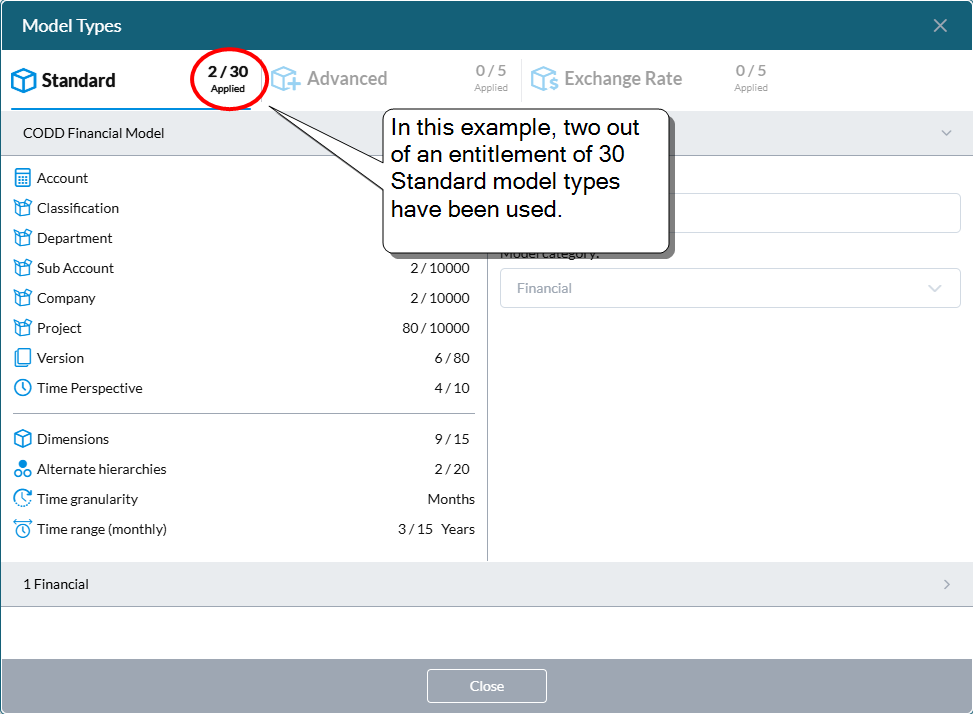
The Model Types dialog is read-only. The numbers it displays are meant to help guide you toward informed model-building decisions and to support system transparency and governance. The dialog shows the provisioned limits for dimensions, their members, alternate hierarchies, and so on, versus the actual amounts in use.
Tip: The Model Types option does not appear until you have created at least one model.
Create a model
- In the left-side panel, click Create New Model.
- In the main panel, define the model.
Delete a model
Note: If the
- Select Actions > Delete Model.
- From the drop-down, select the Model.
- Do you want to retain model definition and assets?:
- Yes: Select to delete the model and all its data but keep the model definition, including dimension tables, filter definitions, Cell Comment tables, Line Item tables, and related documents; confirm your decision.
No: Select to delete the model including all its data and the model definition; confirm your decision.
Note: Any dimension definitions and filters that are shared with another model (that is running) will not be deleted. (Shared dimensions are indicated by .)
- (Option enabled if you chose No for the previous option) Do you want to retain dimension definitions for future use?:
- Yes: Select to delete the model and all its data but keep the model definition, including dimension tables, filter definitions, Cell Comment tables, Line Item tables, and related documents; confirm your decision.
- No: Select to delete the model including all its data and the model definition, and to orphan any related documents; confirm your decision.
- Click Delete.
Note: By default, dimensions and dimension tables in other models connected to this model will be deleted; if this is not what you want, clear these options.
Dimensions
Show the dimensions in a model
- In the left-side panel, click <model name>.
Open a dimension
-
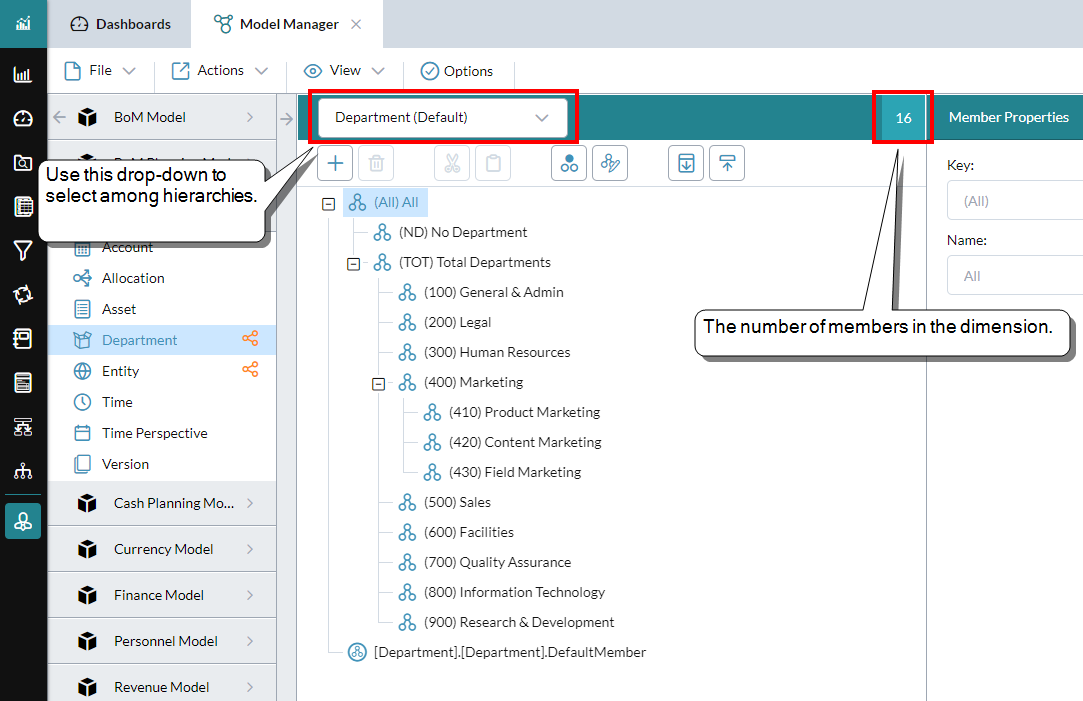
Beneath the model, click the dimension name.
The middle panel appears and shows the member hierarchy.
The number at the end of the title bar shows the member count (including the "root" member).
Get information on a dimension.
- Select View > Dimension Definition.
See the properties for a dimension member
-
Select the member in the hierarchy.
The panel on the right shows the properties of that member (and custom properties, if any).
Each dimension type has its own properties.
Open the dimension controls
-
To show/hide the dimension controls, click anywhere in the "lip" located between the dimension title bar and its structure:

Show the models that share a dimension
- Beside the dimension name, click .
Switch to an alternate hierarchy
-
In the hierarchy panel, select from the drop-down:


Members
Select dimension members
- To select a member, click it.
- To select a range, Shift+ click.
- To select non-adjacent members, Ctrl+ click.
Add a member to a dimension
- Select the dimension.
- Select the member that you want as the parent.
- In the lip click .
- Type a Key (up to 40 characters and unique) and a Name (up to 256 characters)
- Click OK.
- Use the Member Properties panel to complete the member definition.
- Save.
Restrictions on adding members
In Model Manager you can't add members to, or edit, the following dimensions:
- Time: Instead add members using the Extend Time Range feature.
- The detailed planning object (DPO) or Allocation: Instead add members in Detailed Planning Manager.
Set the Default member for a dimension
- Select the dimension.
- In the dimension hierarchy, select the .DefaultMember node.
- In the Member Properties panel, click
- Use Selector to choose a member.
Cut and paste members
- Select one or more members from the same level in the hierarchy.
- Click to cut your selection.
- Select a new location.
-
Click to paste your selection.
Tip: You can also drag-and-drop a selection of members.
Specify a calculation method for a member
You use calculation methods to determine how an account's value is derived, including copying values from other models.
Delete a member
- Select the dimension.
- Select the member.
-
In the lip click , and confirm your decision.
Caution: When you delete a parent, its children are also deleted.
Search/Sort
Turn on member search.
-
Select View > Find Member.
The search bar opens beneath the lip.
Search for members
- Type a name and/or key in the search bar and click . (Searches are case insensitive.)
- To continue the same search, click .
Set the sort order for the dimension default hierarchy
- Select Options and click .
-
From Order members by, select a sort option.
Note: This option is not available for level-based dimensions.
Member Properties
Add a note to a member
- The Note property can contain up to 1,000 characters.
Add a custom property to a member
- Do one of the following:
- Complete the details.
- Click OK.
Save
Save your changes
-
Select File > Save Dimension.
Note: This command saves your edits but does not send them to the model (and thus does not interrupt access to the model for other users). To update the model with your changes, you use the Publish command.
Autosave
Model Manager also has an Autosave feature. Changes you make to the data are automatically saved when you perform either of the following actions:
- Select a different dimension.
- Open the Publish dialog (select Actions > Publish).
Undo changes
The changes that you make to dimensions in Model Manager are automatically recorded and are known as revisions.
- Select a model and a dimension.
-
Select View > Revisions.
The Revisions dialog opens.
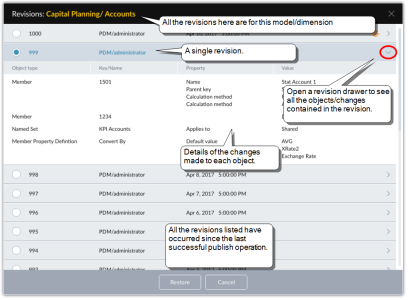
- To get more information about a change, click .
-
To restore a revision:
Note: Any revisions that are more recent than the selected revision are also restored. Note as well that all changes contained in a revision are restored.
- Select the revision that you want to restore.
- Click Restore.
- Click Yes.

Alternate hierarchies
Manage alternate hierarchies
-
In the lip click .
The Alternate Hierarchies Editor opens.
Note: Only certain dimensions can have alternate hierarchies.
Publish
See the publish state of your models
Select Actions > Publish. The icons show the state of each model as follows:
- Publish Not Required: No revisions exist; the model is up-to-date.
- Publish Required: Revisions exist and have not yet been published.
- Running: The publish process is under way.
-
Pending: The publish process is waiting to run.
At any time, to update the statuses, click .
Publish to a model
- Select Actions > Publish,
-
Beside the model name click .
The Confirm dialog opens, showing a graphical analysis of all the models and dimensions that the operation will affect.
- To publish, click Yes.
Tip: Process Manager also provides a Publish process, which you can run on a schedule.