The Time dimension
Every model has a Time dimension, which defines the time range of the model. Time is a level-based dimension, and its members are called time periods.
Example: If a Time dimension has the levels Year, Quarter, and Month, the Month level will contain the time periods January, February, and so on.
Tip: To get the Time format you want in templates and reports, you may want to use custom display formats.
A Time dimension's properties are grouped as follows:
-
Calendar Type
-
Time Range
-
Fiscal Year
-
Include Levels
As you make selections in the dialog, the available options change to reflect your current choices.
Calendar types
Every Time dimension must have a Calendar Type specified. The available options are as follows:
- Calendar or Fiscal 12 months: The fiscal year uses the standard calendar periods; that is, by default months begin on the first of each month.
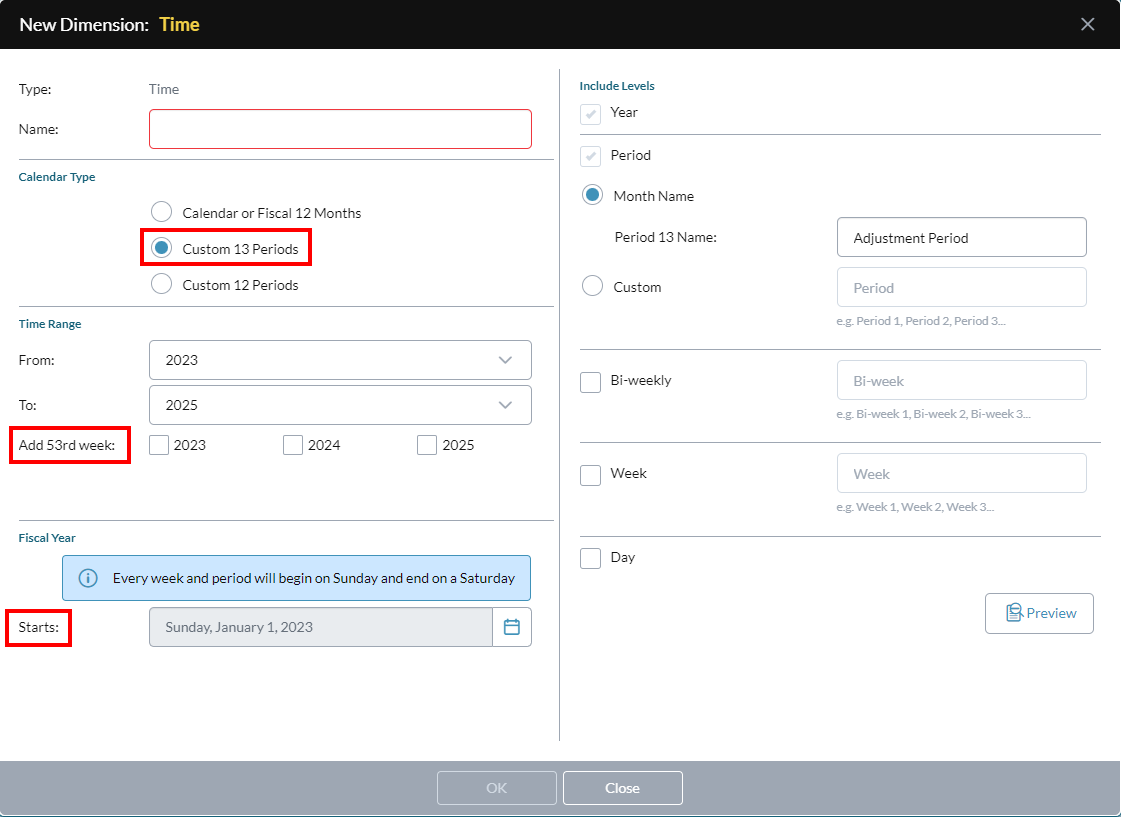
- Custom 13 periods: The fiscal year uses 13 periods with four weeks (or 28 days) per period.
-
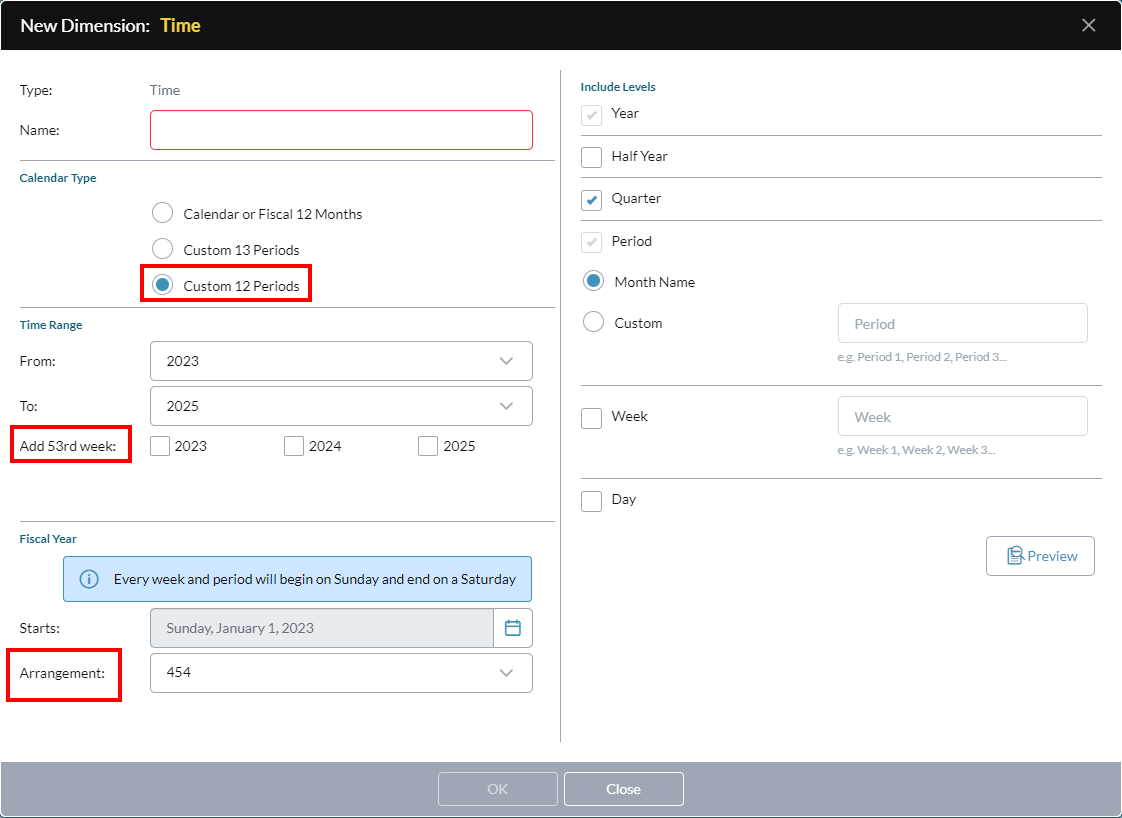
Custom 12 periods: The fiscal year uses non-standard calendar periods—months can begin on any date.
Note:If you select either of the "custom" calendar options, the option to add 53rd weeks appears.
If you select the Custom 12 periods option, under Fiscal Year the Arrangement property appears, allowing you to choose how the weeks in a period are ordered.
Example: June can begin on May 31, and use 4-4-5, 4-5-4, or 5-4-4 weeks in a period.
Your choice in Calendar Type has the biggest effect on your other Time options:
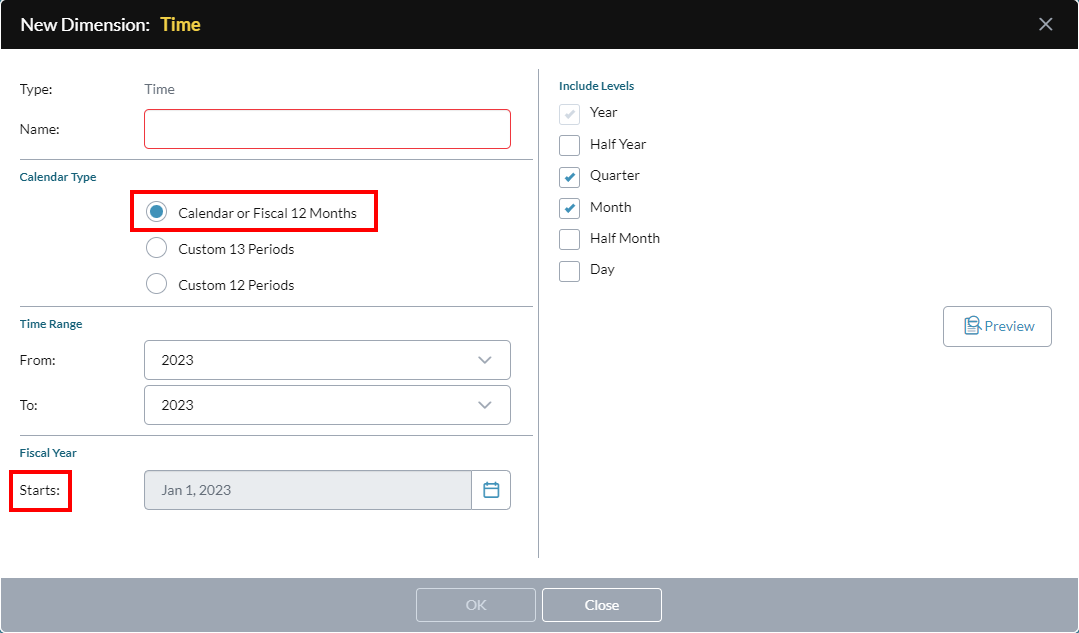
Time Range
Time Range refers to the time span of a model (in years) but does not imply the span of a plan. (The time span of a plan is determined in the Version dimension.)
A model can hold any number of years and can start on any date.
-
Click the From and To drop-downs and select the starting and ending years for the dimension.
-
If your Calendar Type is Custom 13 periods or Custom 12 periods, under Add 53rd week specify which years contain 53 weeks.
Tip: The 53rd week typically occurs every five to six years.
You initially set up the time range of the model in Create New Model, but you can change the time range later in Model Manager using the Extend Time Range function.
You can only use the Extend Time Range function if Time contains any of the following level types: Years, Half Years, Quarters, Months, Weeks, or Days.
The Extend Time Range function cannot be used if the level types are Hours or Other (in this case, you must add the members individually).
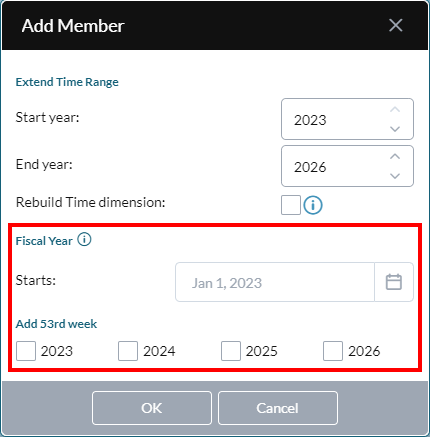
Fiscal Year
Your choices in Fiscal Year depend on your selection of Calendar Type, described above.
-
Starts is the starting date of your Time dimension's earliest year; accept the default or click to specify a different date.
Tip: If your Calendar Type is Custom 13 periods or Custom 12 periods, you have the option of changing the start date later. (This is only necessary if you decide to add earlier year(s) to the Time dimension.)
- If your Calendar Type is Custom 12 periods, specify the Arrangement of the weeks per period.
Include Levels
The choices under Include Levels depend on your selection of Calendar Type, described above.
Specify the levels for your Time dimension. Year is always mandatory, but most of the other defaults can be changed.
You can add levels all the way down to Day.
Tip: To see the structure your selections create, at any time click Preview.
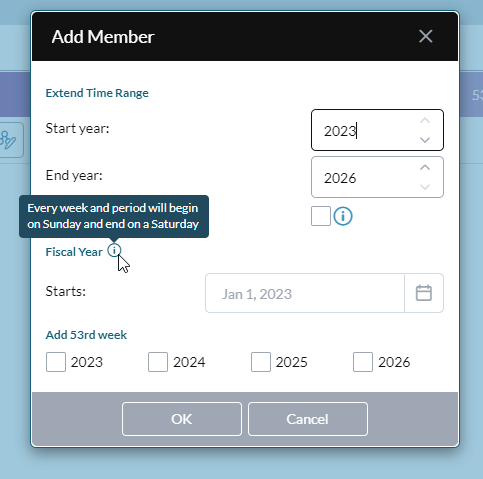
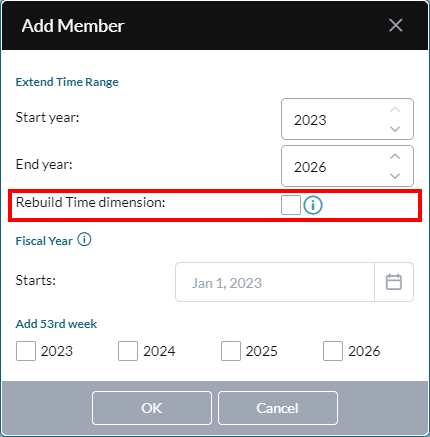
Extend the time range
Use the Extend Time Range function to change the time range for an existing Time dimension.
-
In Model Manager, select Time and click .
The Add Member dialog opens.
Note: If your Calendar Type is Custom 13 periods or Custom 12 periods, the Add 53rd week section appears and any existing years that contain 53 weeks are selected.
- Change the Start year and/or the End year.
-
If you are using a custom calendar and need to change the original structure of your Time dimension, turn on Rebuild Time dimension.
Caution: Rebuilding a Time dimension recreates its structure in all models associated with the Time dimension: all existing customizations in the Time dimension are lost; this may affect associated data views and templates. For more information, see below.
-
Starts is the starting date of your Time dimension's earliest year; accept the default or click to specify a different date.
Note: Starts is disabled by default. To enable it, turn on Rebuild Time dimension.
Tip:If you want to know the weekdays your weeks and periods will start and end on, hover over beside Fiscal Year:

-
Optionally, under Add 53rd week, select the years that you want to contain 53 weeks.
Note: If you change the 53-week setting for any existing year, the Rebuild Time dimension option becomes enabled. For more information see Rebuild a Time dimension.
- Click OK.
Rebuild a Time dimension
The Rebuild Time dimension option is only available to Time dimensions whose fiscal year uses a custom calendar.
If you find that you need to change the structure of a Time dimension, whether owing to evolving business requirements or simply because you need to change the start date and which years contain 53 weeks, use the procedure below.
Note: You only need to rebuild the Time dimension if you change the start and end dates of the existing years. By itself, extending the range by adding years before and/or after the existing years, does not necessitate rebuilding.
Turning on or turning off a 53rd week option for an existing year requires that you rebuild the Time dimension.
Caution: Rebuilding a Time dimension destroys and then recreates its structure, including in all models that use that Time dimension; this process can hugely affect your model. For more information, see the FAQ below.
Best Practice: We recommend only using the Rebuild Time dimension option in the initial stages of model building before major Time dependencies have been introduced to the model.
To rebuild a Time dimension
Note that the following procedure applies only to Time dimensions that use a custom fiscal calendar; if Time uses a standard calendar, rebuilding is not possible.
-
In Model Manager, select Time and click .
The Add Member dialog opens.
- Change Start year and/or End year as needed.
- If you only want to change the Starts date do the following:
- Turn on Rebuild Time dimension (the Starts date becomes enabled).
- Click and specify a new Starts date.
- Go to the last step.
-
If you want to change the 53rd-week settings, do the following:
-
Under Add 53rd week, select one or more of the years listed, as needed.
(Doing this turns on the Rebuild Time dimension option.)
-
Optionally, click to specify a new Starts date.
-
-
Click OK and click Confirm.
Tip: Once enabled, you can't disable the Rebuild Time dimension option; if you don't want to rebuild, click Cancel and start again.
Reserved words
When you are creating member properties for the Time dimension in the Edit Custom Member Properties dialog, certain words are not allowed and a warning message appears.
The reserved words are case insensitive and are as follows:
- FiscalHalfYearNumber
- FiscalMonthNumber
- FiscalMonthAbbreviationWithYear
- FiscalPeriodNumber
- FiscalQuarterNumber
- FiscalWeekNumber
- FiscalYearNumber
- FiscalBiWeeklyNumber
- FiscalHalfMonthNumber
- FiscalHalfYearNumber
- Day
- HalfYear
- Month
- Period
- Quarter
- Week
- Year
- WeekWithYear
- MonthAbbreviation
- MonthWithYear
- PeriodAbbreviation
- PeriodWithYear
FAQ
Why does my fiscal year's Starts date change when I add prior years?
Adding prior years to your Time dimension can cause the fiscal year starting date to shift.
- Your Time dimension's Start year is 2021, and its Starts date is Jan 3, 2021.
- You decide to change Start year to 2020.
- Doing so causes Starts to change to Jan 5, 2020.
- This happens because changing the starting year to 2020 causes the fiscal year start to move forward 52 weeks (364 days) from January 3, 2021.
-
Furthermore, if under Add 53rd week you turn on 2020, Starts changes to Dec 29, 2019.
-
This happens because you have now caused the fiscal year start to move forward 53 weeks (371 days) from January 3, 2021.
-
-
Any prior years you add are subject to the same logic.
Why doesn't the start of the month line up with the month name?
In my custom fiscal calendar, the start of my month doesn't line up with my month name in my 12- or 13-period Time dimension.
This happens because, when you created the dimension, if under Include Levels you enabled Month Name, and then later extended the time range by adding "prior" or "later" years, but without using the Rebuild Time dimension option. Consequently, the months that existed when you created the dimension are the ones used for all added years.
To get the month names to line up with the start and end dates of your month/period, and depending on your business case, the solution may be to enable a 53rd week in some years.
Alternatively, when creating the Time dimension, instead of using Month Name you can use Custom (also located under Include Levels) and name the periods whatever you like, thus avoiding confusion over the month name not matching the actual dates.
Example: Using Custom, you can name your first four-week period, from January 1 to January 28, Period 1. Your next period would start on January 29. Naming it Period 2 instead of February reduces potential confusion.
How can I enable the Fiscal Year Starts option?
In the Add Member dialog, under Fiscal Year, the Starts box is disabled by default.
To enable it, turn on Rebuild Time dimension.
How can I set the weekdays that my weeks and periods start and end on?
If you want to do weekly comparisons and therefore need each week to start and end on specific days, the steps are as follows:
-
To reveal the current setting, hover over beside Fiscal Year:
- If you want to change to a different pair of weekdays, click to specify a different Starts date.
- To verify, hover over again.
What is the effect of rebuilding a Time dimension?
Rebuilding a Time dimension destroys and then recreates its structure, including inside any model that use that Time dimension; the Start and End dates are changed, and this may affect any dependent elements in the model. In other words, the more Time dimension dependencies present in the model, the greater the risk of damage a rebuild causes.
Some of the more common effects of rebuilding a Time dimension include the following:
- In the Time dimension:
- Member property values are erased.
- Custom member properties are lost.
- Alternate hierarchies driven by those member properties are affected.
- In the Account dimension, formulas that reference the Time dimension are affected.
- In the Version dimension:
- Calculated members that reference the Time dimension are affected.
- The Version dimension's own Start and End time members may now reference the wrong days.
- Data views and templates that reference any of the above my be affected.
- Lag and Lead calculation outputs may change, resulting in changes to report values.
- In a Detailed Planning model, any attributes that reference Time dimension members are affected.
I turned on the Rebuild Time dimension option by mistake!
The Rebuild Time dimension option is enabled automatically if you make changes to any options under Add 53rd week.
Once this happens, the following actions do not disable the rebuild option:
-
Clicking on the Rebuild Time dimension option
-
Manually undoing your changes under Add 53rd week
To avoid performing a rebuild, click Cancel. The Add Member dialog closes and you can start again.
How can I tell whether a Time dimension is the old or the new type?
If your dimension uses a custom calendar and you want to know whether it is the old or new version of Time, do the following
- In Model Manager, select Time and click .
- If the Add Member dialog contains the Include previously deleted members option, then Time is of the old type.
- If that option does not appear, Time is of the new type.
Can I convert my pre-2023.2 Time dimension to the new type?
If I have an old Time dimension and want to benefit from the features of the new Time dimension, is there a way that I can "convert" the old one to the new type? Can I use the Rebuild Time dimension option to achieve this?
Unfortunately there is no simple way to convert an old Time dimension to the new type, owing to all the Time-dimension dependencies typically present in a model. (Some examples of these dependencies.)
If you are interested in converting an old-style Time dimension, please contact your account representative.