Workflow Manager
Administrators use Workflow Manager to create and manage workflow projects. Once saved, a workflow project can be run as often as needed.
What you can do
In Workflow Manager, you can do the following:
- Create workflow projects
- Add activities and tasks
- Add notifications, reminders, and deadlines
- Run a workflow project
- Manage workflow projects
- Monitor the status of all activities and tasks in the workflow
- Audit a workflow by generating a report on all the activities, tasks, and participants
Open Workflow Manager
- Open Workflow Manager: Click the logo at the top-left corner and select Workflow Manager.
Open a workflow project
A workflow project is saved in its own file type, which you can open from Workflow Manager or from Document Explorer.
- Select File > Open.
- Open an existing project from Document Explorer: browse to the workflow project file and click it.
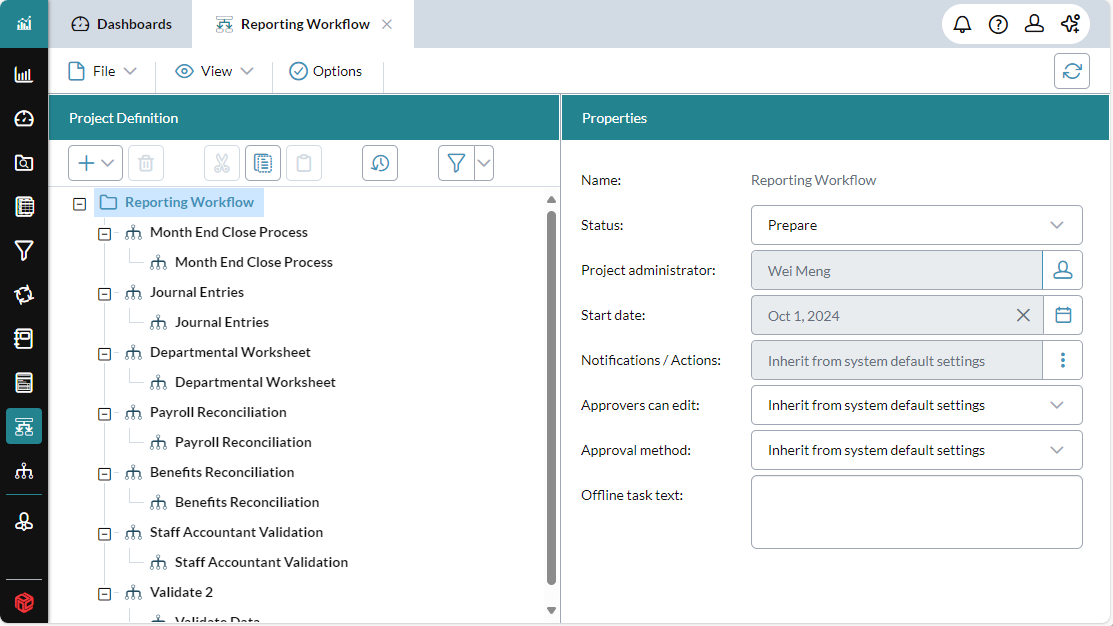
The Workflow Manager tab shows the name of the project.
Use inheritance
Inheritance refers to the way a lower level member in a project takes certain of its properties automatically from the members above it, unless the designer chooses to override those settings.
Tip: Inheritance can save the designer a lot of work.
In a workflow project there are three levels:
- The top level, which is the project itself
- The middle or activity level
- The lowest or task level
The properties that you specify at the project and activity levels automatically apply to the nodes below.
Example: You can define the properties for all the tasks contained in an activity by defining those properties at the activity level. When you add the tasks, they automatically use those predefined properties. If the activity contains four tasks, when you set the Due Date to December 31, 2021, in all four tasks the Due Date property becomes December 31, 2021 (but you can still override it inside each task).
Example: If you want all the tasks in a workflow to send the users a due date reminder two days ahead of the deadline, you would add this setting to the Notifications/Actionsproperty at the project level. But if you only want this to occur for the tasks belonging to a single activty, you would add the setting to that property at the activity level. Finally, if you only need this reminder for a single task, you would add it to the task.
Note: Inheritance is flexible. To continue the example of the due date reminder, if you want to have the two-day reminder apply to all tasks except a couple of exceptions, you would: 1. define the reminder at the project level, causing all activities and their tasks to inherit the reminder; 2. within the exceptions, add a custom setting that overrides the inherited one.
Create a workflow
Best Practice: Before you begin creating a project, you should have already completed an analysis and design for the workflow.
- Open Workflow Manager. A new project appears by default. (To create another at any time, select File > New.)
-
Name the project: select File > Save. Replace New Workflow Project with the name you want. Click OK.
Note: Don't change the Status yet; let it remain on Prepare. You will change it later when you are ready to run the workflow.
- Optional: change the Project administrator. By default, as the person creating the project you are its administrator, but in Properties you can select a different administrator.
-
Optional: If you already know when the project will run, specify a Start date. Otherwise, you can wait until later to set the date.
Note: The remaining properties are inherited by the entire project (but you can also override them at the activity and task levels).
-
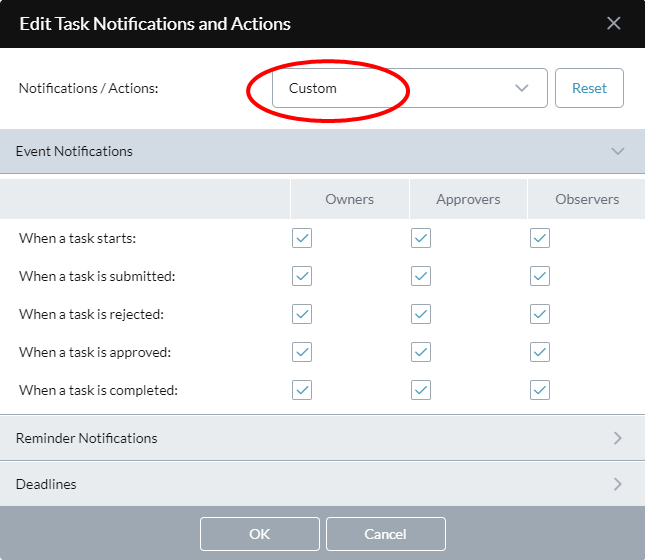
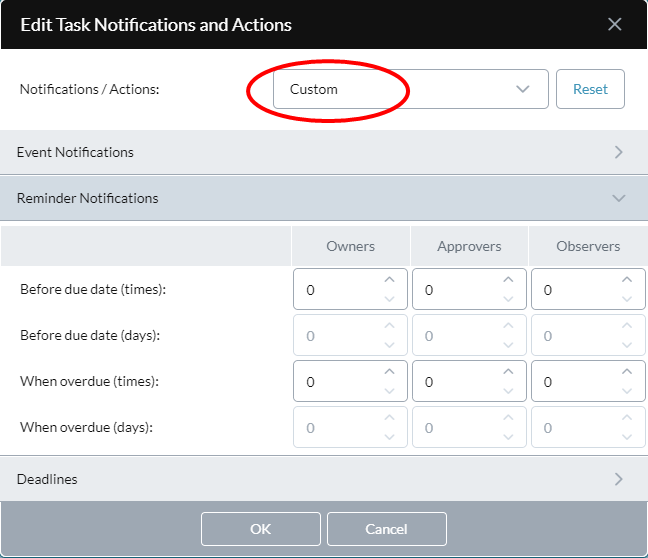
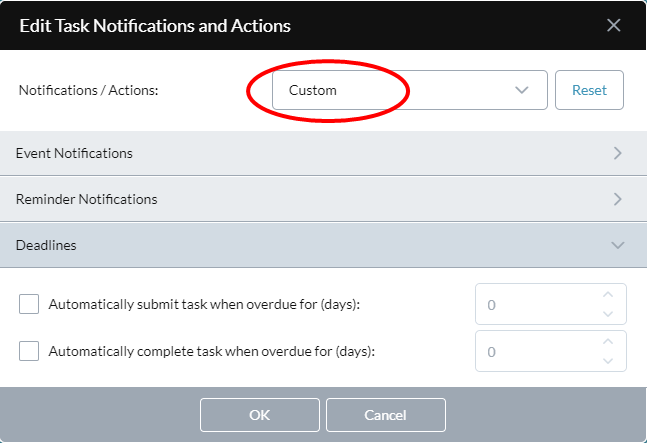
To change the default notification settings and/or enable deadlines, beside Notifications/Actions click , and from the drop-down select Custom.


You can now set the roles that receive messages for specific events and reminders, as well as whether overdue tasks are automatically submitted and/or completed and after how many days.
The default settings for the various properties are as follows:
- Event Notifications: All are selected (that is, all notifications are sent).
- Reminder Notifications: All are set to 0 (that is, no reminders are sent).
- Deadlines: Both are unselected (that is, no auto-submissions or auto-completions occur).
Tip: What are event and reminder notifications? As a workflow task progresses, it sends out email messages to the participants to inform them of the current state of the task. The messages are related to events (for example, the task starting) or can be reminders (either that the due date is approaching or that it has passed). By default, the inherited settings are read-only. For more information as well as examples of how the settings work, see the Workflows FAQ.
- To allow approvers to make changes to a submission, from Approvers Can Edit, select Enabled. (The default setting is Disabled.)
- To require that all approvers approve otherwise the task is rejected, from Approval method, select Multiple Approval. (The default setting is Single Approval.)
- Save your changes.
You are now ready to build the project by adding activities and tasks, as described below.
Add an activity
-
In Project Definition, in the lip click > Add Activity.
Note: The properties that appear in the activity change according to its type. Not all properties described below are present in all activities.
- Name the activity and use Description to define its purpose.
- Optionally, set the various Default properties. These properties become the default values in any tasks that you subsequently add to the activity. If you prefer to define these properties in the tasks, leave them as Not defined. This also applies to a default template, file, binder, process, or schedule.
-
Set the Start condition. Choose one of the following:
- Never: The activity never starts; choose if you want to exclude the activity from the workflow.
- Project Start Date: The activity starts when the project starts.
- Start Date: The activity starts on its own start date, separate from the project.
-
Contingent on Activities: The activity only starts after the prerequisite activities that you specify are complete.
Note:In Flow view, the appearance of the lines reflects the start condition setting:
- Never: The activity has no connecting lines.
- Project Start Date: The activity is connected to the Start node.
- Start Date: The activity is connected to the Start node.
- Contingent on Activities: The activity is connected to the activity it is dependent on.
- Set the date the activity is due: specify a Due date for the activity. (Note that this date can be used in combination with the reminders and deadlines options.)
- Specify custom event and reminder notifications and/or deadline settings: the Notifications/Actions property works in the same way as at the project level (described above). You can simply allow the activity to inherit the project level settings, or click , select Custom, and specify unique settings that apply only to the tasks in this activity.
- Set the approval properties: the Approvers can edit how Approval method properties work in the same way as at the project level (described above). You can allow the activity to inherit these settings, or you can override them.
Add a task
- In Project Definition, in the lip click > Add Task .
- Use the Properties panel to name and define the task, including its type.
- Assign roles to workflow users. The roles available depend on the task type.
- Specify a Due date for the task. (Note that this date can be used in combination with the reminders and deadlines options.)
- Set other unique properties. Other available properties depend on the task's type.
- Specify custom event and reminder notifications and/or deadline settings. The Notifications/Actions property works in the same way as at the project and activity levels (described above). Allow the task to inherit the settings, or click , select Custom, and specify unique settings for this task.
- Set the approval properties. The properties Approvers can edit and Approval method work in the same way as at the project and activity levels (described above). Allow the task to inherit these settings or you can override them.
Add multiple tasks
Tip: The option to add multiple tasks is a time-saver that lets you add a set of tasks to an activity at one time.
Note: The only restrictions are that the tasks must all be of the same type, and be identical except for the Owners and Names.
- In Project Definition, in the lip click > Add Multiple Tasks.
- Provide the default name that will be given to all the tasks (Workflow Manager will add a numeric suffix to each).
- Select the Owners: click and add the users you want. For each owner you add, a task will be created.
- To finish creating the set of tasks, edit any required properties and optionally any that are enabled, and click OK.
- (Optional) Edit the individual tasks: you can select and rename or otherwise edit them.
Run a workflow
- Select the project node.
- In Properties, set the Start date to the current date.
- From Status, select Active.
- Select File > Save.
Manage a workflow
Change the project view
- Select View > List or Flow.
Filter the tasks
- When viewing a large project in the tree view, to quickly find specific tasks, click and select the properties to filter on.
Edit the shared properties of activities or tasks
- To select multiple nodes of the same type (you can even select tasks across activities), in the tree view, Ctrl + click or Shift + click.
- In the Properties panel you can edit the shared values (where the values differ, Not consistent appears).
Move activities or tasks
- Click and drag the node.
Cut/copy/paste activities or tasks
- Select the node(s) and click an option in the lip.
Restart a project, activity, or task
- In the project tree, select the node (project, activity, or task) and click .
Delete a workflow
- In Document Explorer, browse to the workflow project file and delete it.
Use the flow view
Switch from the list view
- Select View > Flow.
Move the view
- Click the background and drag.
Move around quickly in a large flow
- Inside the mini-map click and drag.
Move a node
- Click and drag.
Show the Properties panel
- Click and to show all properties click .
Manage activities
- Use the buttons in the flow view's toolbar to add, delete, zoom, and automatically order activities.
Add/edit tasks
- In the activity's box, click .
- Use the activity dialog to add, edit, or delete tasks.
- To edit the shared properties of the tasks, select the tasks using Ctrl + click.
Connect an activity to Start or to another activity
- Hover over the activity box; two nodes appear at the top and bottom edges.
- Do one of the following:
- To make the activity contingent on another activity or Start, click the top node and drag to the other activity or Start.
To make another activity contingent on the activity, click the bottom node and drag to the other activity.
Note: Connecting from Start to an activity sets the activity's Start Condition to the project's Start Date.
Disconnect an activity
- Select the line and press Delete.
Restart the project or an activity
- Select Start or an activity and click .
Restart a task
- In the activity's box, click .
- In the task click .
Edit the properties that activities have in common
- To select multiple activities, Ctrl + click.
- In the Properties panel you can edit the shared values (where the values differ, Not consistent appears).
Customize notifications
Notifications and workflows
As a workflow progresses, the various events in it automatically generate email messages
How notifications can be customized
Each event type has its own default text, as well as parameters that insert project values (for example, (taskname} for the actual name you gave the task). You can change the text and variables in any of the messages. Your changes then apply to the project globally.
Customize notifications
- Click Options.
- For each notification that you want to change, do the following:
- In Notification Events, select an event.
- In Settings, edit the text in the email's Subject and/or Body, as desired.
- To insert a parameter at the cursor location, select from the drop-down and click .
- To return Subject or Body to the default settings, click .
Monitor a workflow
Update the status of the project and all activities and tasks
- Click . The icons are updated to show the statuses.
Audit a workflow
The Workflow Audit Log is a CSV file that you can open in a text editor or Microsoft Excel. The log provides a list of who did what and when in a workflow, within a time range that you specify.
When dealing with a large, complex workflow with many participants (for example, budgeting) an audit log can enhance member accountability and provide insights into who may benefit from additional resources and/or training.
An audit log also enhances compliance for audit documentation requirements.
Create an audit log report
-
With the workflow project open, select Report > Audit Log.
The Workflow Audit Log: Time Range dialog opens.
-
Specify the Start date and End date.
-
Click OK.
The audit log is downloaded, with the file name Audit Log WorkflowProjectName DDMMYYYY.csv
Contents of an audit log
Every workflow audit log lists the following:
- Audit ID
- Event ID
- Event Name
- User (The user's email address)
- User Name
- Message
- Date
- Activity ID
- Activity Name
- Task ID
- Task Name