Process Manager
Administrators use Process Manager to build, test, and run or schedule automated procedures that accomplish a custom task—typically involving the manipulation of large quantities of data in the model. A single one of these custom procedures is known as a process group.
In Process Manager a process group looks like the following example:
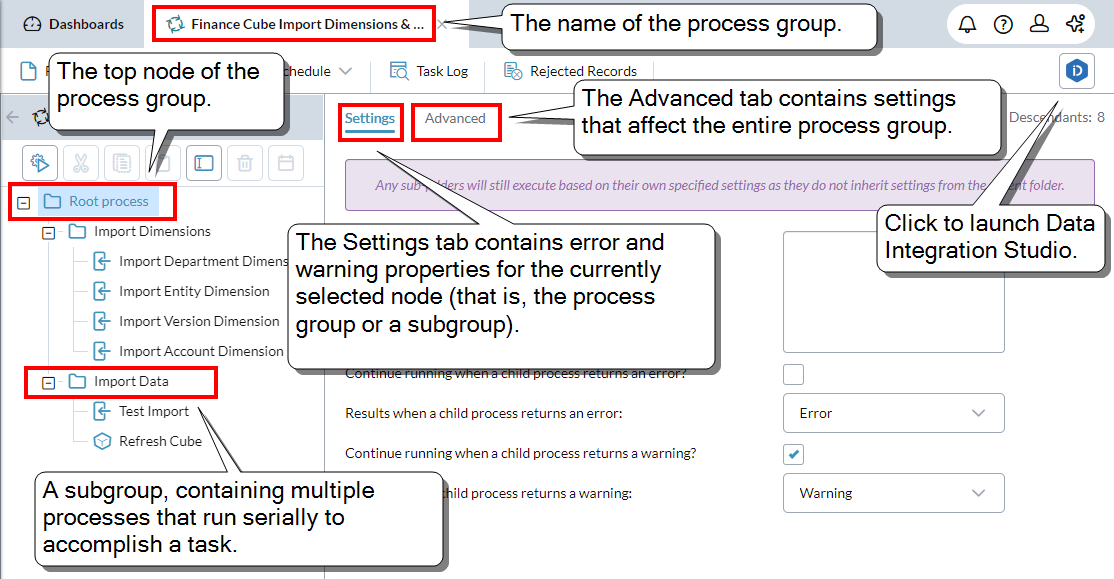
To build a process group, you select from over a dozen process types, add them to the hierarchy inside the group, and then define the desired behavior of each one. Once saved, a process group can be run many times, both manually and through an automated scheduler. To run a process group, you submit it to the Process Manager Service.
The process types can be thought of as falling into the following functional groups:
-
Model Data
For moving or updating data in the model: Import data or dimensions, Export Data, Export Dimension, Remove Data, Update Model, , Web Service
-
Modeling
For transforming data: Template Calculation, InfoFlex, and Currency Conversion
-
Detailed Planning
For moving data and dimensions in a dimensional planning model: Post and Import
-
Sharing
For distributing information to users and others, the Report Binder process
What you can do
In Process Manager you can do the following:
- Create and edit automated processes (also known as process groups).
- Validate that each process functions as intended.
- Define how a group and its subsections treat errors and warnings.
- Run the process group or one of its subsections.
- Schedule the process group or one of its subsections to a run on a regular basis (for example, daily, weekly, monthly).
- Create stored procedures.
- Cancel a pending or running process (Task Log).
- View the results of completed processes (Task Log).
- In case of system problems, restart process services (Task Log).
- Set up data integration to enable data extraction from on-premise ERP systems.
Open Process Manager
- Click the logo at the top-left corner and select Process Manager.
Create a process group
A process group is saved in a Process Group file, which you can open from Process Manager or from Document Explorer.
-
When you open Process Manager, by default an empty process group is created and the browser tab is labeled Process Manager; when a process group is loaded the tab shows the name of the group.
(At any time, to create an empty group select File > New.)
-
Add a folder or process: select from the Insert.
All processes and folders that you add appear beneath the Root process node.
Tip:If your process group has many processes, you can use folders to add structure and to make the group easier to understand. (To add a folder, select the node below which you want to put the folder, then select Insert > Folder.)
Another benefit of using folders is that you can run the processes in a folder on their own, including automatically on a schedule.
- Repeat the previous step for each process that you want to add.
- Define each process. Every process type has its own parameters, that you use to define its behavior.
- Periodically, save the process group: select File > Save or Save As.
- (Optional) Change the settings for errors and warnings.
- (Optional) Define notifications and retry attempts.
- Save the process group.
- (Can be done later) Test the process group and make changes as needed.
- (Optional/can be done later) Define a schedule on which to run the process group (or any of its subgroups) automatically.
Run processes manually
- Select what you want to run:
- to run the entire process group, select the root node
- to run a subgroup, select its folder
- to run an individual process, select its node
- In the lip, click (Run Process).
- (Optional) You can use the Task Log to monitor what is happening: in the menu bar, click Task Log.
Note: Every process is validated for model security based on the privileges of the user who runs it (for a scheduled process, validation is based on the privileges of the user who schedules the process).
Manage a process group
- Move a folder or a process: select it and click cut or copy, and then select another process or folder and click paste. If you paste to a folder, the item appears inside the folder, at the bottom. Alternatively, select and drag the folder or process.
- Rename a folder or process: select it and click . Names can be up to 30 characters.
-
Delete a folder or process: select it and click . A deleted process group file is moved to Document Explorer's Recycle Bin.
Note: If you delete a process, all instances of the process scheduled to run will also be deleted.
Change the settings for errors and warnings
Within a process group, the processes run in sequential order, from top to bottom. An error or warning raised by a single process can affect whether the remaining processes run. You can use the root folder to define how the entire process group handles errors and warnings. You can also use other folders to do the same for subgroups.
Note: In a process group, all folders run based on their own settings; folders never inherit their settings from higher-level folders.
- Select the folder.
- Select the Settings tab.
- By default, an error stops the processes. To have them continue running after a child process raises an error, turn on Continue running when a child process returns an error?.
- From Results when a child process returns an error, select the result you want returned.
- The default results are as follows:
- Success: all processes in the folder ran without incident
- Error: an error was encountered
- Warning: a warning was encountered
- The default results are as follows:
- By default, after a warning the processes continue running. To have them stop running, turn off Continue running when a child process returns a warning?.
- From Results when a child process returns a warning, select the result you want returned. The options are the same as those listed in step 4.
Advanced settings
Define the advanced behaviors of a process group or subgroup
- Select the folder.
- Select the Advanced tab.
- To add an automatic notification, turn on Send notifications after process runs.
- From Frequency set when the notification should be sent:
- Always: will be sent regardless of outcome
- Only if not successful: will be sent if there are warnings
- Only on failure: will only be sent if there is an error
- To set who receives the notifications, in To click to open User Selector where you can add users and groups.
- To automatically retry running a process group when locking fails, turn on Retry process on failed lock request.
- The Number of retries can be up to 10, and you can specify the Time (in seconds) between attempts.
- To automatically test the processes in a process group before they run, turn on Validate all child processes prior to execution?.
Test a process group
Before you put a process group into production, you should verify that its processes function correctly.
Run the process group or the processes belonging to a single folder
Select the folder or process and click . You can see its status in the Task Log.
Set up data integration with an on-premise ERP system
Global Administrators set up data integration elements to connect on-premise ERP systems for importing data. The import happens through the Source Extract process.
Schedule a process
A schedule is an assigned date and time for a process to run automatically. A schedule has a frequency, which can range from once, to daily, weekly, or monthly. A process or folder can have multiple schedules.
Who can edit a schedule
A schedule can only be changed by the user who created it or by a Global Administrator.
Create a schedule
You can schedule an entire process group, a subgroup, or a single process, to run automatically.
- Select the folder or process.
- Select Schedule > Add.
- Type a name and optionally a description.
- From Perform task, select the frequency.
-
Under Schedule Options, specify the details of your chosen frequency.
Tip: To schedule a process to run daily but not every day of the week (for example, Monday to Friday only) select Weekly and then select the specific days.
-
Click OK.
See and edit all schedules for a process
An orange circle appears on the icon of a folder or process that has a schedule(s).
- To list the schedules, in the lip click .
- To open the schedule, select it.
Note: You can't delete a schedule here, but only in the All Schedules dialog (see below).
See and manage all schedules
Admins can review, edit, and delete schedules.
- Select Schedule > View all.
Tip: To discard changes, including deletions, click Cancel.
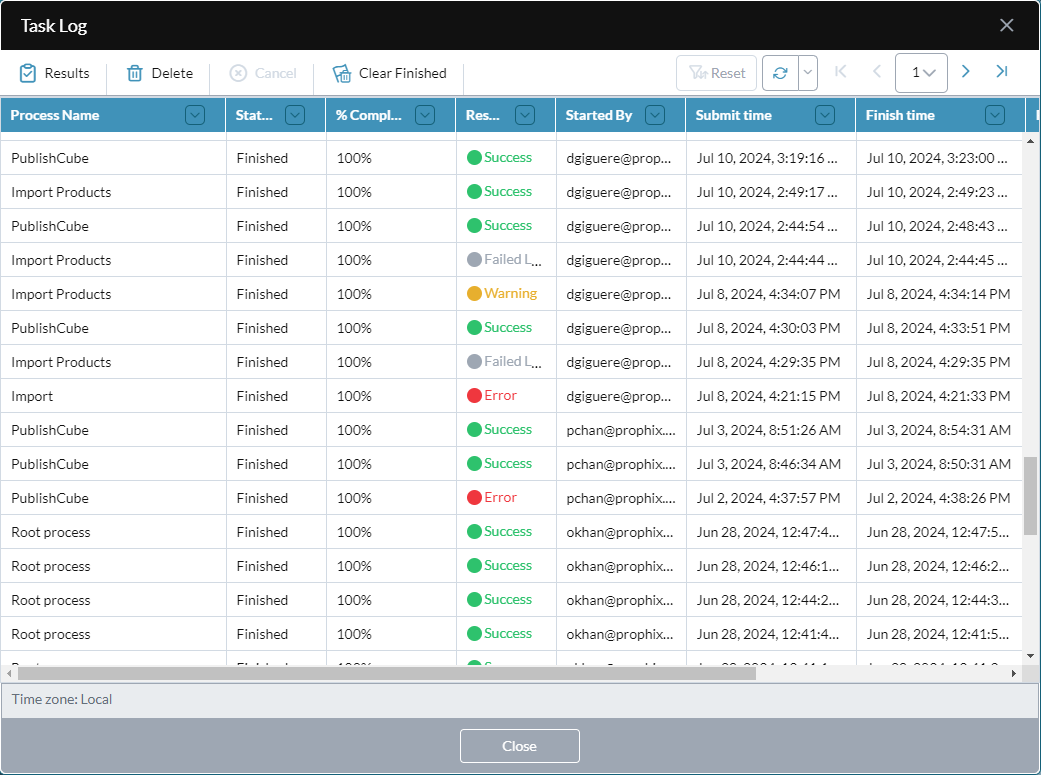
Task Log
The Task Log shows the status of all running or completed processes. The log lists 100 processes per page, starting with the most recent.
Open the Task Log
- Click Task Log.
Note: If the Process Manager service is not running, tasks appear as Pending. Check with your admin to ensure the service is running properly.
Sort the log and set filters
If you need to work with a log that contains many processes, you can do the following:
- To sort on any column, click and select a sort option.
- To filter a column, click , select Unique column, and turn on one or more filter values; some filters to keep in mind:
- Process Name: show only the selected process types
- Status: show only Finished processes
- Result: show only processes with the selected result statuses
- Started By: show only processes started by the selected users
- Process File: show only processes belonging to the select process file
- Request Type: show only processes with the selected request type
Tip: All filtered column's show: .
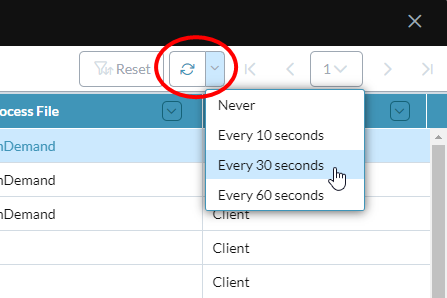
Turn on automatic refresh
-
To have the log refresh automatically, click and select a refresh frequency other than Never:
Cancel a Running or Pending process
- Select the task and click Cancel.
See rejected records
- After an Import process runs, you can see what records were rejected and the reasons for the rejections.
See the detailed results of a Finished or Canceled process
-
Select the task and click Results. The Execution Results dialog opens.
The Result Details panel provides information for the Result—for example, the number of records processed, the reason for the warning or error, and so on.
Clean up the log
- You can remove any process whose status is Finished.
- To remove all the finished processes, click Clear Finished.
Restart process services
If a process gets "stuck" or seems to run too long, a Global Administrator can use the Restart Services option, which stops and restarts the underlying services that your automated processes depend on; using this option cancels the currently running process.
- To restart process services, click Restart Services.
Note: Any Pending processes in the queue are unaffected by a restart. After the services have finished restarting, Pending processes will resume.
Tip: To see when services were stopped and when they restarted, open the Error Log.