Use DP schedules
Detailed planning schedules are used to add, edit, or delete detailed planning resources. In appearance schedules are similar to templates but are more structured: the rows always represent the Detailed Planning Object (DPO); for example, employees. Provided you have the necessary permissions, you can open a schedule from Document Explorer or from within a workflow task.
Administrators create schedules in Detailed Planning Manager.
Open a schedule
You can open a schedule in the following ways:
- In Document Explorer, locate and click the schedule file.
- In My Tasks, click a workflow task that uses the schedule.
Note: Detailed Planning schedules are unavailable when the Detailed Planning
Edit a schedule
If your user account has the appropriate permissions for the schedule, you are able to make changes to the data.
Save your work at any time
- Click Save.
Change the member selection in a cell
-
Click .
Selector opens.
Add a DPO
-
Click in the last row (its header contains an asterisk (*)) and type or paste data.
(If the schedule is missing any of the DPO's required fields, a dialog opens.)
- Add the required data.
- Click OK.
Edit the attributes of a DPO
Select the row, then select Edit > Edit Detailed Planning Object Member.
Delete one or more DPOs
- Select each row.
- Select Edit > Delete Row(s).
Paste clipboard data
- Copy data from Excel or another application.
- Select the target cell or contiguous cells.
- Press Ctrl + V.
How pasting works
- If you select the entire row, the data is pasted starting with the ID column; however, pasting also starts from whatever column you select.
- Columns that do not receive data automatically fill with their default value.
- Columns that didn't receive valid data are outlined in red and contain an asterisk.
-
If the clipboard contains multiple rows, all are pasted.
Tip: If you need to add many rows, consider using the DP Import process.
Use calculations
Fill input calculation columns
- Select the cell(s).
- Select Edit > Fill Down or Fill Right.
Fill attribute and calculation parameter columns
- Select the cell.
- Select Edit > Fill Down.
Expand or collapse calculation columns
- In the column header, click to expand the time period columns that make up the calculated column.
-
Click to collapse the columns.
Note: Collapsed columns are excluded from calculations.
- Alternatively, select Actions > Expand or Collapse to achieve the same result.
Run calculations
Calculations are run for DPOs that are new, that have been edited, or where either the row or a cell is selected.
- Select Actions > Calculate.
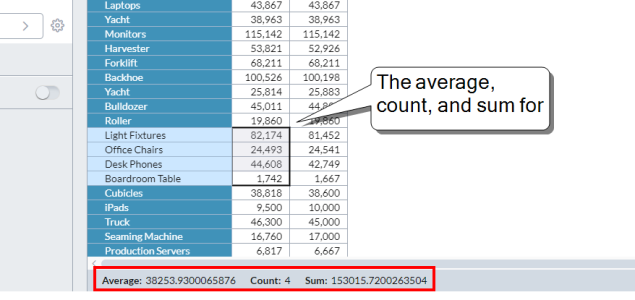
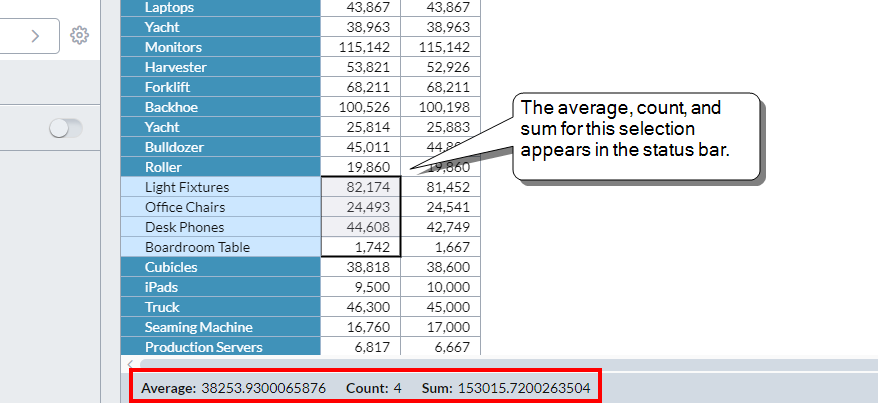
Get dynamic calculations
-
Select a range of numeric cells in one or more columns; the status bar shows the average, count, and sum for the selection:
 Note:
Note:- Sum and Count ignore any collapsed columns in the selection.
- Sum and Average are no longer rounded (previously they were rounded to three decimal places).
Update the financial model
If a financial model is attached to the detailed plan model, you can update the financial model with any changes made to the schedule.
- Select Actions > Update.
Open reviewing template(s)
- If the schedule has an attached template, you can select Actions > Template template name.
Manage columns
Hide one or more columns
- Select one or more column headers.
- select Actions > Hide.
Show a hidden column
- Select headers of the adjacent columns.
- Select Actions > Unhide.
Show all hidden columns
- Select Actions > Unhide All.
Sort the schedule on a column
- In the column header, click > Sort.
- Select Ascending or Descending.
-
Click Apply.
Note: You can only sort on one column at a time.
Filter data
Filter the schedule on a column using values from the column
- In the column header, click > Filter, select Unique Column Filter.
- Select one or more values from the list.
-
Click Apply.
Note: The list of values derives from the contents of the column; if there are more than 75 unique values available, this filter option is disabled.
Filter the schedule on a column using text you type
- In the column header, click > Filter, and select Text Filter.
- Type up to 50 characters.
- Click Apply.
Filter the schedule on a numeric column using a condition
- In the column header, click > Filter, and select Text Filter.
- Click and select an operator (=, >, or <).
- Type the value.
- Click Apply.
Filter the schedule on multiple columns
- You can filter on more than one column, and the effect is cumulative.
Turn off all sort and filter settings
- In the toolbar, click Reset.
Save as PDF or Excel
Optionally, you can save the schedule as a PDF or Excel file.
-
Select File > Download Excel or PDF.
Note: When downloading to Excel, filtered rows and unexpanded calculation columns are excluded.