Page hierarchy groups
A page hierarchy group is a set of dimensions that is shared by the data views in a template and that has at least one common member.
Example: If the Organization dimension appears in data view A and in data view B, and both data views share at least one member from that dimension, then a page hierarchy group can be created.
Create a PH Group
Automatically create page hierarchy groups
- Open the Page Hierarchy Groups drawer.
- Click > Auto Generate.
FP&A Plus creates groups and adds them to the Page Hierarchy Groups drawer, based on whether page dimensions have the same dimension type and share the same dimension hierarchy, even if the dimensions are in different cubes.
Example: Two dimensions are named Organization and Region, but are both of type Geography.
Manually create a page hierarchy group
- Open the Page Hierarchy Groups drawer.
-
Click > New.
The Edit Page Hierarchy Groups dialog opens.
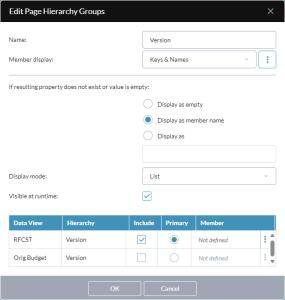
- (Optional) In Name, replace the dimension name with a custom name for the group (up to 40 characters).
- From Member display, select the format for how group members are displayed in drop-down lists for end users.
- To define a custom display format, including whether it is sourced from the parent level, click .
-
Select an option to use in case the member property you chose in the previous step does not exist or its value is empty:
-
Display as empty: Show a blank space.
-
Display as member name: Show the member name instead of a blank space.
-
Display as: Type the text you want shown (maximum 20 characters).
-
- From Display mode, choose whether you want the members shown as a simple List or as a Hierarchy.
- To hide the dimension when the template runs, turn off Visible at runtime.
- For each dimension that you want in the group (you must choose at least two), select Include.
- For the dimension that you want to base the member selection on, select Primary.
- To change the member selection for a dimension, click .
- Click OK. The new group appears in the Page Hierarchy Group drawer.
Note: In the data view drawers, the names of the grouped dimensions now appear in gray, to indicate that they are managed in the Page Hierarchy Groups drawer.
Edit a page hierarchy group
- Open the Page Hierarchy Groups drawer.
- Select the dimension.
- Click .
Delete a page hierarchy group
- Open the Page Hierarchy Groups drawer.
- Select the group.
- Click .
FAQ
Why use a page hierarchy group?
A page hierarchy group simplifies navigating in reports and can reduce the number of generated page combinations.
Where do I create and manage page hierarchy groups?
When a template contains two or more data views, the Page Hierarchy Groups drawer appears at the top of the left-side panel in Template Studio.
How is a page hierarchy group made?
To better understand how page hierarchy groups function, consider a template that contains three data views, all sharing the Organization dimension, as follows:
| Data View | Organization dimension member selection |
|---|---|
| A | Organization.All Members in Hierarchy |
| B | Organization.USA.Children |
| C |
|
In this template, if you use the Auto Generate option, FP&A Plus creates a page hierarchy group containing the following members:
- Chicago
- Los Angeles
- New York
Auto-generate chooses these members because they are common to all three data views.
If you wanted to customize the group by adding Toronto, you could do so by opening the Page Hierarchy Group drawer, selecting the group, and choosing the edit option.
Alternatively, you could create the same custom group from scratch, in the Page Hierarchy Groups drawer, by clicking > New.