Importing
After creating a model and defining its dimensions, you typically need to import dimension structures and data from an external source, such as a database or a spreadsheet. After creating a detailed planning model, you need to import the detailed planning object (DPO) data, and usually the supporting data needed for Input Calculations. You accomplish these goals using automated processes created in Process Manager.
The types of import and the process types used are listed in the following table:
| To import ... | Use this process ... |
|---|---|
| A dimension structure into a financial model | Import (for dimensions) |
| Data into a dimension in a financial model | Import (for data) |
| Data to populate the DPO in a detailed planning model | DP Import (for DPO data) |
| Data required for Input Calculations in a detailed planning model | DP Import (for Input Calculation data) |
| A mapping table | Import Mapping Table |
The Mapping Table Editor
A mapping table is used to match external data fields to internal ones, so that external keys can be mapped to internal keys.
Mapping tables are needed when external keys used to identify accounts or dimension members are not the same as those used in your model.
Example: A remote location in your organization may have a separate accounting system with its own chart of accounts.
Mapping tables are an option when creating processes for importing data, a dimension structure , detailed planning data, or detailed planning Input Calculation data.
You create mapping tables using the Mapping Table Editor:
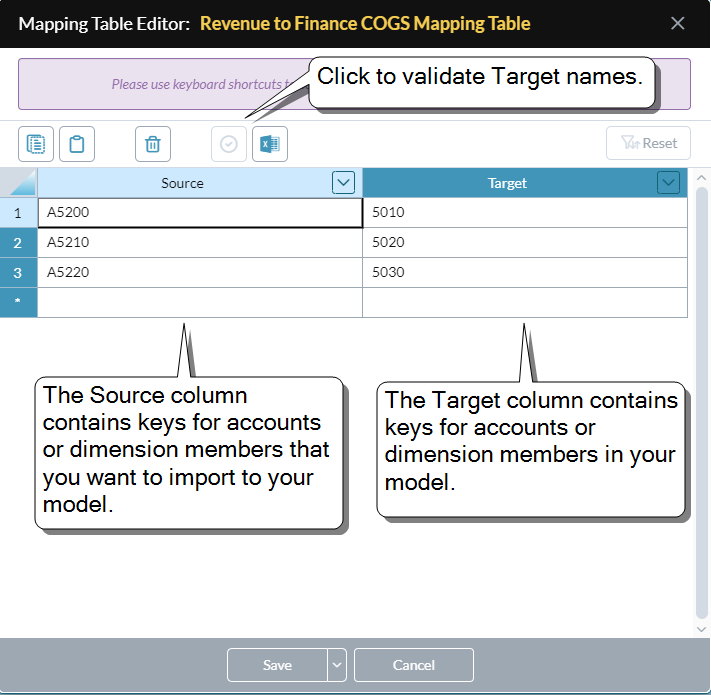
The editor consists of two columns: Source and Target. The Source column contains the corresponding representation in the external data source. The Target column contains keys for accounts or dimension members in FP&A Plus.
What you can do in the Mapping Table Editor
Any of the following:
- Map keys from an external data source to those used in your model, prior to importing the data or dimensions
- Validate the internal keys that you enter to the mapping table
- Use wild-card characters to make mapping easier
- Sort and filter the table cells
- Save the mapping table to its own file type for re-use
- Open an existing mapping table file for editing
- Export a mapping table to Excel
- View a mapping table imported from Excel
Open the Mapping Table Editor
- In Document Explorer, click the mapping table file that you want to work with.
- In Process Manager, add or select an import process.
- When you reach the Target Mapping tab, in the Transformation column you have the option of opening an existing mapping table or creating a new one; selecting either option opens the Mapping Table Editor.
Map fields for import
Note: Only map keys where the source and target keys for a dimension member differ; keys that already match don't need mapping.
- Open the Mapping Table Editor.
- For each key that needs to be mapped:
In the Source column, type the key of the corresponding member in the external source.
Tip: You can also copy and paste data from external sources to a selection of table cells.
- In the Target column, type the key of the member from the model.
- To test that the keys in the Target column are correct, click .
- Save the table. (This creates a Mapping Table file.)
Tip: Alternatively, you can import a mapping table from an Excel worksheet.
Use wild-card characters in mapping tables
Mapping tables use the wild-card characters ?, *, and # to enable sophisticated mapping between source and target account codes and dimension members. Multiple source accounts (or dimension keys) can be mapped to a single target account, and the data automatically aggregated as it is imported. Multiple source codes can be mapped to multiple target codes with just one line in the mapping table.
A single model can contain multiple mapping tables; for example, one can be used for accounts while another is used for cost centers.
Tip: The ? wild-card character always stands for a single character; the * character stands for one-or-more characters; # stands for a single digit.
Note: Mapping tables that contain wild-card characters are not supported when applied to a drill across definition file.
Example: Wild-card characters used in mapping table
In the following example, source data values that begin with “1” will be aggregated into a single FP&A Plus account (1000). All four-digit source values that begin with “2” and end with “00” will be aggregated into 5100. Finally, all external accounts beginning with “60” will be changed to “50” accounts.
| Source Value | Source | Target Value |
|---|---|---|
| 1001 | 1* | 1000 |
| 1021 | 1* | 1000 |
| 1109 | 1* | 1000 |
| 2200 | 2?00 | 5100 |
| 6002 | 60* | 5002 |
| 6099 | 60* | 5002 |
| 19, 29, 39, ... 99 | #9 | 100 |
| 4564 | 4##4 | 3000 |
Export to Excel
- Open an existing mapping table file in the Mapping Table Editor.
-
Click .
The mapping table is downloaded to a new Excel spreadsheet.
Tip: You can also export a mapping table file directly from Document Explorer.
Import from Excel
You can't import a mapping table directly from Excel to the Mapping Table Editor. Instead, you can use the Mapping Table Import process to import a table to an existing mapping table file.
Best Practice: In the Excel worksheet, you should format every data cell as Text. (Otherwise any numbers in the data will fail to import correctly.)
After the import is complete, from Document Explorer you can select the mapping table file and open it in the Mapping Table Editor.