Define calculations
Calculations are an integral part of any detailed planning model. You create and manage calculations in the Detailed Planning Manager.
1. Define a calculation
- Select Administration > Calculations.
- In the lip panel click .
-
Type a Name (up to 250 characters) or select an existing name.
Note: You can give the same name to more than one calculation in a scenario; name sharing allows the same calculation to be applied to different subsets of the DPO with different parameters.
- Select a Calculation type.
- The next two options enable posting the calculation result to accounts; click to open Member Selector and choose the account.
- DP cube target account: a target account in the detailed planning cube
- Linked cube target account: a target account in a financial cube (only available if your model is connected to one)
-
From Scenario, select the scenario that uses the calculation. The default is All scenarios, but you can restrict the calculation to the Default Scenario, or to some other single scenario.
Tip: To apply the calculation to more than one scenario, duplicate the calculation and in the copy select another scenario.
- Select a Reporting category for the calculation. The category determines where the calculation appears in the Summary tab.
- Use Format to set how the result appears in the Summary tab and elsewhere.
- Turn on Discretionary if you want the calculation to be applied as needed, rather than to all DPOs. (Enabling this property enables the Applies To tab, described below.)
- Turn on Inactive if you want this calculation to be ignored by other calculations and the posting process.
- Comments accepts up to 4,000 characters.
2. Complete the Timing section
The settings in Timing determine the time period over which the calculation runs.
- Click Define Timing.
- By default Start period and End period are set to the start and end of the scenario; to change them to members in the Time dimension of the Detailed Planning cube, click .
- Each of the next options, if enabled, has the following effect:
Apply to acquisitions after waiting for # of Periods
Delays applying the calculation to new DPOs for the number of periods specified.
Example: In personnel planning it is a common practice to delay benefits coverage for a probationary period.
Apply only to acquisitions for # of Periods*
Restricts the calculation to new DPOs only, and only for the duration specified.
Apply only to terminations for # of Periods*
Restricts the calculation only to departing DPOs, and only for the duration specified.
*You can only select one of these; never both.
-
For all three preceding settings, turning on Adjustable means that the end user can override the setting for a given DPO.
Example: If an employee has negotiated an immediate start for her benefits, the user would be able to disallow the acquisition wait period.
3. Define the details
-
Select the Calculation Details tab.
The parameters that appear in this tab were set earlier when you chose the calculation type.
- Complete the details as required by the calculation type.
4. Define conditions
Optionally, you can set rules for when the calculation runs and what DPOs it applies to.
- Select the Conditions tab.
- Click .
- Select an Attribute.
- Select a logical Operator. (The available operators depend on the data type of the Attribute.)
- Select a Value. (If the Attribute uses a dimension, you can open Selector.)
- To add another condition, repeat the above steps.
- Click OK.
5. Define DPOs for a discretionary calculation
If you enabled the Discretionary option above, you can specify the DPOs the calculation affects.
Note: You can also assign discretionary calculations directly to a DPO in its Discretionary tab.
-
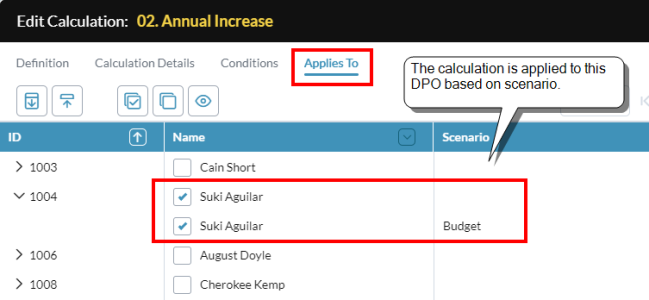
Select the Applies To tab. The tab lists all the DPOs in the model.
Note:If the calculation applies to more than one scenario and in the Definition tab you set Scenario to All scenarios, the Scenario column appears and you can assign based on scenario.
-
Select/deselect DPOs.
Tip: To more easily manage a large set of DPOs, you can use the column filters and/or the Conditions tab to narrow the selection, and then click or to select/deselect all the DPOs in the set.

6. Finish
-
Click OK.
The calculation details appear in the Calculations panel.
Manage calculations
Duplicate an existing calculation
- Select a calculation (it cannot be a discretionary calculation).
-
In the lip panel click .
Note: To re-use the copy, you must either change the name or the coverage, in accordance with calculation name sharing.
Delete a calculation or calculation group
- Select the calculation or group.
-
In the lip panel click .
Note: Deletion is not allowed if the calculation or group is used by another calculation or group, an allocation, or a schedule. In this case a message appears identifying the references.
Customize the columns that appear in the panel
- Click .
- Select the columns that you want to appear in the panel.