Work with journals
After an administrator has set up journals for a model, users with Journals Manager Contributor permission can open Journal Manager to add and manage journal entries.
Open Journals Manager
- Click the logo at the top-left corner and select Journals Manager.
View journal entries
-
Select the model. By default Journal Entries is selected and the first 1,000 entries appear in the grid:
The top lip shows the dimension members, if any, that an administrator has defined as the defaults for new journal entries in this model.

Add a journal entry
-
Select the model.
- Click . The Add Journal Entry dialog opens.
- Type a Name for the journal entry (up to 250 characters).
- Optionally, add any of the following:
- a Description (up to 1,000 characters)
- a Category (user-defined and up to 40 characters)
- a Sub-category (user-defined and up to 40 characters)
Tip: Use Category and Sub-category to group similar journal entries. Later you can also filter on these fields (see below).
-
If you want to indicate that the entry repeats over multiple periods, select Recurring.
-
You can attach a text, Excel, or PDF file, up to 23 MB.
- Select the Journal Details tab.
-
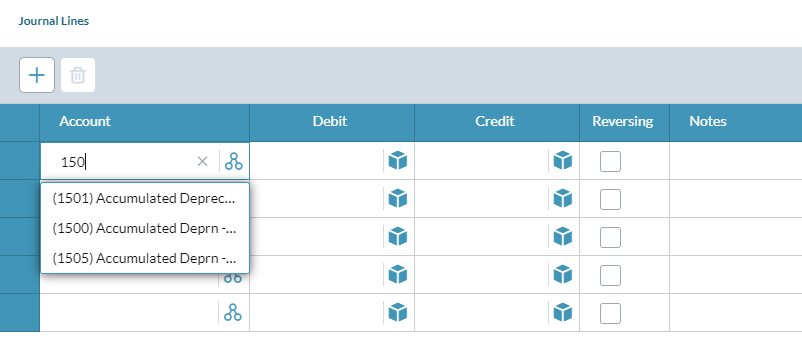
In Journal Lines, the first lines already exist; to add more, click .
Tip: To make auditing easier, it is better to create lots of journal entries, rather than a few entries with many lines.
- To complete a line:
- Add and complete all the lines for the journal entry. (A journal entry can have up to 40 lines.)
-
When all the lines are complete, click OK.
The journal entry appears in the list of journal entries, with the Status of New.
Save New journal entries
- Click Save.
Delete an unsaved journal entry
- Select one or more journal entries with the Status of New.
- Click .
Delete a saved journal entry
You can't remove an entry that is Saved or Unposted but you can change its Status to Deleted.
Note: The following action cannot be undone.
- Select one or more entries.
- Click and click Yes.
Restore Deleted journal entries
- Select one or more entries whose Status is Deleted.
-
Click .
The Status changes to Edited.
Edit or view a journal entry
You can edit a journal entry if the Status is Saved or Unposted; if it is Posted or Deleted, the entry is view only.
- Select the row and click .
Tip: If a line's Debit or Credit contains Sourced from model, to see the actual value click .
Values that are Sourced from model are rounded to decimal places.
Download an attachment
You download an attachment from a journal entry as follows:
- If a file name appears in Attachment, click .
Duplicate a journal entry
You can create duplicates of Saved, Posted, or Unposted entries. The duplicate(s) will have the Status of Saved.
- Select one or more entries.
- Click .
- Select a Time member.
- Click Duplicate.
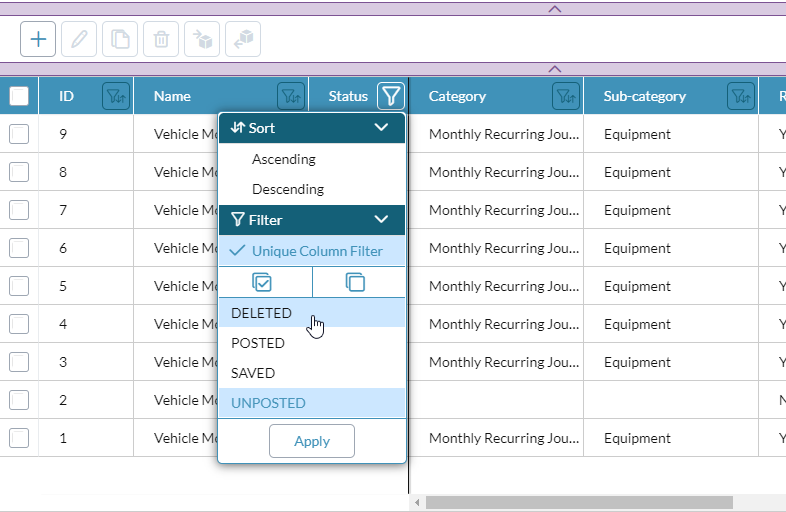
Show Deleted journal entries
By default journal entries with the Status of Deleted do not appear in the journal entries list. However, you can use the filter to show them.
- In the Status column header, click .
- Select Unique Column Filter.
- Select DELETED.
- Click Apply.
Post journal entries
You post journal entries to the model as follows:
- Select one or more entries (Status must be Saved and/or Unposted).
-
Click .
If any entries fail to post, a dialog opens listing those entries and what went wrong with each.
To save this information:
- Click Copy.
- Open a blank spreadsheet.
- Paste from the clipboard.
Unpost journal entries from the model
- Select one or more entries (Status must be Posted).
- Click .
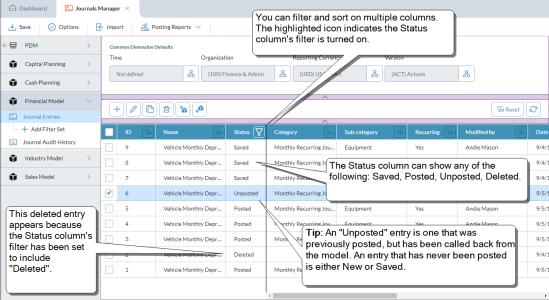
Sort and filter
You can sort and filter on multiple columns.
- In the column heading click :
What is the difference between a Text Filter and a Unique Column Filter?
With Text Filter, you type in a value for the filter. With Unique Column Filter, you are presented with values already populating the column, and you select the values you want to filter on. Some columns have both options, whereas others only have one or the other.
Tip: To filter for 'Unknown Members' in any common dimension column on the journal entries grid, type unknown or unknown member.
Turn off filters and sorting
In the lip, click Reset.
Note: Resetting filters does not affect the Status column filter. You must turn off this filter directly.
Add a filter set
- Create a filter/sort.
- Click Add Filter Set.
- Type a name (up to 150 characters).
What is a filter set?
A filter set is a saved filter/sort setting and is a handy way to switch among filter setups that you use frequently.
All your filter sets appear in the side drawer, in a tree beneath Journal Entries:
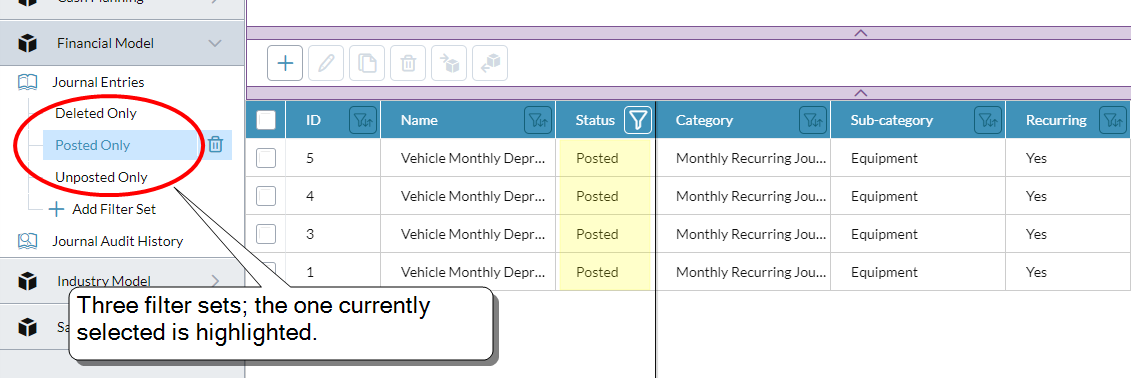
A filter set stays in effect until you change any of the filter or sort settings, select another set, or click Reset.
Suggested filter sets:
- Filter by posting month(s)
- Filter by reporting entity (for example, US parent, Canadian parent, Global parent)
- Filter by accounting adjustment type (for example, IFRS, US GAAP, and so on)
- Filter by recurring status (Recurring = Yes)
Quick recurring entries
You can create recurring entries quickly as follows:
- Select your recurring entries filter set (Recurring = Yes).
- Select the entries.
- Click , select the month, and click Duplicate.
- Modify and post the new entries.
Import journal entries
Optionally, you can import journal entries from a file in Excel format (.xlsx).
- Select Import.
-
Follow the online instructions, including the requirements.
Note: If the administrator has turned on the Enforce balanced journal entries option, all imported journal entries must be balanced, or an error will be generated, as described below.
Handling a failed import
If any of the entries fail to import, all the entries are rejected.
A dialog opens listing those entries and what went wrong with each:
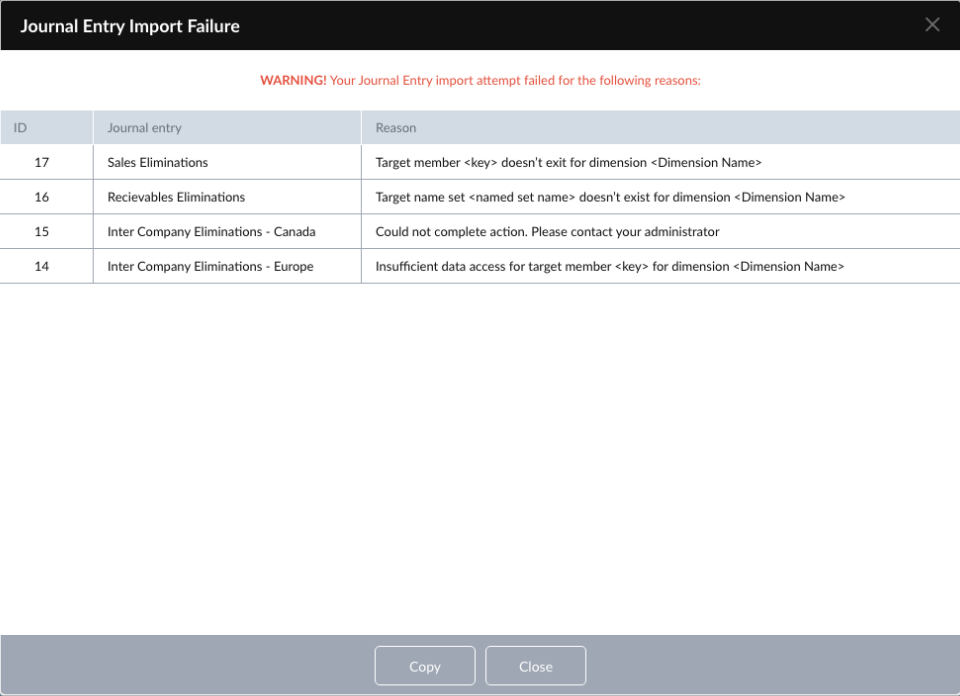
To save this information:
- Click Copy.
- Open a blank spreadsheet.
- Paste from the clipboard.
- Correct the problem entries and run import again.
Audit history reports
View a list of posted journal entries
Click Journal Audit History.
See the details of a posting in the audit history
Select a row and select View Details.
Create and download Excel spreadsheets of posting audit reports
- Select Posting Reports and one of the audit report options.
- Specify the Time members for the Start and End periods.
- Click Download.
What posting reports are available?
The posting reports are as follows:
- Posting Audit Report: Shows all posted and unposted journal entries and the user responsible.
- Posting Summary Report: Shows all posted journal entries, but only the most recent versions that currently affect the model data.
What is the difference between the Audit and Summary posting reports?
As an example, if a journal entry was posted, then unposted, and finally posted again, the reports would treat it as follows:
- Posting Audit Report: Would show all three actions.
- Posting Summary Report: Would show only the last action.