Analyzer
Note: This is an Opt-In feature.
Analyzer is an add-in for Microsoft Excel and replaces the Microsoft 365 Add-In Excel add-in.
Analyzer is an on-demand data tool for advanced FP&A users who want to pull their FP&A data into Excel to use in advanced models and reports, and then push the results back into FP&A .
Analyzer allows advanced users to do the following:
- Change data view structures from within Excel
- Analyzer provides an Edit Layout tool identical to Edit Layout in FP&A .
- After inserting a data view you can change the member selection, structure, and page members from within the Excel sheet.
- Delete data views from within Excel
- Analyzer allows you to delete a data view while keeping the sheet and all its other content.
- Switch among display formats for page members
- Analyzer allows you to modify the member display format on every axis of a data view inside an Excel sheet.
- You can change the display format to Names, Keys, or Names & Keys.
- Read cube data using Prophix Functions
- Analyzer adds Prophix Functions to Excel that allow you to read data values and cell comments for defined member combinations.
- By providing the cube and member key to a Prophix Function, you can read member names.
- Update cube values from within Excel using the Writeback feature
- The Writeback feature works in conjunction with Prophix Functions.
For more background, see Analyzer FAQ, below.
Requirements
Analyzer supports Microsoft 365 using Monthly or Semi-Annual Enterprise Channels.
Note: Microsoft Office 2019 and Office 2016 perpetual licensed editions are not supported.
Analyzer does not support the following:
- Microsoft 365 Excel Online
- Microsoft 365 before version 16.0.11629
- Microsoft Office Insider/Pre-Production Semi Annual (Targeted) Channel
- Office for Mac
Note: Microsoft Office 365 versions that use the Internet Explorer browser are not supported. Analyzer requires using Microsoft Edge with Webview2.
Deploy Analyzer
To install Analyzer :
- To obtain ProphixAnalyzerV2.xml, please contact Prophix Support.
-
Open ProphixAnalyzerV2.xml in an editor.
-
Replace each CLOUD-INSTANCE-URL placeholder with the fully qualified domain name of your instance of FP&A, being sure to prefix the URL with https://.
- If your FP&A sign-in process requires using external URLs (for example, to access an identity provider for SSO or for multi-factor authentication through a service such as DUO) you need to add these domains to ProphixAnalyzerV2.xml to whitelist them. You do this in two parts:
- Get the URLs for the whitelist:
- In a web browser, in Incognito or private browsing mode, open your FP&A instance.
- During the sign-in process, record all the URLs that you access that are different than your FP&A instance URL.
- In ProphixAnalyzerV2.xml, for each URL, do the following:
- Go to the <AppDomains> section.
Within the section add the following line:
<AppDomain>https://<ExternalURL></AppDomain>Where <ExternalURL> is a URL for the whitelist. (You only need to insert the domain name.)
- Get the URLs for the whitelist:
- Save the XML file.
- To deploy Analyzer, choose one method:
Microsoft 365 Centralized Deployment
Centralized deployment requires users have Exchange Online and active Exchange Online mailboxes. Specifically, to use the Centralized Deployment feature the following requirements are necessary:
- Your directory must be federated to Azure Active Directory
- Your users must sign in to Microsoft 365 using their Organizational ID
- Your user's Exchange mailbox must be OAuth enabled
To perform a Microsoft 365 centralized deployment:
- Sign in to Microsoft 365 as an administrator.
- At the upper-left from the app launcher icon select Admin.
- In the navigation menu, select Settings > Services & add-ins.
-
Select Upload Add-in at the top of the page.
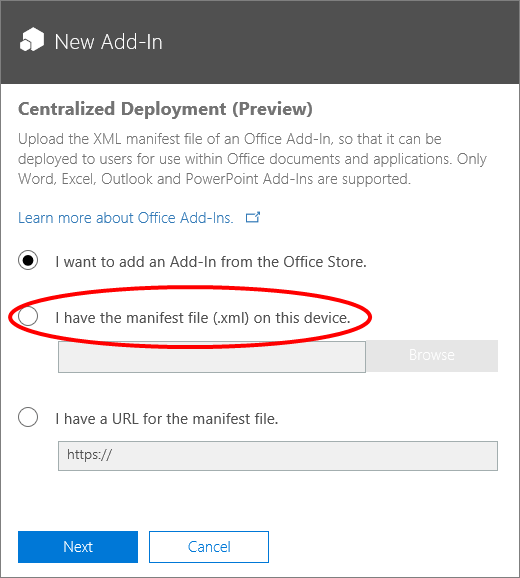
- On the Centralized Deployment page, select I have the manifest file (.xml) on this device.
- Upload the manifest file.
-
Click Next.
On the Centralized Deployment page, the add-in's Status shows as On.
- Click Next.
- In the Who has access? section, click Edit.
- On the Edit who has access page, select either Everyone or Specific Users/Groups, as appropriate.
- Click Save.
Set up a network share for Analyzer
Note: Use this method of deployment if you do not have Microsoft 365 or are not able to use Centralized Deployment.
The following steps should be completed by someone with the appropriate permissions to create shares:
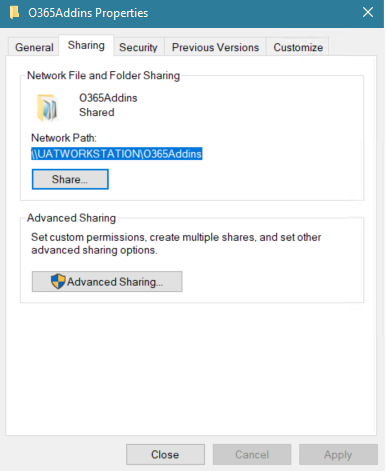
- On a file server where you store your network shared files, create a directory.
- Copy ProphixAnalyzerV2.xml to the new directory.
- Open the directory's Properties dialog and select the Sharing tab.
- Click Share and add yourself and any users or groups who you want to have access to the add-in.
-
Click Share:
-
Note or copy the network file path.
The following steps must be completed on each user’s installed version of Excel
- Open Excel and select a new document.
- Select the File tab and select Options.
-
Select Trust Center and click Trust Center Settings:
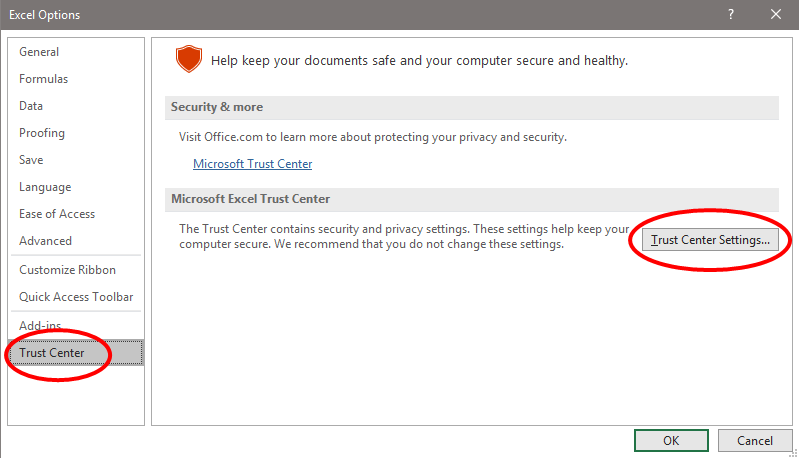
- Select Trusted Add-in Catalogs.
-
In Catalog URL, type or paste the previously copied UNC path (that is: \\<servername>\<path>\):

- Click Add Catalog.
- Select Show in menu, and click OK.
- Restart the Microsoft 365 application.
Install Analyzer
Prerequisite
Your FP&A admin needs to deploy Analyzer to your organization.
After the deployment is complete, the administrator should announce that you can install Analyzer from inside your desktop Excel.
Install Analyzer
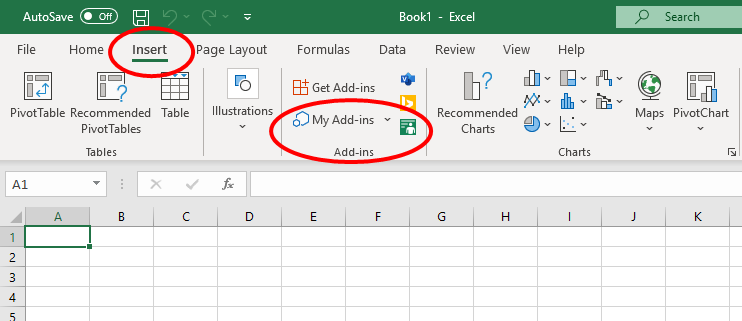
- Open Excel.
- Go to Insert > My Add-ins:
The Office Add-ins window opens:
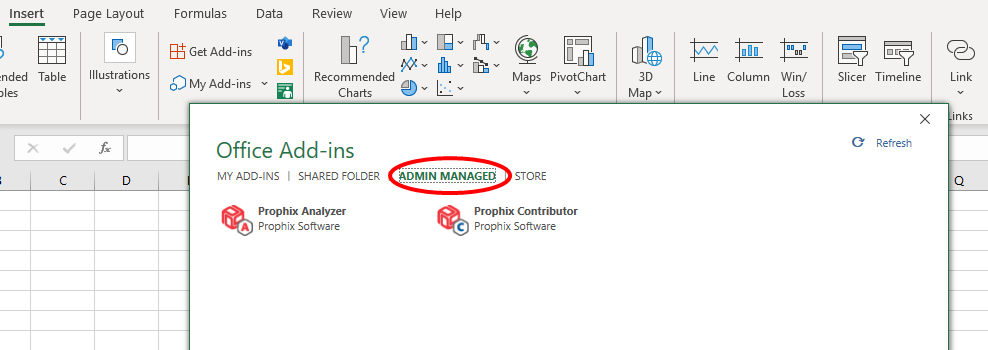
- Depending on how your administrator chose to install the add-in, do one of the following:
- Click ADMIN MANAGED, and click Analyzer.
- Click Shared Folder, select Analyzer.
-
Click Add.
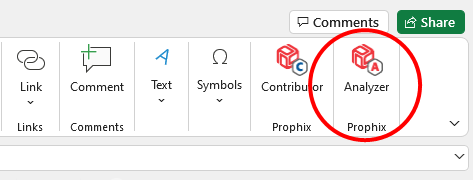
A Prophix panel is added to the Ribbon:
Run Analyzer
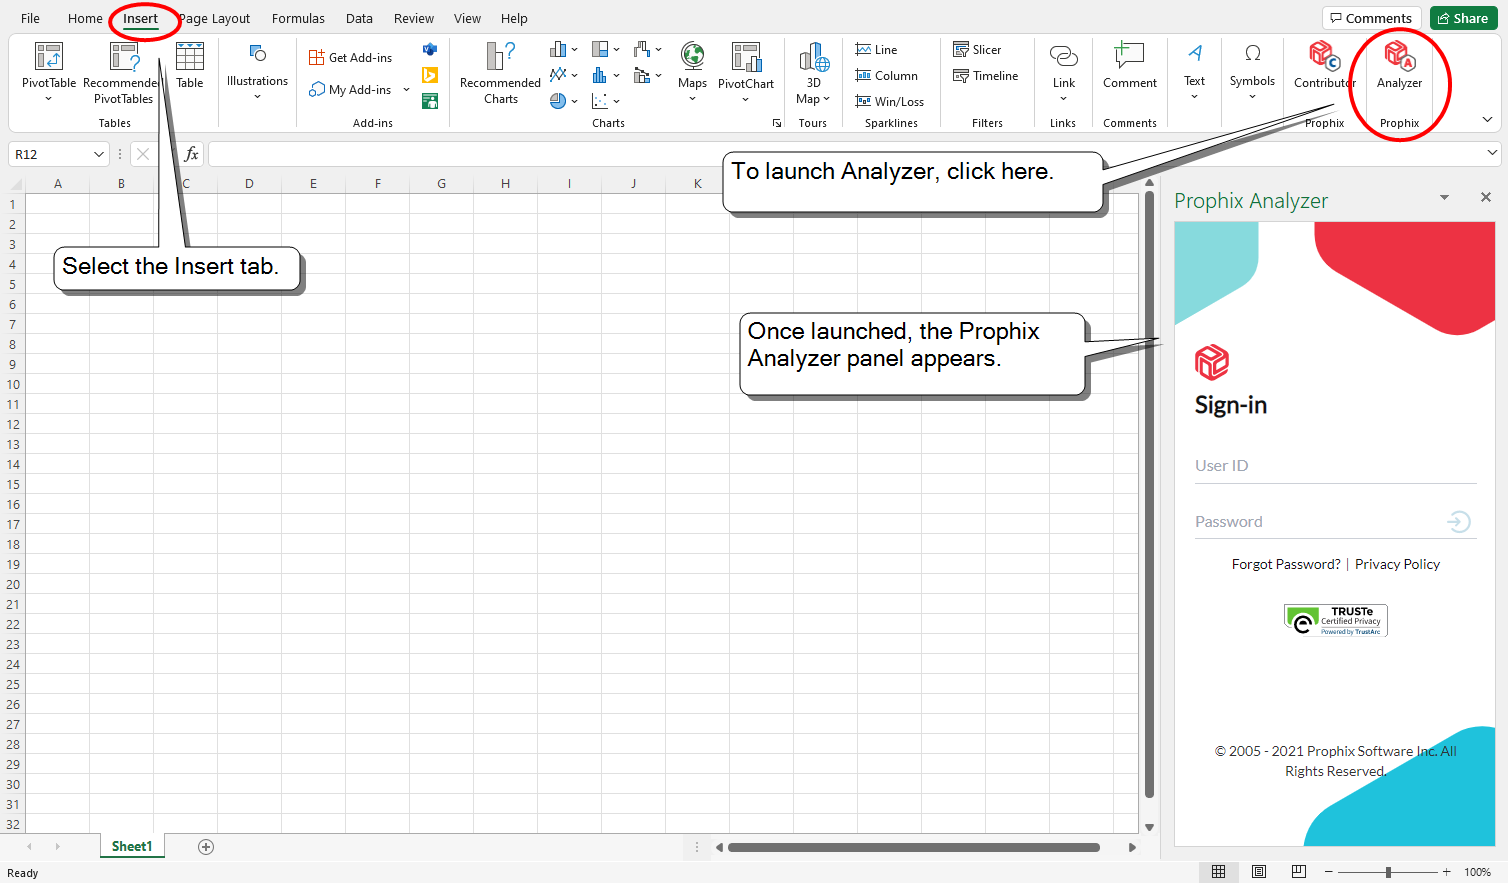
- In Excel, select the Insert tab.
-
Go to Prophix > Analyzer.
The Analyzer panel opens:
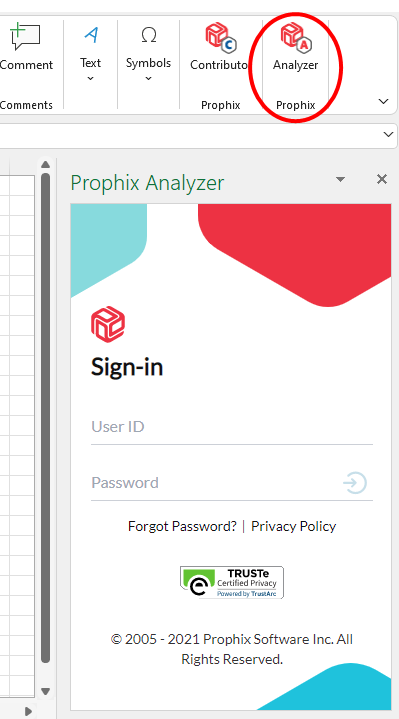
-
Sign in to FP&A.
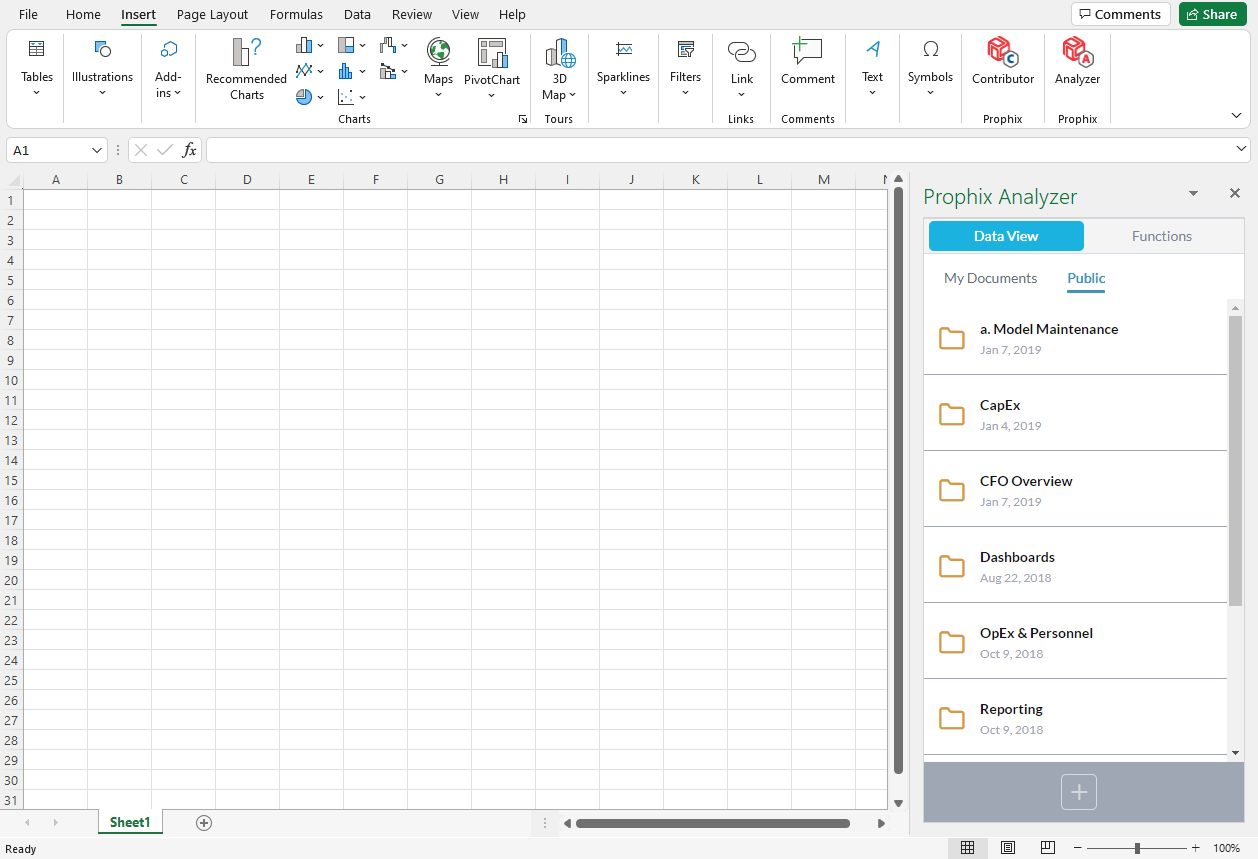
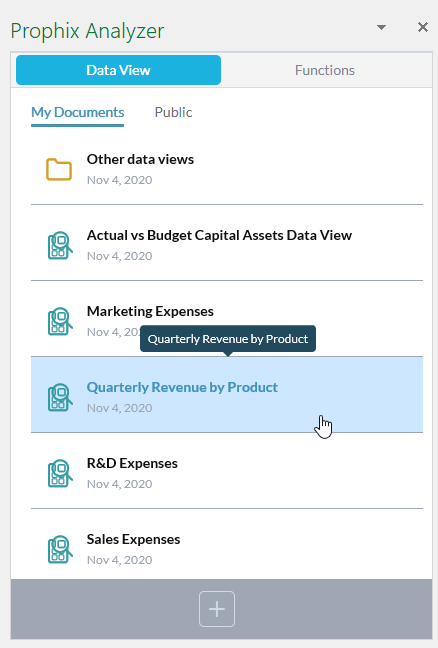
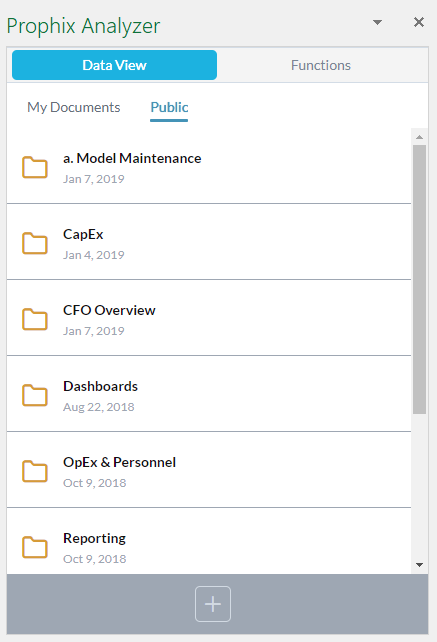
After sign-in, the Analyzer panel defaults to the Data View tab, showing the data view files from your My Documents exactly as it would in Document Explorer; for example:
To explore the same Public folders as you would in Document Explorer, click Public:
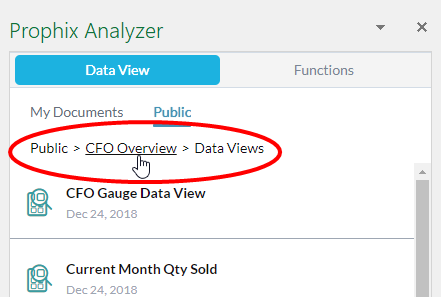
When you browse down into the folder hierarchy, a breadcrumb appears; to move back up, click a link in the breadcrumb:
Close/Open the Analyzer panel
- To close the panel, click in the top-right corner.
- To re-open the panel, click the Analyzer option in Excel's Ribbon (you won't be asked to sign-in again).
Work with data views
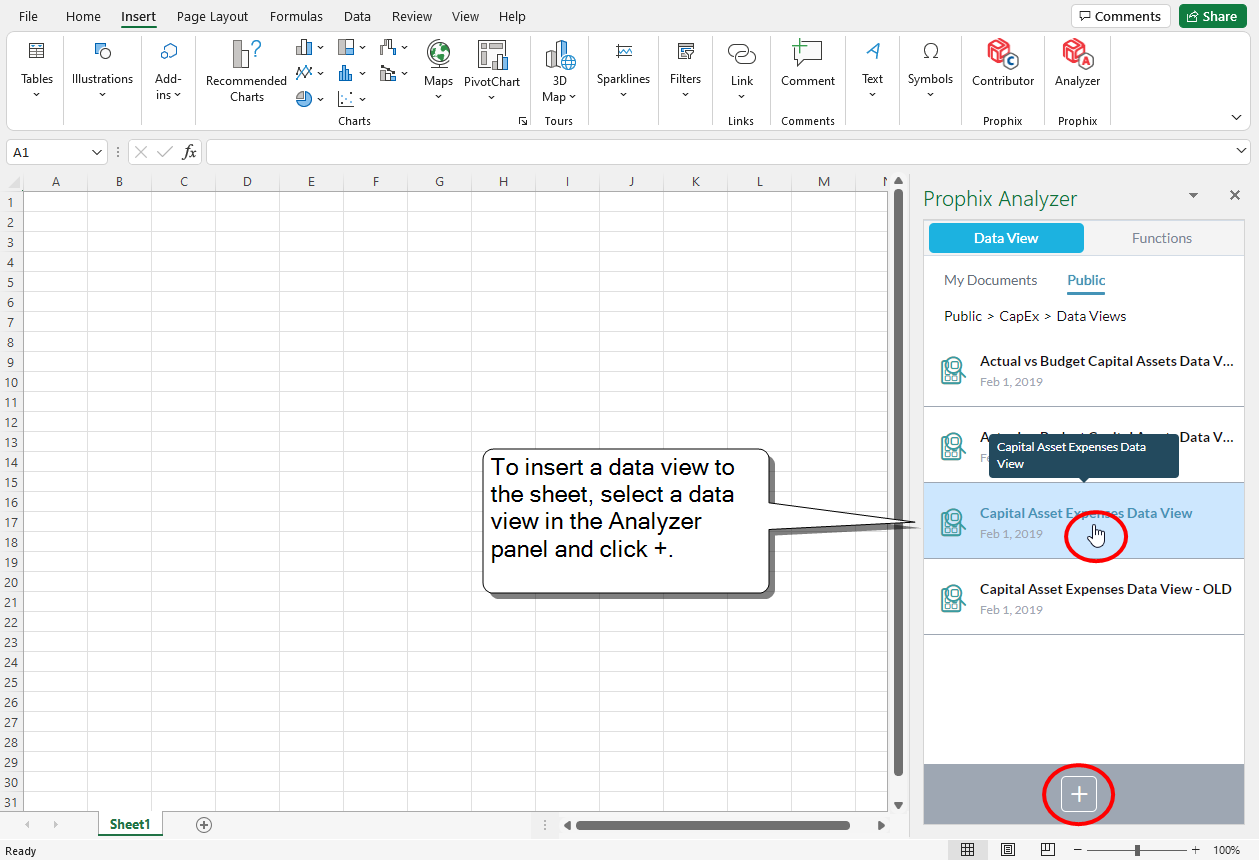
Insert a data view
You can add one data view per worksheet.
- Open a worksheet.
- Select the cell where you want to place the top-left corner of the data view.
- In the Analyzer panel, select the Data View tab.
- Browse to and select a data view.
-
To insert the data view, at the bottom of the panel click .
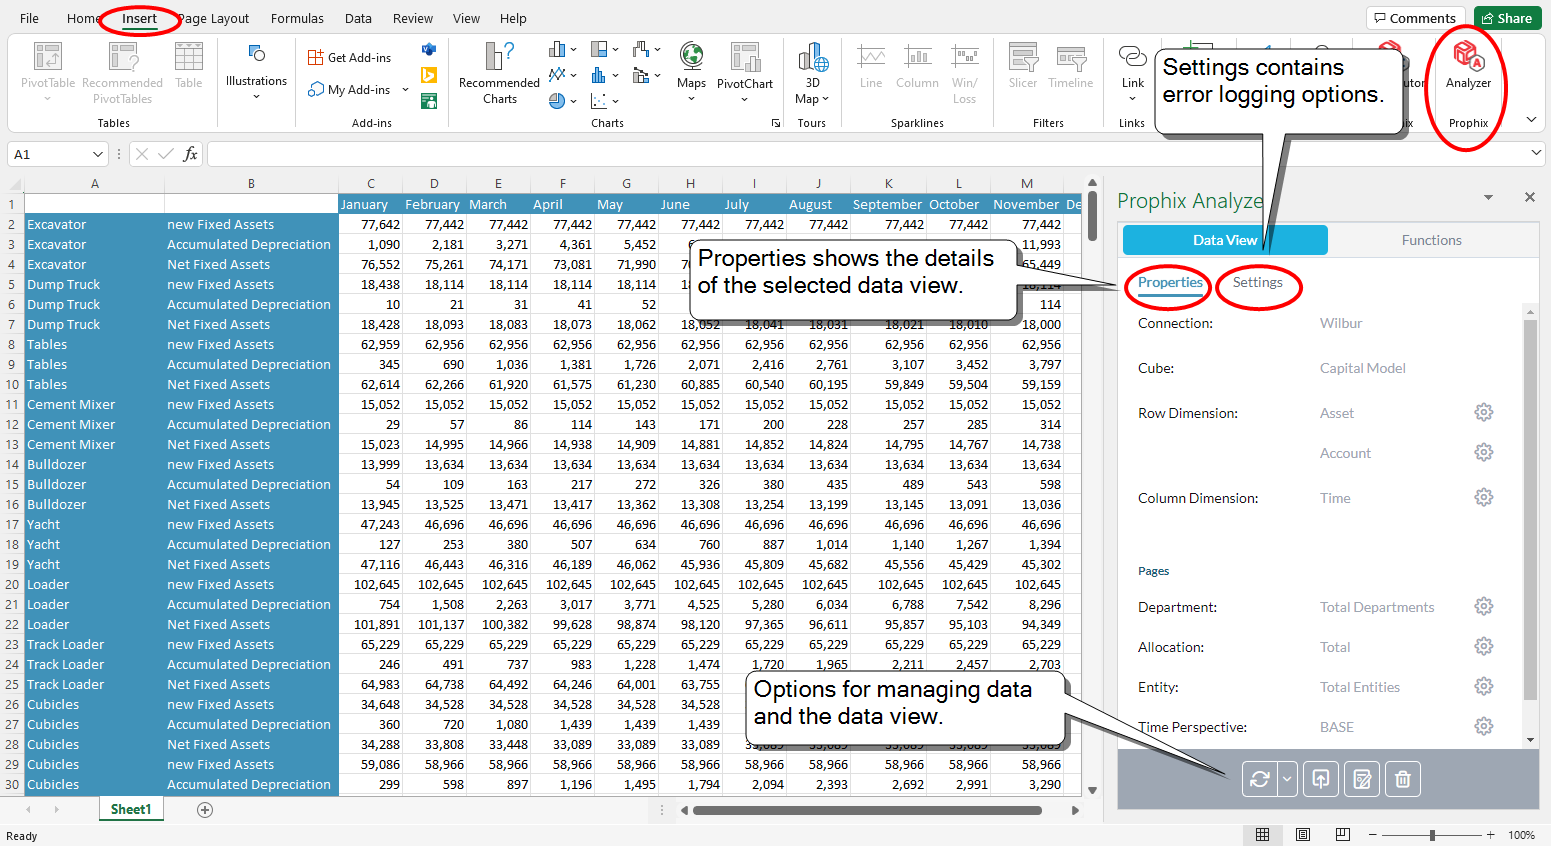
Note: Once a data view is opened, the Data View tab changes; it now shows the data view's properties and settings.
Edit a data view layout
Analyzer provides the same tools as in FP&A for editing data view structures.
- In the Analyzer panel, select the Data View tab.
-
At the bottom of the Analyzer panel, click .
The Edit Layout dialog opens.
- Make your changes.
- Click OK.
Change the display formats for page members
Analyzer allows you to change the member display format on every axis of a data view inside an Excel sheet to one of the standard formats: Names, Keys, or Names & Keys.
Note: If the data view uses a custom member display format, Analyzer shows that format, but only allows you to change it to one of the standard formats.
- In the Analyzer panel, select the Data View tab and select Properties.
-
In the Analyzer panel, select Properties.
-
Beside the dimension whose format you want to change, click :
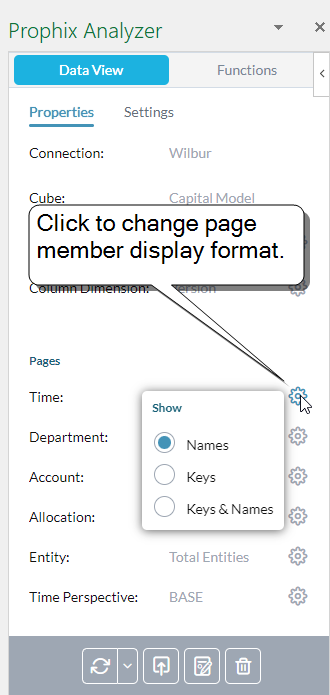
- Select a format option.
- To see the change, click .
Delete the data view in the current sheet
When you use this option, only the data view is deleted—all other content in the sheet is retained.
- In the Analyzer panel, select the Data View tab.
- At the bottom of the Analyzer panel, click .
- Confirm your choice.
Convert a data view
You can convert an existing data view to use Prophix Functions.
- In the Data View tab, select a data view and insert it into the worksheet.
- At the bottom of the Analyzer panel, click .
- Confirm your choice.
Converting a data view has the following effects:
- Analyzer no longer recognizes the table as a data view, and therefore you are free to insert another data view from the Data View tab.
- All members on the rows, columns, and pages are converted to member keys.
- All values in the table cells reference the row, column, and page member cells.
Manage data
Pull data from FP&A
Refresh (pull) the data view from the cube for the current sheet or all sheets.
- In the Analyzer panel, select the Data View tab.
- In the Analyzer panel, click .
- At the bottom of the Analyzer panel, click .
- Select an option: refresh the open sheets or all sheets in the workbook.
Caution: If you have altered the structure of the data view (for example, by adding columns or rows) pulling overwrites your changes.
Save data to FP&A
Update the FP&A cube with the data in the data view.
- In the Analyzer panel, select the Data View tab.
- At the bottom of the Analyzer panel, click .
- In the Analyzer panel, click .
Save the workbook
- Save the Excel workbook as you normally would. (See the next section on naming requirements for Excel sheets.)
- The next time you open the workbook, the data views will be present but unconnected from FP&A .
- To re-establish the connection, you will need to run Analyzer and sign-in to FP&A again.
Updating Prophix Functions
Each time that Analyzer is updated with new functions, to access the new functions Microsoft requires performing the following steps:
- Clear your Microsoft Office 365 cache.
-
Re-install Analyzer to Excel, using the same method that you did when you first installed Analyzer.
Do one of the following:
- If you installed using Microsoft 365 Centralized Deployment:
- Open Excel.
- Select the Insert tab.
- Click My Add-ins. (The Office Add-ins dialog opens.)
- Click ADMIN MANAGED.
- Click the Analyzer Add-in.
- If you installed using a network share:
- Open Excel.
- Select the Insert tab.
- Click My Add-ins. (The Add-ins dialog opens.)
- Click Shared Folder.
- At the top-right, click Refresh.
- Select the Analyzer Add-in.
- Click Add.
- If you installed using Microsoft 365 Centralized Deployment:
Use Prophix Functions
Prophix Functions allow you to read specific member values, member names, and cell comments from your cubes into Excel.
-
Prophix Functions work just like Excel functions—when you start typing the function name in a cell, Excel's list of functions pops up:

-
And just like with Excel functions, you can select the cell and then add/edit the function's parameters in the Excel function editor:
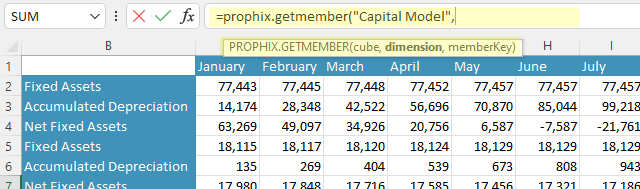
-
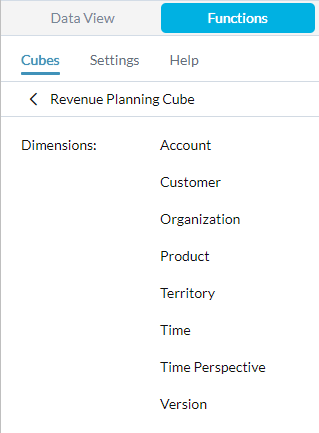
To get the values required by a function, go to Functions tab > Cubes tab:
For details of the Prophix Functions, in Analyzer go to Functions tab > Help, or see the related topic here.
Manage the error log
You can use Analyzer's error log feature to gain a better understanding for what happens when you push data to FP&A .
Turn on and manage the error log
- In the Analyzer panel, select the Data View tab.
- Select Settings.
-
In the Analyzer panel, select Settings:
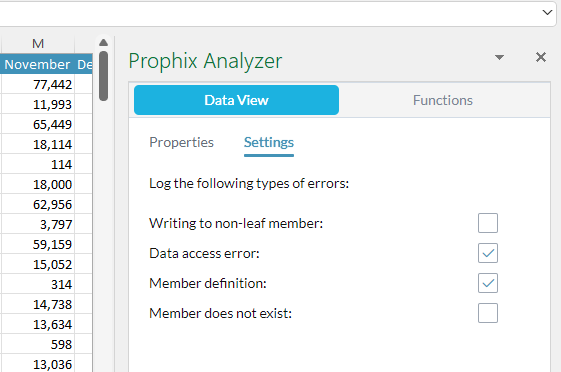
- Turn on each type of write error that you want logged:
Writing to non-leaf member
You edited non-leaf members.
Data access error
You edited a member that is read-only in FP&A , or an account member that does not allow data entry.
Member definition
You edited a member with one of the following restrictions:
- a calculated account, version, or time perspective
- an account member that requires a line item
- a version that is a folder, that is completed, or that is outside the editable time range
Member does not exist
You edited a member that no longer exists in FP&A .
Note: The error log is created the next time you push, but only if any errors of the selected types occur.
Turn off the error log
-
In Settings, turn off all the errors types.
The next time you push, the error log is removed.
Analyzer FAQ
How do I know if I am a good fit for Analyzer?
Analyzer is likely for you if you:
- Love using Excel
- Love using FP&A
- Have advanced FP&A knowledge
What are the prerequisites to use Analyzer?
You need to be assigned the Advanced license type (giving you full access to Ad Hoc Analysis) and the Analyzer add-in must be installed in Microsoft 365 Excel. For more on how your permissions/license type affects what you can do, see the next question in the FAQ.
Can I save data back to FP&A ?
Your Analyzer permissions always match your Ad Hoc Analysis permissions. That is, if in Ad Hoc Analysis you can save data, in Analyzer you can save data; if in Ad Hoc Analysis you can only view data, in Analyzer you can only view data.
Is a data view "live"?
A data view inserted to Excel is totally unconnected from FP&A. In other words, if the data subsequently changes in FP&A, your Excel data view does not automatically reflect the changes. Likewise, if you edit the data in Excel, your changes are not automatically written to FP&A.
If the connection isn't live, how do updates happen?
To get the latest version of the data from FP&A, you use the Pull command.
How do I update FP&A with my changes?
To send your changes to FP&A, you use the Push command.
Does Analyzer protect certain values, the way Ad Hoc Analysis does?
To make Analyzer as flexible as possible, every value in a data view is editable.
If all data values are editable, how do I avoid updating the wrong values in FP&A ?
When you push, only the leaf-level members are written to FP&A—any other changes are rejected as "errors" (but do not cause error messages).
If I insert columns or rows, and then push, does that "re-map" the values and cause errors?
Structural changes have no effect on the data mapping; Analyzer keeps track of the member combination each data cell belongs to.
If I insert columns or rows, and then pull, what happens?
Structural changes are overwritten.
What happens if I replace a value with a formula?
When you push, the value resulting from the formula is written to the member combination.
Does pushing show me what values were accepted or rejected?
A push never updates the values in Excel (only a pull does). For this reason a push doesn't highlight errors. For example, if you edit a non-leaf member, the value remains the same until the next pull.
When I push, what happens to cells that contain non-numeric (that is, alpha) characters?
Unless there were other errors, you only receive a confirmation for the push. Alpha values are never written to FP&A.
How can I identify protected values?
Optionally, you can choose to list the non-editable cells in a log. The log appears in its own worksheet and is updated whenever you push. You control this option in Analyzer's Settings.
What happens when I save a workbook?
- The data is saved like any other Excel workbook.
- The next time you open the workbook, you can continue to edit the data.
- To refresh the data or send it to FP&A, run Analyzer, sign in, and pull or push.