Create Skills with Planning Agent
Using the Planning Agent, FP&A users can automate repeatable, multi-step tasks in Prophix. This article covers the Planning Agent, granting access, building and configuring skills, scheduling and running them, monitoring runs, and managing notifications..
A Skill is a sequence of Prophix actions that runs as a single unit, either on demand or on a schedule.
About Planning Agent
Planning Agent lets an FP&A user automate a repeatable, multi-step task in Prophix. A skill is a sequence of Prophix actions that runs as a single unit, either on demand or on a schedule. Actions can include updating a filter, creating or updating a version, publishing a model, running a process, or reviewing a file.
Planning Agent consists of two components:
-
Skills Manager: Build and manage skills.
-
Planning Agent: Run skills conversationally through Prophix Copilot. Example, Planning Agent.
A skill built in Skills Manager can be run from Skills Manager or through the Planning Agent.
Access to Planning Agent
Planning Agent and Skills Manager use a single access setting. Enabling Planning Agent gives a user access to both Skills Manager and the Planning Agent. You cannot enable one without the other.
Default access: Planning Agent is enabled for global administrators and disabled for all other users. A global administrator can grant access to additional users or roles.
Grant access to Planning Agent
To grant user access:
-
In the left navigation, open Administration > Security Manager.
-
Select the user to grant access.
-
Go to the Functions tab.
-
In the Administrative Functions list, select Planning Agent. As a result:
-
Skills Manager menu is enabled and appears in the main menu.
-
Planning Agent is enabled and appears in the Copilot agent list.
These two capabilities are linked: enabling Planning Agent always enables both Skills Manager and Planning Agent. You cannot enable them independently.
-
Build a Skill
Use Skills Manager to create, configure, and manage skills. Each skill includes four tabs:
-
Steps: Build and configure the skill workflow.
-
Info: View and edit the skill name and description.
-
Schedule: Define when and how often the skill runs.
-
Result Log: View the skill's run history.
1. Create a skill
You can create a skill using a blank skill or a pre-built template.
Start from a blank skill
-
In the left navigation, open Administration > Skills Manager
-
Select Create Skill; or if skills have already been created.
Create Skills panel opens.
-
Select Blank.
-
Enter a Name, and optionally, a Description for the skill.
-
Click Create. The New Step panel appears.
-
Proceed to add at least one step.
Note: A skill is not saved as a record until you save its first step.
Start from a template
Skills Manager includes two starter templates.
-
Select a template:
-
Monthly maintenance: A five-step flow: update two filters, review a file for FX rates, run a process to import actuals, then review the resulting P&L file. Default schedule: monthly, skipping the last month of each quarter.
-
Rolling Quarter Forecasting: A four-step flow: create a version, update a filter, update the version with actuals, then update an ad-hoc layout. Default schedule: quarterly.
Note: Template Configuration:
Template steps come with names and actions preselected, but the inputs are blank. You must fill in the inputs before running the skill. While the Name and Description fields auto-fill from the template, you can still edit them.
-
-
Click Create.
Edit a skill
After you create a skill, you can update its name or description as needed. Select the skill you want to modify and make changes to its information.
-
In Skills Manager, select the skill drop-down at the top of the page.
Note: You can switch between skills by choosing from this drop-down
-
Search for or select another skill from the list. You can switch between skills by choosing from this drop-down.
The page loads the Steps, Info, Schedule, and Result Log tabs for the selected skill.
-
Select the Info tab.
-
Update the Name or Description field.
-
Select Save Changes.
Unsaved changes: An Unsaved changes indicator appears when you make changes and remains visible until you save them.
2. Add and arrange steps
You can add steps in two ways, with each method producing a different result:
-
Select Add Step on the canvas to add a step at the root level of the flow.
-
Select at the bottom of an existing step to add a step that is automatically connected to that step.
Insert a step at the root level
-
In the New Step panel displayed after creating the skill, complete these fields:
Step name: Enter a name for the step.
Step action: Select an action for the step. See Choose a step action.
Depends on: Not applicable to the first step in a skill. See Configure step dependencies.
INPUTS: Displays the required and optional input for each step action chosen. See Configure step inputs.
-
Click Save Changes.
Insert a step between existing steps
-
Hover over the connector between the two steps.
-
Select that appears inline. A placeholder appears below for the new step.
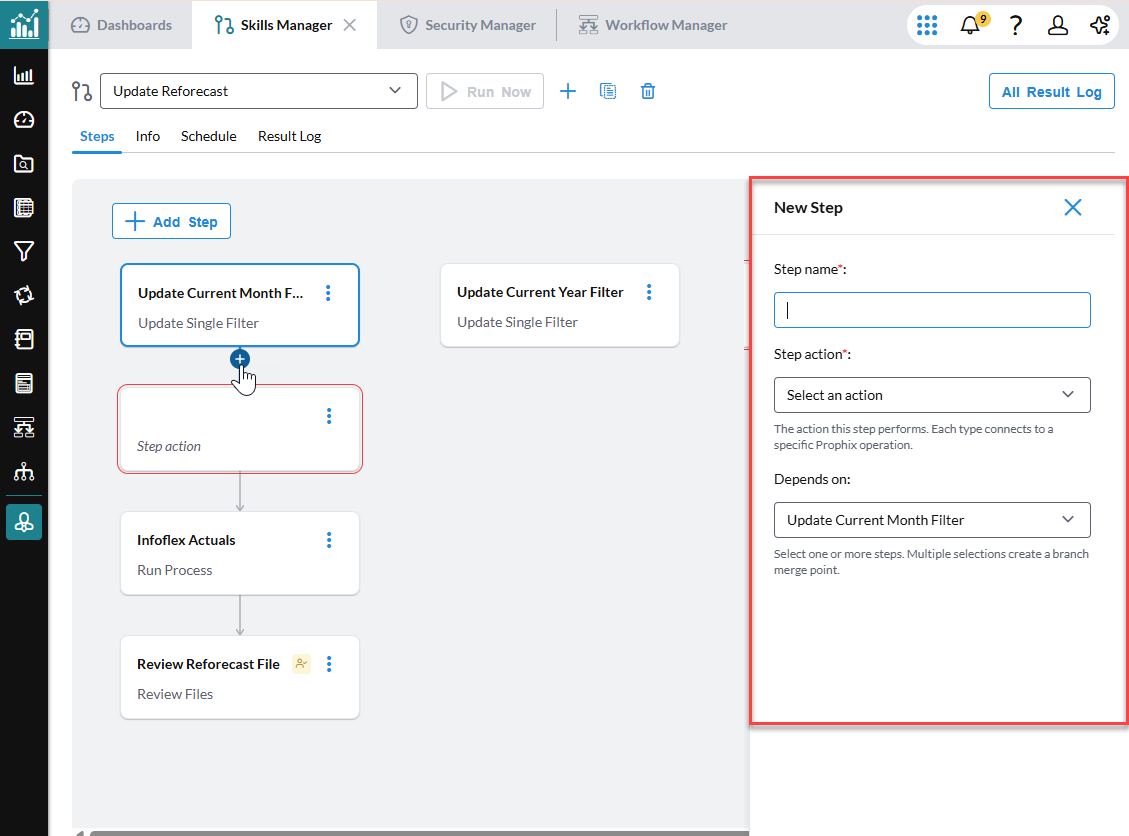
-
In the New Step panel, enter the required information.
Reorder steps
To reorder steps, use either method:
-
Drag and drop a step card to a new position.
-
Edit the step's Depends On field directly.
Either method updates the flow graph when you save.
3. Choose a step action
In the Step action drop-box, actions are grouped by categories, including Filters, Models, Layouts, Files, Versions, and Processes.
| Category | Actions |
|---|---|
|
Filters |
Update Single Filter; Update Time Reference Filter; Update Time Reference Filter; Update Standard Filter; Review Filters |
|
Versions |
Add New Version; Update Version |
|
Models |
Publish Model; Refresh Model |
|
Layouts and Files |
Update Ad-Hoc Layout; Review files |
|
Processes and Validation |
Run Process |
Any action with "Review" in its name is automatically treated as an approval step. When the skill runs, the process pauses at this step and displays Approve and Reject options.
4. Configure step dependencies
The Depends on field does not apply to the first step in a skill. It becomes available when you add subsequent steps, since each of those steps can depend on one or more steps that came before it.
From the Depends on drop-down, select the step you want the current step to depend on.
5. Configure step inputs
Choosing an action reveals the inputs for that action. For example, selecting Run Process in the Step action field display a Process input field for you to select and upload an applicable process. Your entries persist as you navigate between steps.
The following table lists the required and optional inputs for each action.
Note: All input fields are required, unless otherwise stated.
| Action | Inputs | |
|---|---|---|
| Required | Optional | |
|
Update Single Filter |
Filter; Member | |
|
Update Time Reference Filter |
Filter; Member | |
|
Update Time Reference Filter |
Filter | Range Start: Range End |
|
Update Standard Filter |
Filter; Member | |
| Review Filters | At least one filter row | |
|
Add New Version |
Model; Key | Parent ; Name ; Version Type; Rule Set; Start Date; End Date; Status; Carry Forward From |
|
Update Version |
Model; Version | Date Range Start/End; Carryforward Method |
|
Publish Model |
Model | |
|
Refresh Model |
Model | |
|
Update Ad-Hoc Layout |
Ad-Hoc File; layout dimensions for Pages, Rows, and Columns; Member selections per dimension | Display or exclude options for zero values, unique combinations, and missing or no-access rows or columns |
|
Review files |
At least one file | |
|
Run Process |
Process | |
Note: Filter, version, model, layout, and process inputs are drop-downs populated from your tenant's existing objects. Single and time reference filters are available as an option in every member picker.
6. Save all skill changes
Select Save Changes. Any edit anywhere in a skill triggers the “Unsaved changes” indicator. If you try to leave a skill with unsaved changes, a confirmation window asks whether you want to save or discard them.
Skill examples
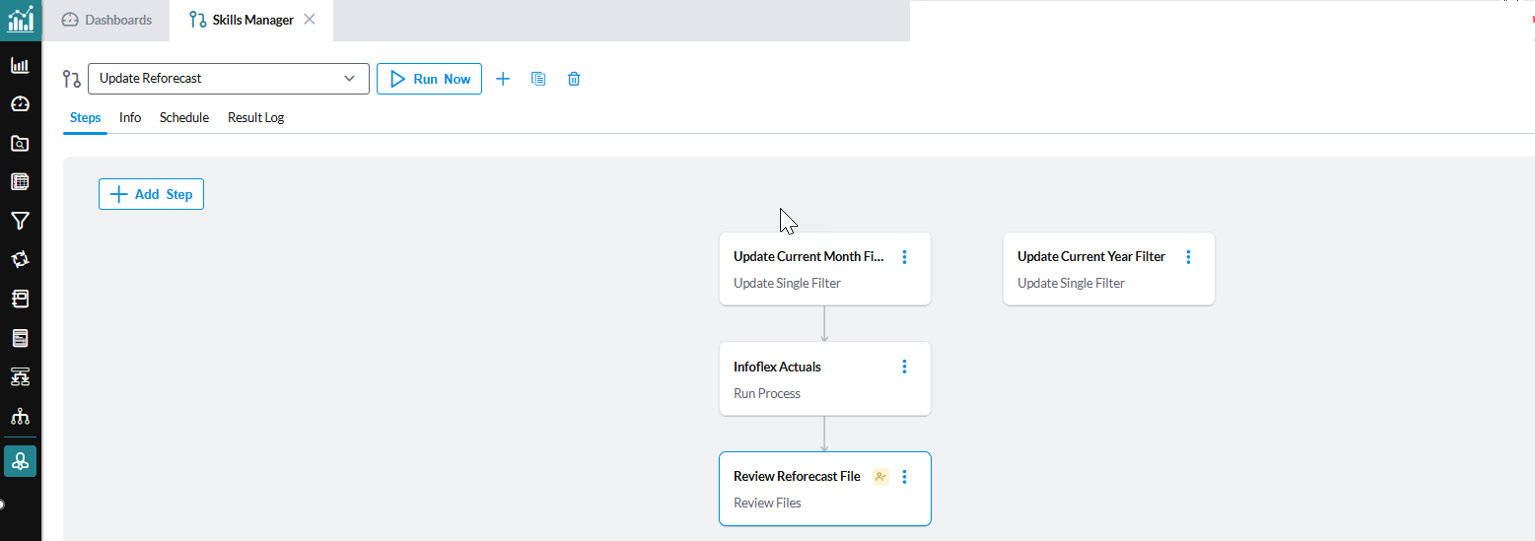
Here is an example of a skill that updates the reforecast.
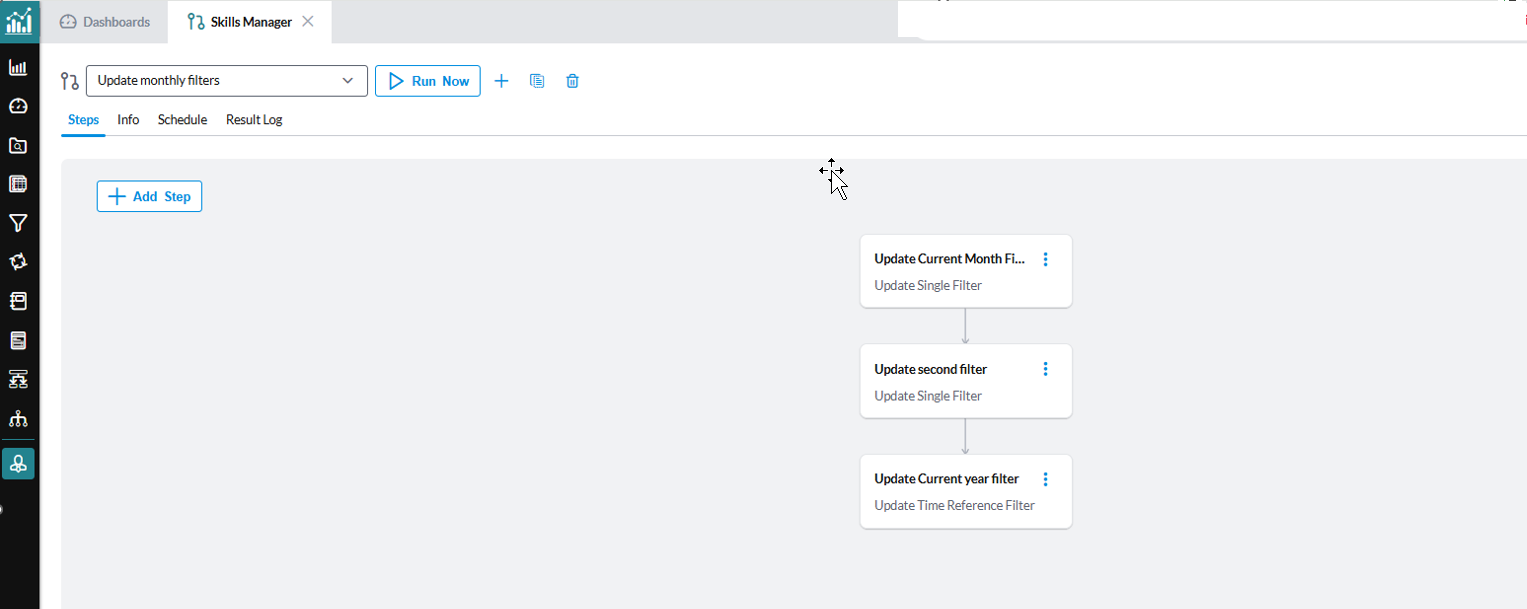
Here is a skill that helps with updating monthly filters (monthly maintenance).
Schedule a Skill
Use the Schedule tab to set when and how often a skill runs.
-
Select the Schedule tab.
-
Select a Frequency (trigger type): Manual, One Time Only, Daily, Weekly, or Monthly.
Note: Manual hides all recurrence fields. A manual skill runs only when you select Run Now.
-
For a recurring schedule, set the Time Zone, Start Time, Start Date, and, optionally, an End Date.
Note: If you leave End Date blank, the skill recurs indefinitely.
-
Depending on your chosen Frequency, set the Repeat every or Run Day(s)/Week(s)/Month(s) interval.
A plain-language banner (for example, Runs every day at 03:40 AM Eastern Time) updates automatically as you change these fields.
Run without Review
The Run without Review toggle is off by default and controls what happens when a scheduled run starts:
-
Off — At the scheduled time, the skill does not run automatically. Prophix emails a reminder to the skill's owner with a link to review and start the run in the Planning Agent Copilot window.
-
On — No email is sent. The skill runs automatically at the scheduled time.
Run a Skill
Run a skill immediately
-
Select Run Now on any tab. It starts an immediate run and does not let you adjust inputs.
Note: If the skill has unsaved changes or invalid steps, Run Now is blocked or asks you to confirm.
-
Alternatively, select Run Now from the Planning Agent also opens the View Details.window in Skills Manager, so you can watch the run immediately.
Run a skill from Prophix Copilot
-
In Prophix Copilot, select Planning Agent from the Agent drop-down.
-
Type a request, such as “Run skill called Reforecast plan.” The agent looks up the matching skill by name.
-
Confirm the list of steps (collapsed by default).
If a step is set to pause for review, expanding it shows a banner explaining that the run will stop there and wait for input.
-
Expand any step to review its saved inputs. You can edit these inputs inline before running the skill.
Note: Changes made while running a skill from Planning Agent are not saved back to Skills Manager.
-
Select Run to start the skill, or Cancel to stop it.
-
Track live progress. While a skill runs, the progress and status of each step is displayed. A checkmark means the step is done, a spinner means it is active, and a neutral icon means it has not started.
Respond to a paused step
When a step is a paused for review, a warning highlights the paused step and a Review Before Continuing panel displays the specific item.
-
Open the Review Before Continuing panel.
-
Review the specific item shown.
-
Select Continue Run to proceed, or Reject to stop the run.
Note: Rejecting a run stops all steps and set the run's status to Rejected.
Monitor Skill runs
View the Result Log
The Result Log tab lists every run of the open skill, including its status, start time, and completion time. Run statuses include Success, Running, Paused, Rejected, Failed, and Cancelled. Results are paginated.
-
To view run history across every skill instead of only the open skill, select All Result Log in the top right of Skills Manager page.
Note: Cancelling a run stops all steps immediately. Any step already in progress or not yet started is marked Cancelled.
View Run Details
-
In the Result Log tab , select View Details.
The View Detail window opens to the most relevant step: first a paused step, then a running step, then a cancelled or rejected step, then the first step if none of those apply.
Step statuses are indicated by colors:
-
Green: complete
-
Yellow: awaiting review
-
Gray: not started
-
-
Review the overall status, the completed steps count (for example, "3/5 steps"), the elapsed time, the progress bar, and each step shown as a connected card.
-
Select a completed step to view its run time, duration, and Inputs table. Hover over a truncated value to see the full text.
-
Select an approval step to view the reviewed item and the Review Outcomes table, including decision, reviewer, and timestamp.
-
If a run is paused for review, select Continue Run to proceed or Reject to stop the run.
Manage existing Steps
Each step has a menu with the following options:
-
Duplicate — Copies the step.
-
Delete — Removes the step and any connecting links.
Duplicate a step
To make a copy of a selected step:
-
In the Steps tab, select a step.
-
Click .
-
Select Duplicate A copy of the step displays.
-
Select the copied step to display its fields.
-
Rename the step, add step action, dependencies and configure the step inputs.
Delete a step
To delete a step:
-
In the Steps tab, select a step.
-
Click .
-
Select Delete
- Confirm your action.
Skill Notifications
Skill activity uses existing Prophix notification system: notifications, the notification hub, and email. There is no separate Skills-only notification system.
Schedule reminder email
The schedule reminder email is separate from lifecycle notifications. It is sent only when a skill is scheduled and Run Without Review is off.
-
Subject: “Reminder: Run [skill name] skill.”
-
Body: “It's time to run the [skill name] skill. Click here to review and run it.”
The link opens directly in the Planning Agent Copilot window, where the agent prompts user to review and run the skill. It displays the review tile with a Run button.
If Run Without Review is on, no reminder email is sent. The skill runs automatically at the scheduled time.
Lifecycle notifications
Status changes on a run can generate notifications through up to three channels.
| Event | Channel | Recipient |
|---|---|---|
|
Manual run started |
Toast only |
Originator |
|
Scheduled run started |
Toast only |
Schedule owner |
|
Awaiting approval |
Toast + Hub + Email (immediate) |
Originator (manual start), Schedule owner (schedule start) |
|
Succeeded |
Toast + Hub + Email (batched) |
Originator |
|
Failed |
Toast + Hub + Email (batched) |
Originator |
|
Cancelled |
Toast + Hub + Email (batched) |
Originator |
Manage notification preferences
Skill notifications use the existing general notification category. There is no separate Skills row in notification settings. See Notifications Hub.
-
Notification frequency: Batched Skill notifications follow the frequency configured for general notifications. The default frequency is every 15 minutes.
-
Immediate notifications: Awaiting Approval and Awaiting Standby Release notifications are always sent immediately because they require action.
-
Mute Notifications: Turning on Mute Notifications silences all Skill toast, hub, and email activity. It does not affect the schedule reminder email, which is sent by the scheduler rather than the notification service.
-
Notification timing: A short delay of approximately two seconds prevents Prophix from sending both an Awaiting Approval notification and an immediately following Cancelled notification for the same rapid state change.
-
Notification scope: Each lifecycle notification links directly to the same execution detail view used in Copilot chat. Step-level progress does not generate separate notifications; only lifecycle events for the parent execution generate notifications.
-
Notification opt-out: Notifications cannot be disabled for an individual skill or step. There is also no admin-wide any failure feed. Failure notifications are sent only to the run's originator.
Known limitations
-
No Portal support: Planning Agent is available only in FP&A Plus, and is not supported in the Portal.
-
Single combined permission: Access to Skills Manager and the Copilot Planning Agent cannot be granted separately. A single feature toggle controls access to both.
-
Template inputs are not pre-filled: The two starter templates include preselected steps and actions, but all inputs must still be configured manually
-
Back-end-driven error messages: When a run fails, the explanation displayed to the user is the message returned by the back end rather than a curated in-product explanation.