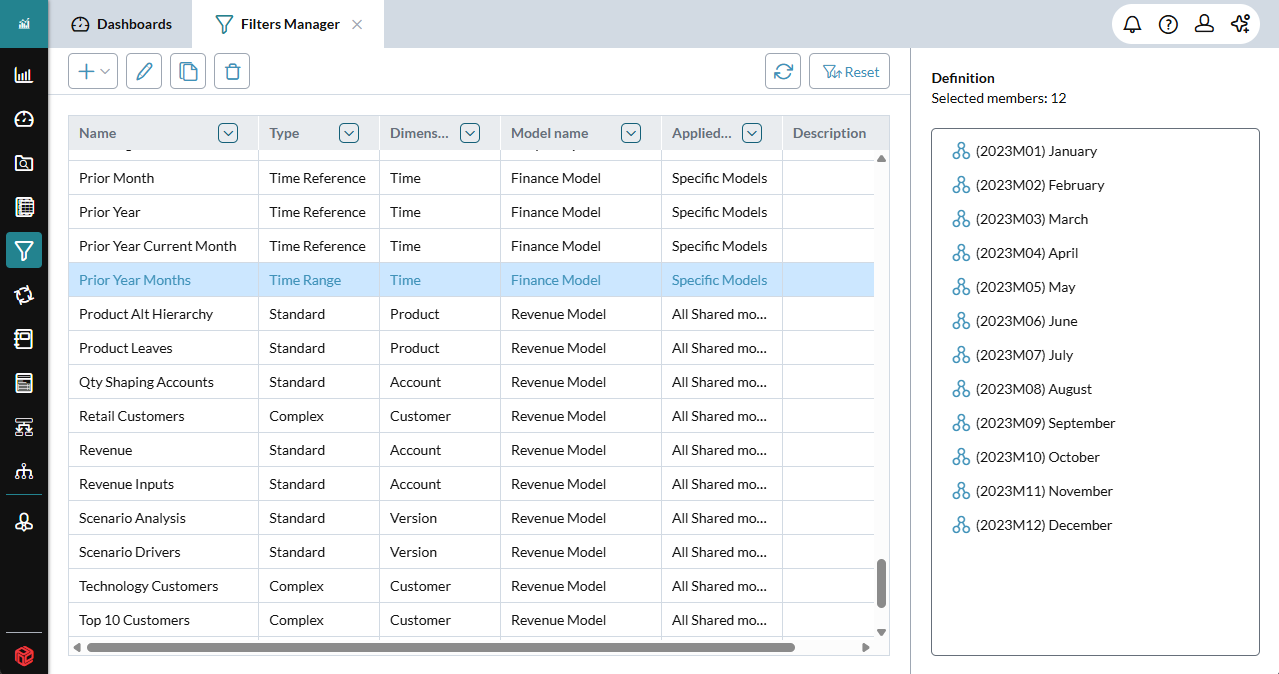
Filters Manager
A filter is a dynamic, user-defined group of members in a dimension. Filters make it easy to select exactly the members that you need, in the order that you define. Furthermore, you can swap filters in and out of reports and dashboards on the fly, without having to republish.
You create and mange filters using Filters Manager.
You need to maintain 20 budget reports for 20 departments. Each month you update every report by manually changing the date parameter to reflect the most recent closed month.
Using Filter Manager, you could instead create a Current Month filter (Single filter type) and include it once, in each report. Each month, before you generate the new reports, you edit the filter to use the last month.
Open Filters Manager
- Click the logo at the top-left corner and select Filters Manager.
Create a filter
The types of filter you can create are as follows:
-
The basic filter type.
-
Just like a Standard filter but can have only a single member.
-
Filters Time dimension members based on the anchor member you choose and the offset that you specify.
-
Filters Time dimension members based on the date range you specify.
-
Filters a dimension based on member properties.
-
Filters a dimension based on member properties, the values for that dimension, or both.
The procedures below describe how to create each filter type.
Tip: Often you can save time and effort by duplicating an existing filter that is similar to the one you want to create, and then editing the duplicate.
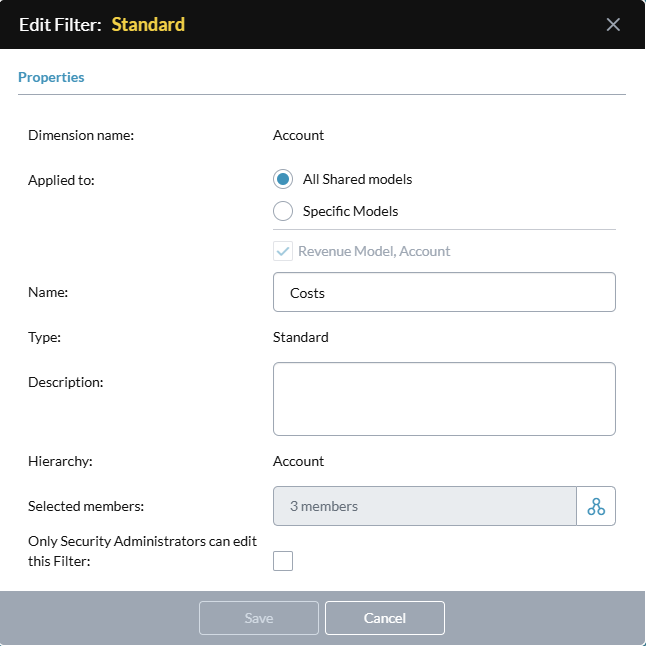
Standard
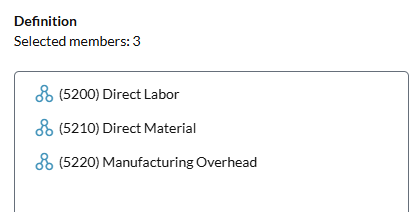
A completed Standard filter and its Definition panel:
-
Click and select Standard.
The Add Filter dialog opens.
- From Model name select the model you want to apply the filter to.
- From Dimension name select the dimension you want to apply the filter to.
- For Applied to, choose one:
- All Shared models: Makes the filter available to all models the dimension is shared to (and any models it is shared to in future).
- Specific models: Makes the filter available to only the models listed below (but not to any models the dimension is shared to in future).
- Turn on/off the models you want the filter applied to (Model name from above is included and cannot be turned off).
- In Name, type a unique name for the filter (up to 250 characters).
-
From Hierarchy select the dimension hierarchy you want the filter to use.
-
Beside Selected members click to open Member Selector and define the content of the filter.
Tip: In Member Selector you also can select existing filters.
- To restrict editing of the filter, turn on Only Security Administrators can edit this Filter.
- Click Save.
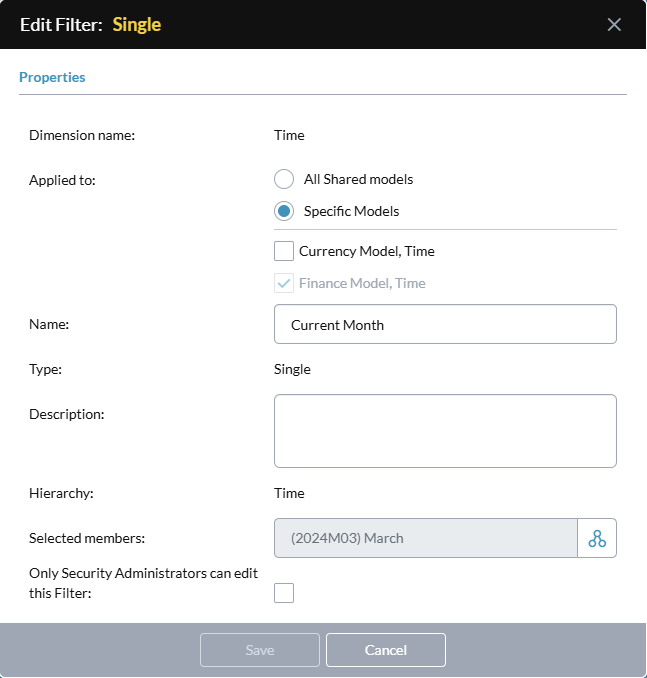
Single
A completed Single filter:
-
Click and select Single.
The Add Filter dialog opens.
- From Model name select the model you want to apply the filter to.
- From Dimension name select the dimension you want to apply the filter to.
- For Applied to, choose one:
- All Shared models: Makes the filter available to all models the dimension is shared to (and any models it is shared to in future).
Specific models: Makes the filter available to only the models listed below (but not to any models the dimension is shared to in future).
- Turn on/off the models you want the filter applied to (Model name from above is included and cannot be turned off).
- In Name, type a unique name for the filter (up to 250 characters).
- From Hierarchy select the dimension hierarchy you want the filter to use.
-
Beside Selected members click to open Member Selector and select the filter's single member.
Tip: In Member Selector you also can select existing Single filters or Time Reference filters.
- To restrict editing of the filter, turn on Only Security Administrators can edit this Filter.
- Click Save.
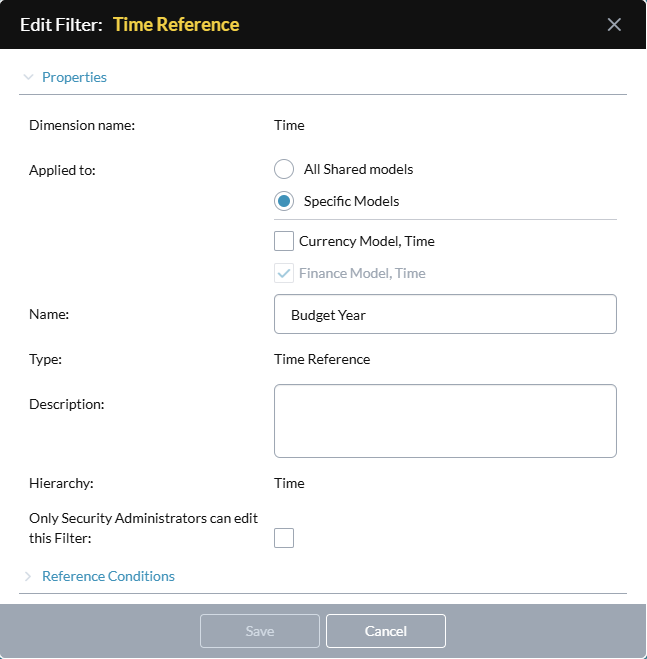
Time Reference
A completed Time Reference filter:
-
Click and select Time Reference.
The Add Filter dialog opens.
- From Model name select the model you want to apply the filter to.
- Dimension name is always Time.
- For Applied to, choose one:
- All Shared models: Makes the filter available to all models the dimension is shared to (and any models it is shared to in future).
Specific models: Makes the filter available to only the models listed below (but not to any models the dimension is shared to in future).
- Turn on/off the models you want the filter applied to (Model name from above is included and cannot be turned off).
- In Name, type a unique name for the filter (up to 250 characters).
- To restrict editing of the filter, turn on Only Security Administrators can edit this Filter.
- Click Reference Conditions.
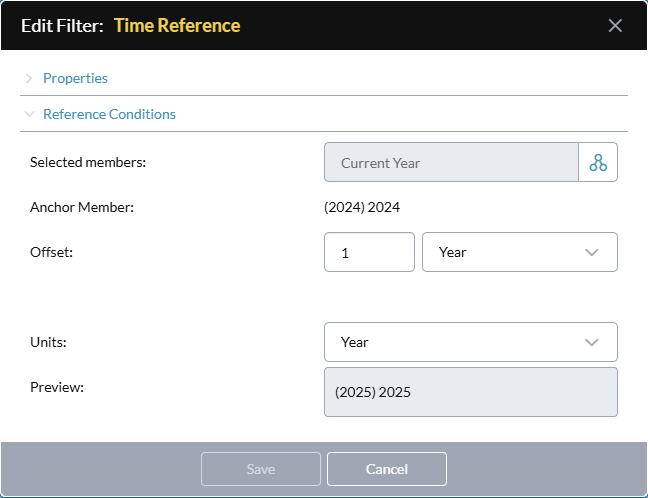
-
Beside Selected members click to open Member Selector and the Time member for the filter.
Tip: In Member Selector you also can select existing filters.
- Anchor Member shows the resolved member selection.
-
In Offset type a positive or negative value to indicate how far forward or backward to look from the Anchor Member, then from the drop-down select the hierarchy level to apply the Offset to.
Note: The Offset and the offset level determine where to navigate in the hierarchy relative to the Anchor Member.
- From Units select the hierarchy level you want the filter to display.
- Preview shows the members returned based on the above settings.
- Click Save.
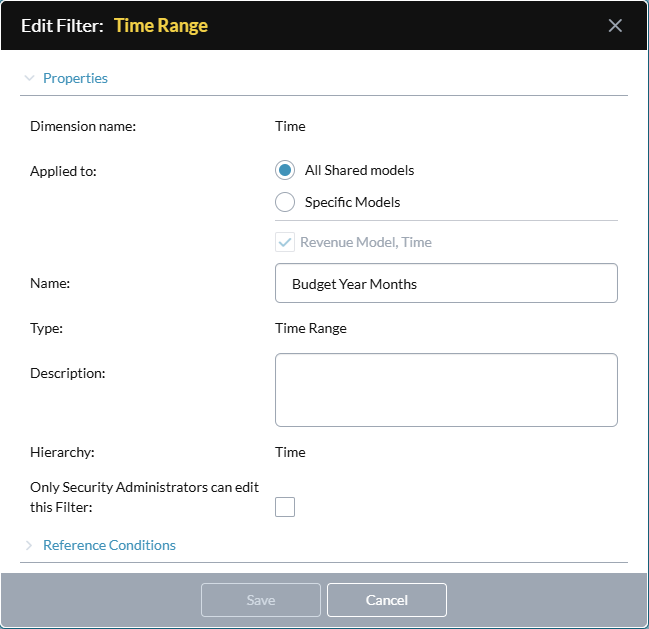
Time Range
A completed Time Range filter:
-
Click and select Time Range.
The Add Filter dialog opens.
- From Model name select the model you want to apply the filter to.
- From Dimension name select the dimension you want to apply the filter to.
- Dimension name is always Time.
- For Applied to, choose one:
- All Shared models: Makes the filter available to all models the dimension is shared to (and any models it is shared to in future).
- Specific models: Makes the filter available to only the models listed below (but not to any models the dimension is shared to in future).
- In Name, type a unique name for the filter (up to 250 characters).
- From Hierarchy select the dimension hierarchy you want the filter to use.
- To restrict editing of the filter, turn on Only Security Administrators can edit this Filter.
- Click Reference Conditions.
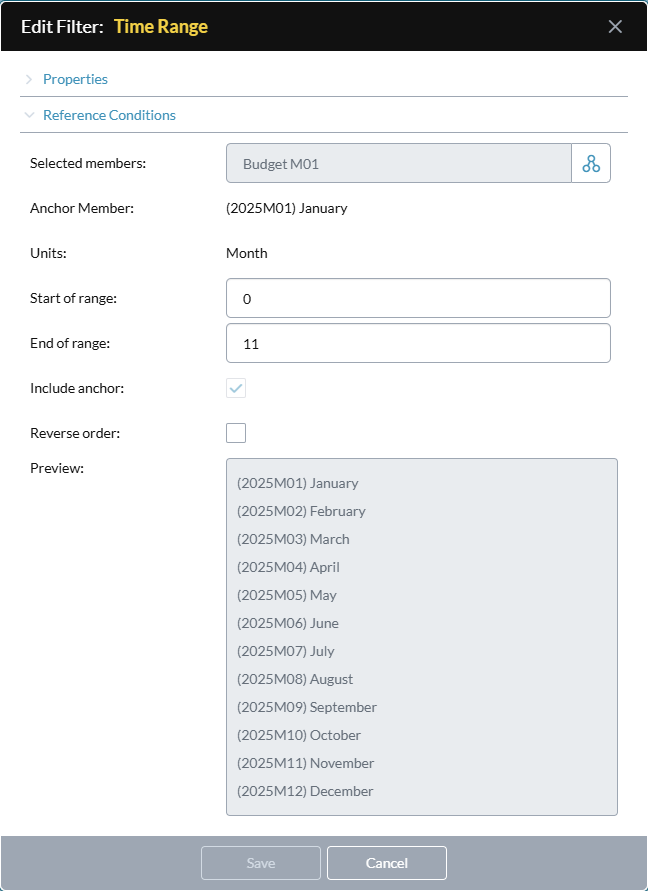
-
Beside Selected members click to open Member Selector and the Time member for the filter.
Tip: In Member Selector you also can select existing filters.
- Anchor Member shows the resolved member selection.
- Units shows the resolved hierarchy level.
-
Start of range and End of range determine the range within the hierarchy relative to the Anchor Member.
Type positive or negative values.
Example: If the Anchor Member is January, and you provide the values 0 and 11, Preview shows the months January through to December. (If you instead provided -2 and 11, Preview would show November and December of the previous year, and January through December of the current year.)
- Include anchor is always disabled and appears turned on if 0 is provided in Start or End, or the Anchor Member is within the range.
- If you want to have the results appear in reverse chronological order, turn on Reverse order.
- Preview shows the members returned based on the above settings.
- Click Save.
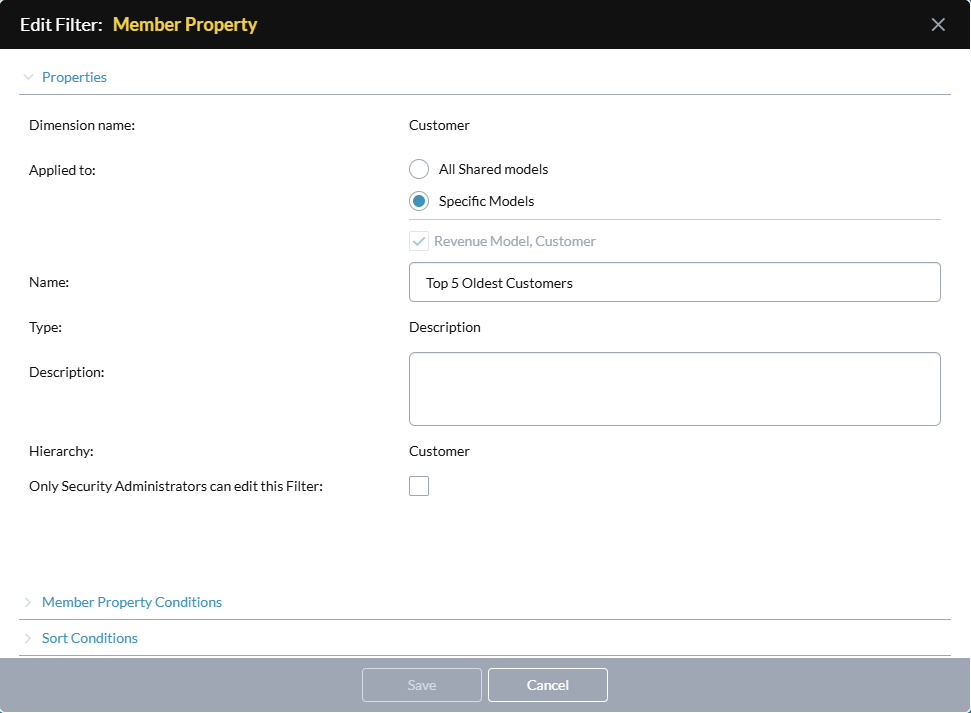
Member Property
A completed Member Property filter:
-
Click and select Member Property.
The Add Filter dialog opens.
- From Dimension name select the dimension you want to apply the filter to.
- For Applied to, choose one:
- All Shared models: Makes the filter available to all models the dimension is shared to (and any models it is shared to in future).
- Specific models: Makes the filter available to only the models listed below (but not to any models the dimension is shared to in future).
- Turn on/off the models you want the filter applied to (Model name from above is included and cannot be turned off).
-
In Name, type a unique name for the filter (up to 250 characters).
Note: To complete your Complex filter, you can use either of the remaining sections on its own, or combine them.
- To restrict editing of the filter, turn on Only Security Administrators can edit this Filter.
-
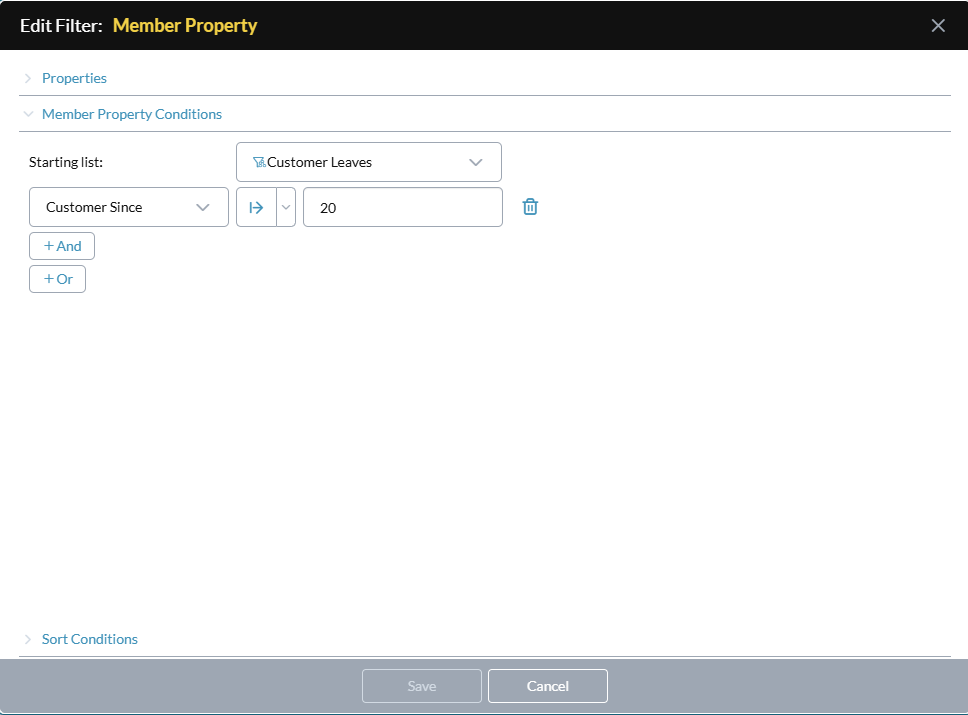
(Optional) Click Member Property Conditions.
Use this section to add complex conditional logic to the filter based on dimension member properties.
Example: If the dimension is Account, you could select the property Debit/Credit and and for the filter value select Debit.
To build a member property condition:
- From Starting list select the dimension's hierarchy or a filter (if the dimension has any filters).
- To add a condition, click +And.
- From the first two drop-downs, select a member property and an operator.
- In the third box, select or type a filter value, as appropriate.
- To add further conditions to the group, click +And.
- To add a group, click +Or.
- To remove a group, click .
-
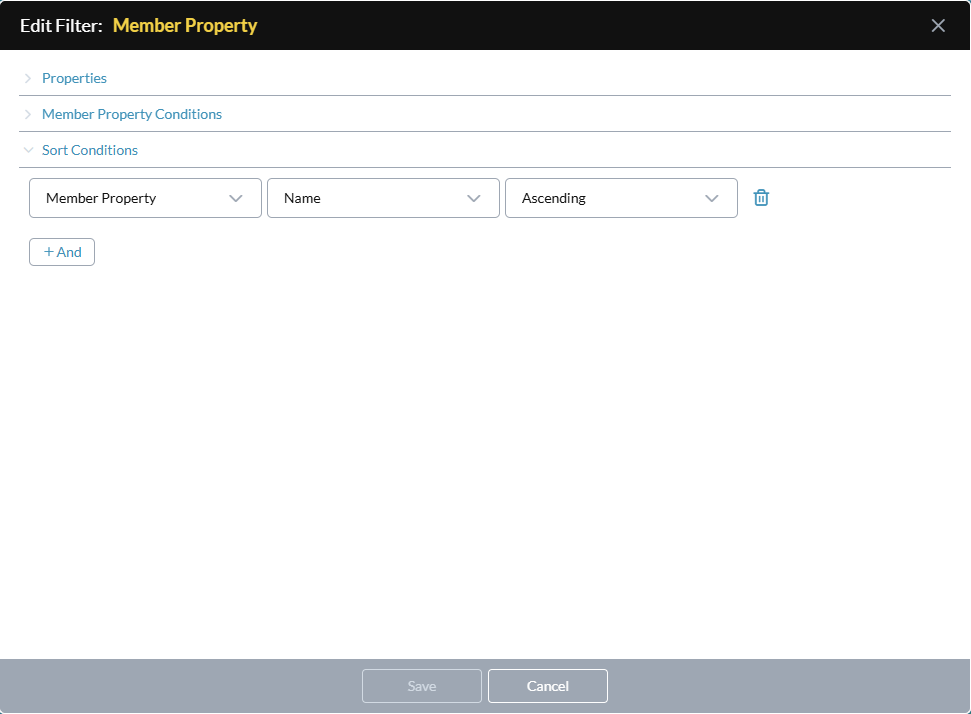
(Optional) Click Sort Conditions.
Use this section to sort the dimension members based on member properties.
To build a sort condition:
- To add a condition, click +And.
- From the second drop-down, select a member property.
- From the third drop-down, select the sort order.
-
To add more conditions, repeat these steps.
Note: Multiple conditions are applied in top-down order
- Click Save.
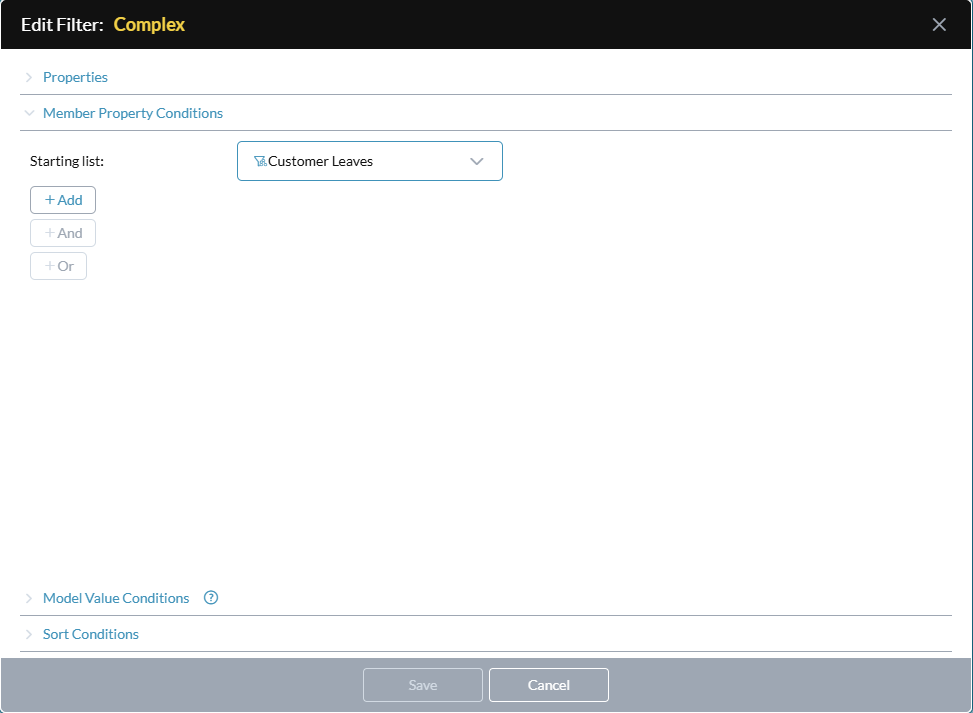
Complex
A completed Complex filter with its three sections and its Data Sourced From Model dialog:
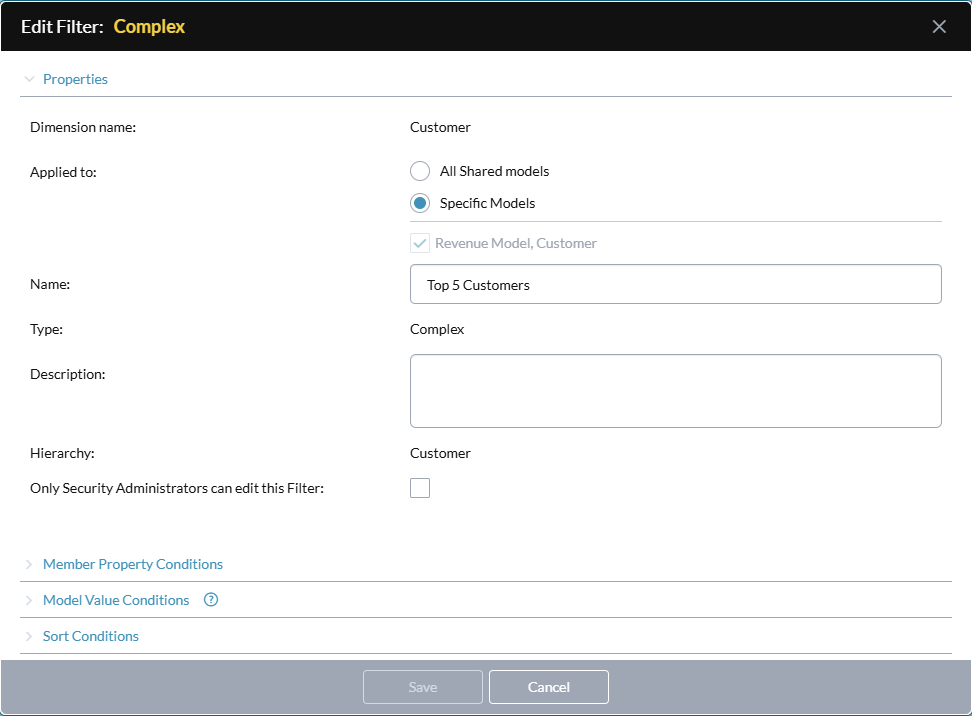
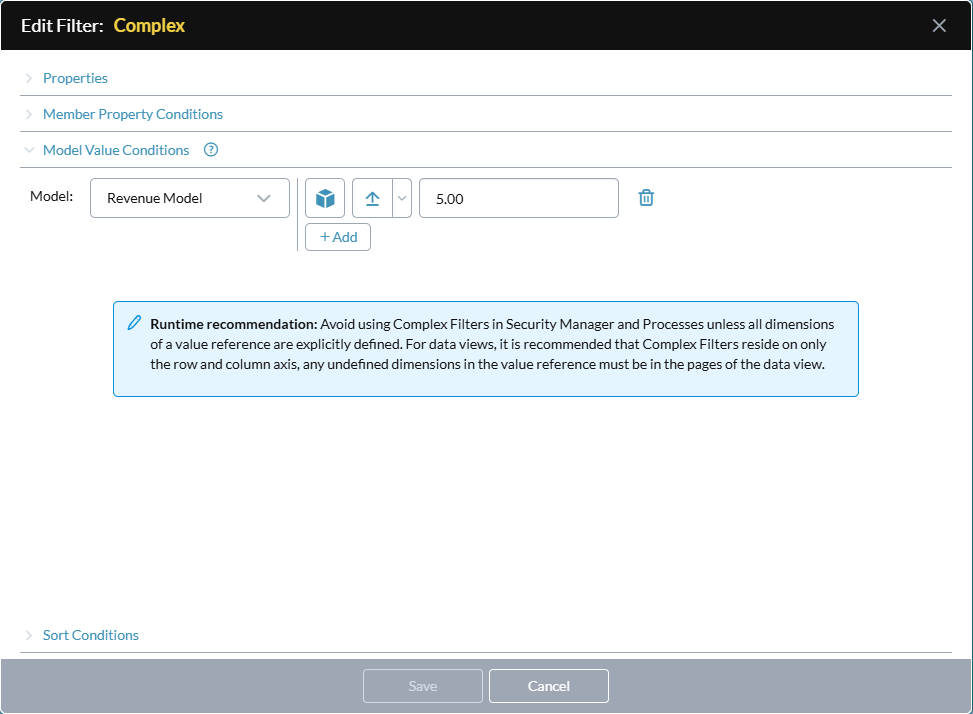
Note: Avoid using Complex filters in Security Manager and Processes unless all dimensions of a value reference are explicitly defined. For data views, it is recommended that Complex filters reside on only the row and column axis, any undefined dimensions in the value reference must be in the pages of the data view.
-
Click and select Complex.
The Add Filter dialog opens.
- From Model name select the model you want to apply the filter to.
- From Dimension name select the dimension you want to apply the filter to.
- For Applied to, choose one:
- All Shared models: Makes the filter available to all models the dimension is shared to (and any models it is shared to in future).
- Specific models: Makes the filter available to only the models listed below (but not to any models the dimension is shared to in future).
- Turn on/off the models you want the filter applied to (Model name from above is included and cannot be turned off).
-
In Name, type a unique name for the filter (up to 250 characters).
Note: To complete your Complex filter, you can use either of the remaining sections on its own, or combine them.
- Description is optional.
- To restrict editing of the filter, turn on Only Security Administrators can edit this Filter.
-
(Optional) Click Member Property Conditions.
Use this section to add complex conditional logic to the filter based on dimension member properties.
Example: If the dimension is Account, you could select the property Debit/Credit and and for the filter value select Debit.
To build a member property condition:
-
From Starting list select the dimension's hierarchy or a filter (if the dimension has any filters).
-
To add a condition, click +And.
-
From the first two drop-downs, select a member property and an operator.
-
In the third box, select or type a filter value, as appropriate.
-
To add further conditions to the group, click +And.
-
To add a group, click +Or.
-
To remove a group, click .
-
-
(Optional) Click Model Value Conditions.
Use this section to filter the list of dimension members, based on their values in a specific model.
Example: If the dimension is Account in the Finance Model, you could open that model and select Depreciation; then in the condition you could select and for the value type 10000.
To build a model-value condition:
-
From the drop-down select a model.
-
To open the model's structure, click .
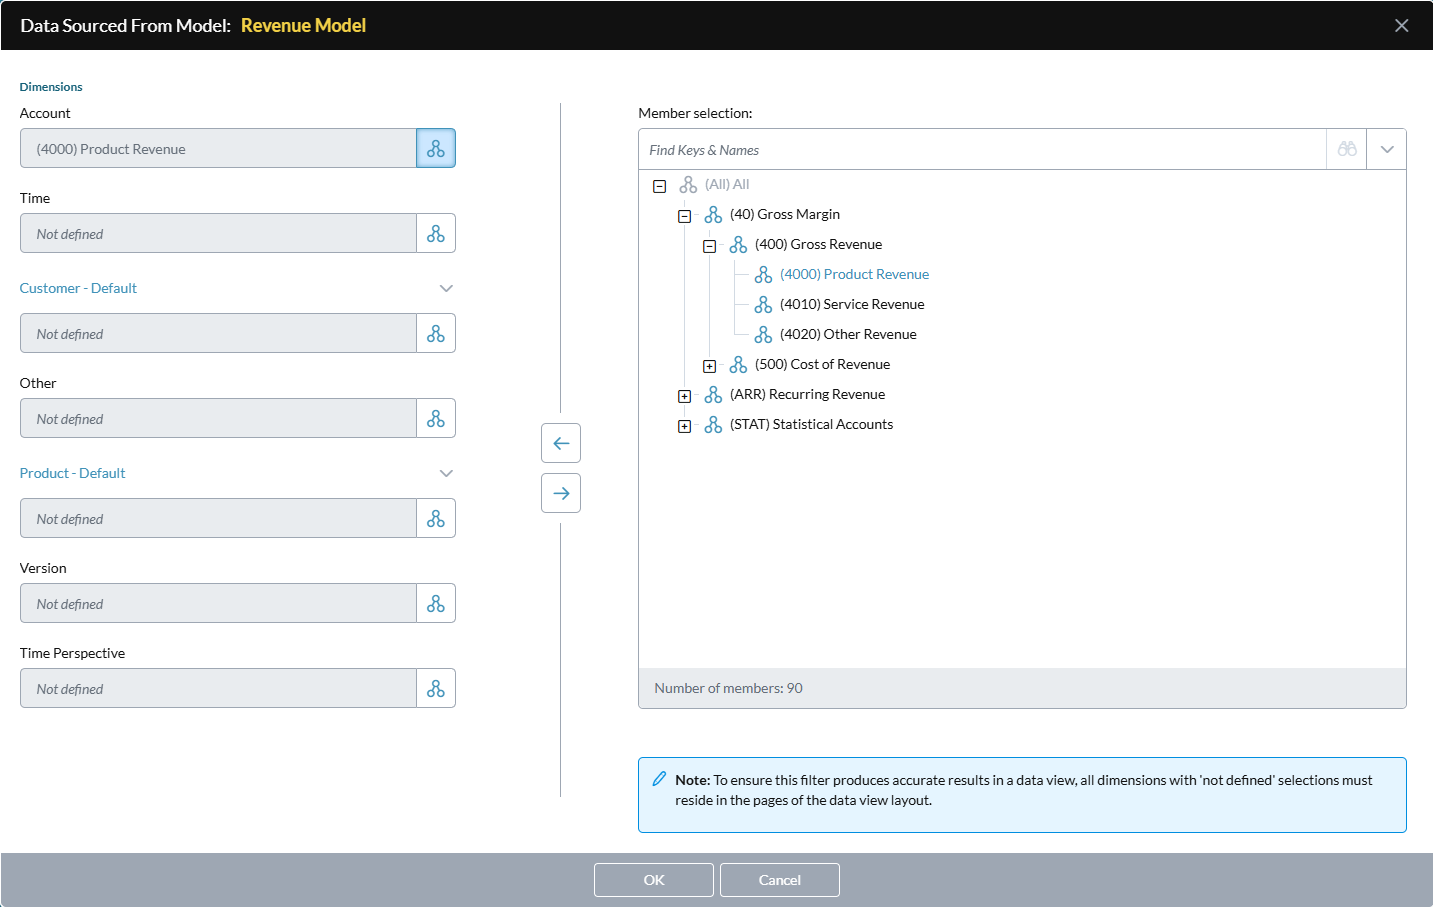
The Data Sourced From Model dialog opens.
-
To add a specific dimension member, click , select the member in the hierarchy and click , and click OK.
- From the drop-down select an operator and type a value.
-
To add another condition, click +And.
Note: To ensure this filter produces accurate results in a data view, all dimensions with Not defined selections must reside in the pages of the data view layout.
-
-
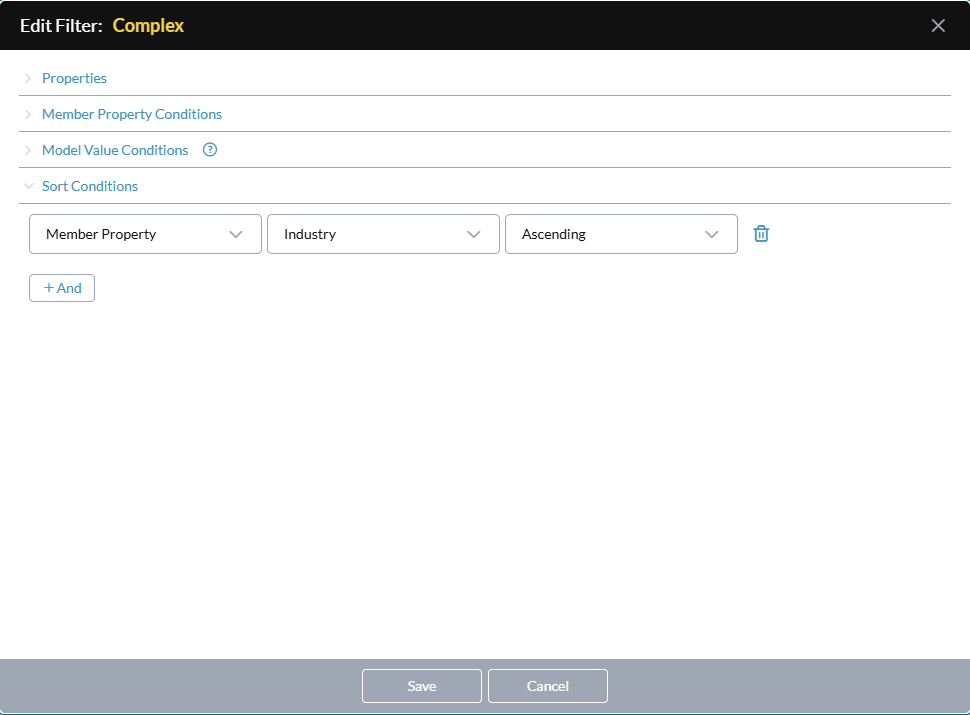
(Optional) Click Sort Conditions.
Use this section to sort the dimension members based on member properties.
To build a sort condition:
- To add a condition, click +And.
- From the second drop-down, select a member property.
- From the third drop-down, select the sort order.
-
To add more conditions, repeat these steps.
Note: Multiple conditions are applied in top-down order
- Click Save.
Manage filters
-
Open filter Manager.
-
Select the filter you want.
-
With the filter highlighted, do any of the following:
- To edit the filter, click (or double-click the filter's row).
- To duplicate the filter, click ,
- To delete the filter, click .
Note: To edit a filter, you must be assigned Model Admin Privileges for at least one model in the filter's Applied to property.
Sort/filter the list
You can use sorting and filtering to make a large set of filters more manageable.
Filter Manager by default sorts filters by Name.
-
Beside the column name, click .
Tip: You can both sort and filter the same column.
-
To sort on the column, select Ascending or Descending.
-
To filter on the column, do one of the following:
-
Select Text and type a filter value.
-
Select Unique column and select the values you want to filter for.
-
-
Click Apply.
-
To sort/filter on other columns, repeat the above steps.
-
To remove all your sort/filter settings, click Reset.
-
To update the list of filters, click .